


Want to record voice memos, automatically transcribe them (a.k.a. speech to text), summarize them, and send the transcripts and summaries to Notion?
This tutorial will teach you exactly how to do that.
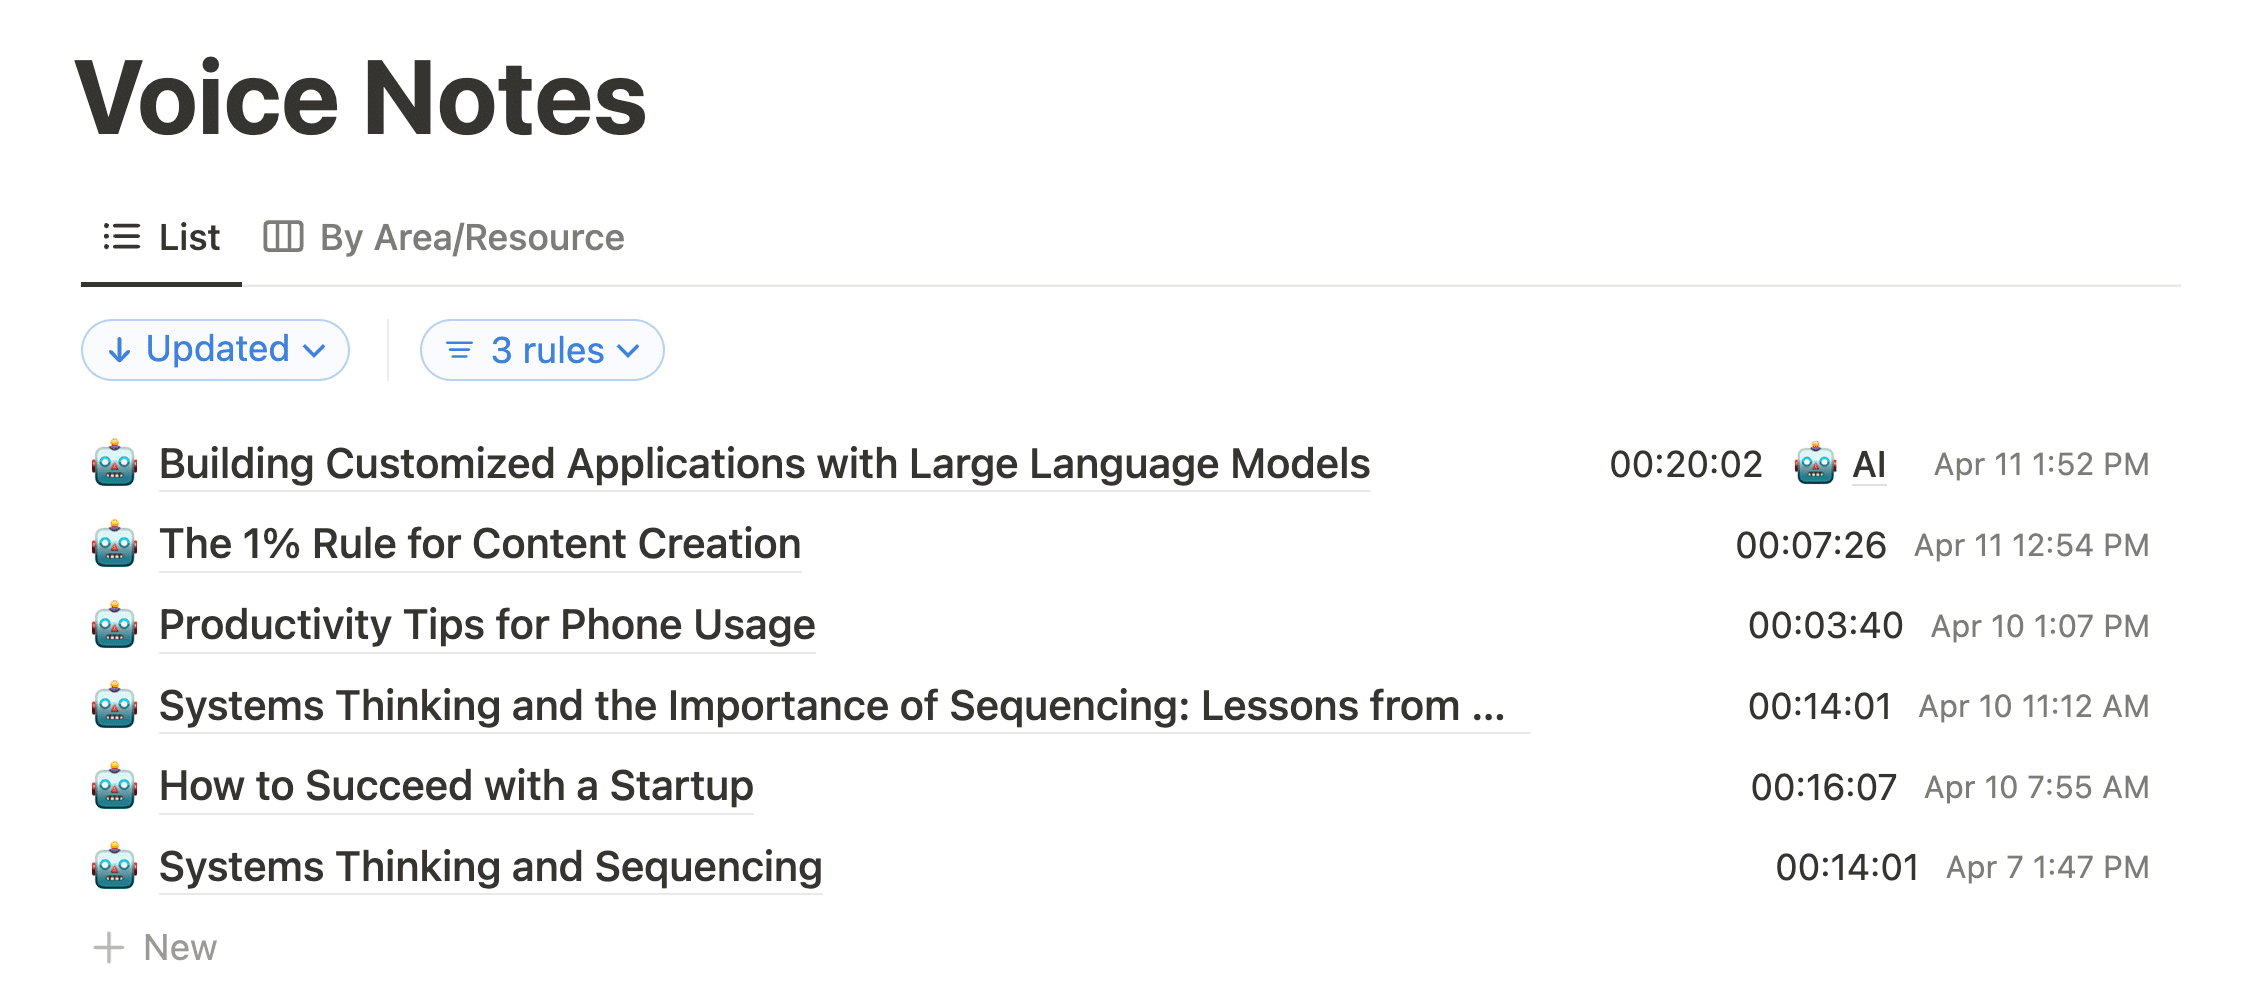
Here’s a 14-minute voice note I took recently, in which I brain-dump some thoughts on a video idea:
After I stopped recording, my transcript and summary showed up in Notion in just 90 seconds. The cost? $0.09. That’s 9 cents for a near-perfect transcription of 14 minutes of audio, plus a summary.
You can see the entire thing here.
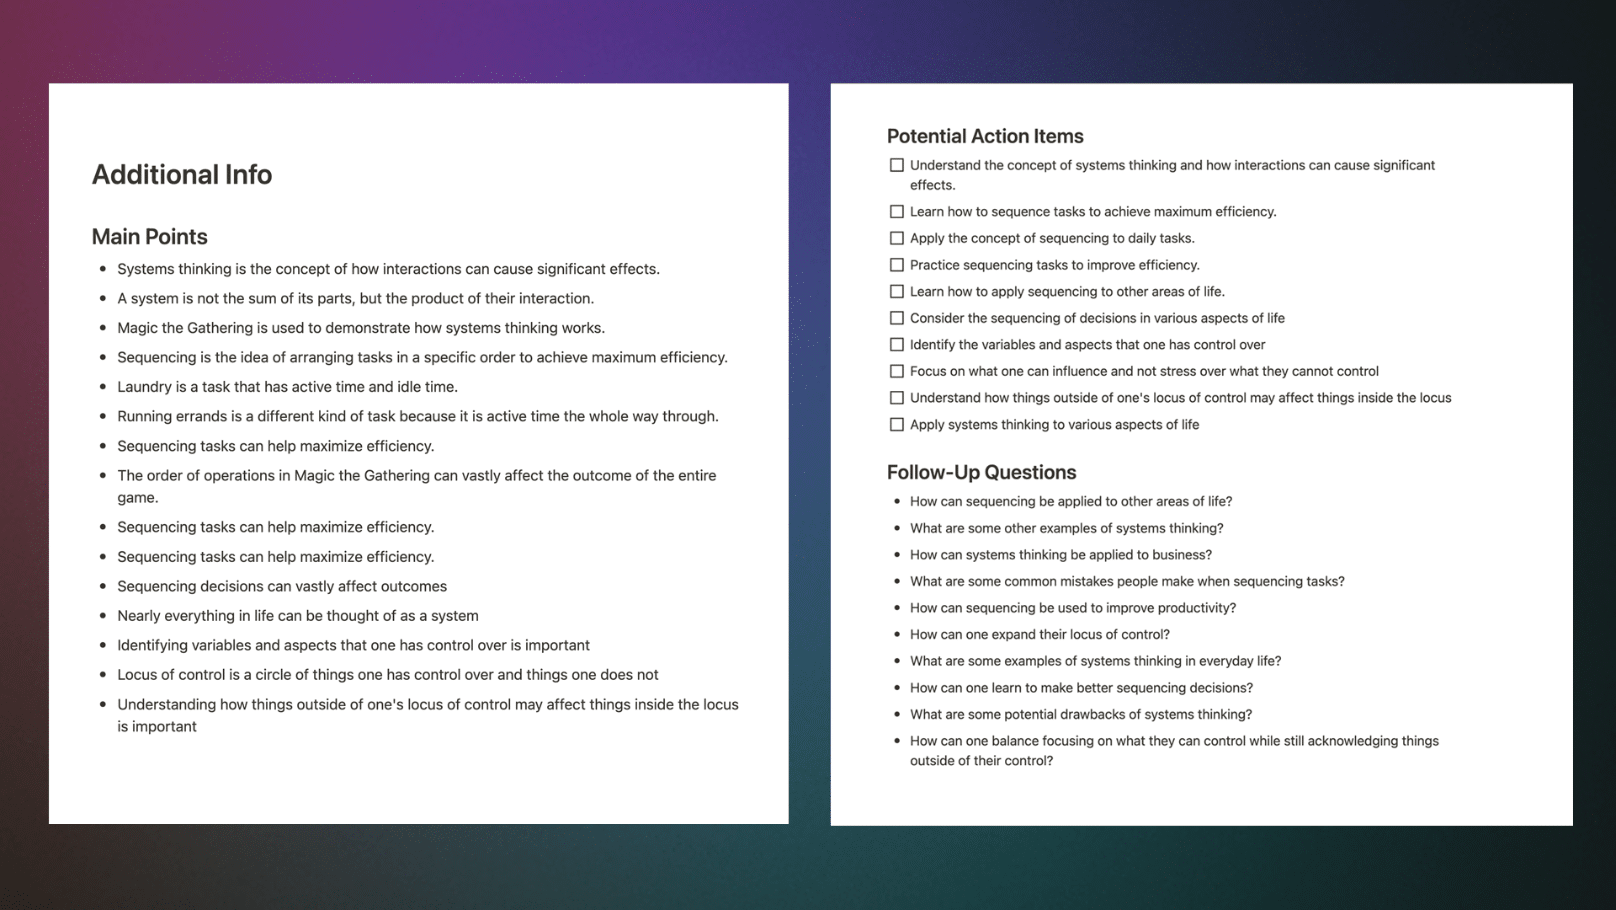
I’m not just getting a summary and transcript, either.
I’ve also set the automation up so that ChatGPT creates some useful lists:
- Main points
- Action items
- Stories, examples, and citations
- Follow-up questions
- Potential arguments against my transcript
- Related topics
In short, I can now brain-dump an idea as a voice note on my phone, upload it to Dropbox or Google Drive, and quickly get a fleshed-out document with a transcript and a ton of other useful information.
In this tutorial, I’ll show you how you to build the same workflow for yourself.
Specifically, we’ll create a speech-to-text automation that:
- Lets you quickly record a voice note
- Uses OpenAI’s Whisper model to convert the audio into a near-perfect transcription.
- Summarizes the transcript and pulls out key points using ChatGPT
- Sends the transcript, summary, and points directly to your Notion workspace
This is one of the most powerful and seemingly magical workflows I’ve ever built. It feels like I have a superpower now.
The best part is that once you’ve uploaded your audio file, it’s completely hands-off.
Want to build this for yourself? Keep reading.
And if you never want to miss when I post new Notion tutorials like this one, you should join my free Notion Tips newsletter:
Here’s a quick look at how this automation will work.
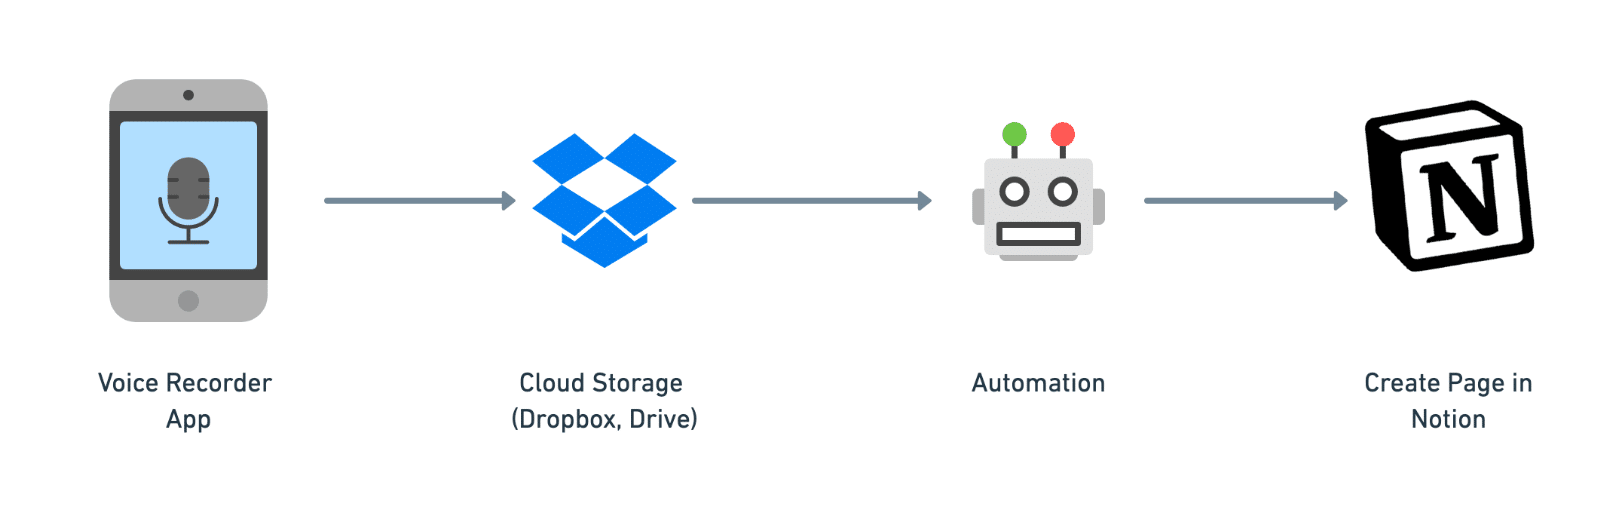
When you take a voice recording, you’ll upload it to a cloud storage app like Dropbox or Google Drive (this tutorial will show you how to use both.)
Once your audio file gets uploaded, our automation will trigger. Your recording will be transcribed by Whisper and summarized by the ChatGPT API.
Finally, the automation will package up the transcript and summary, and then it’ll send them to a new page in your Notion workspace using the Notion API.
But what’s actually going on behind the scenes?
First, I should note that we’ll be building and deploying this automation on Pipedream, which is an automation-builder that is similar to Make.com and Zapier. It’s also my favorite of those platforms.
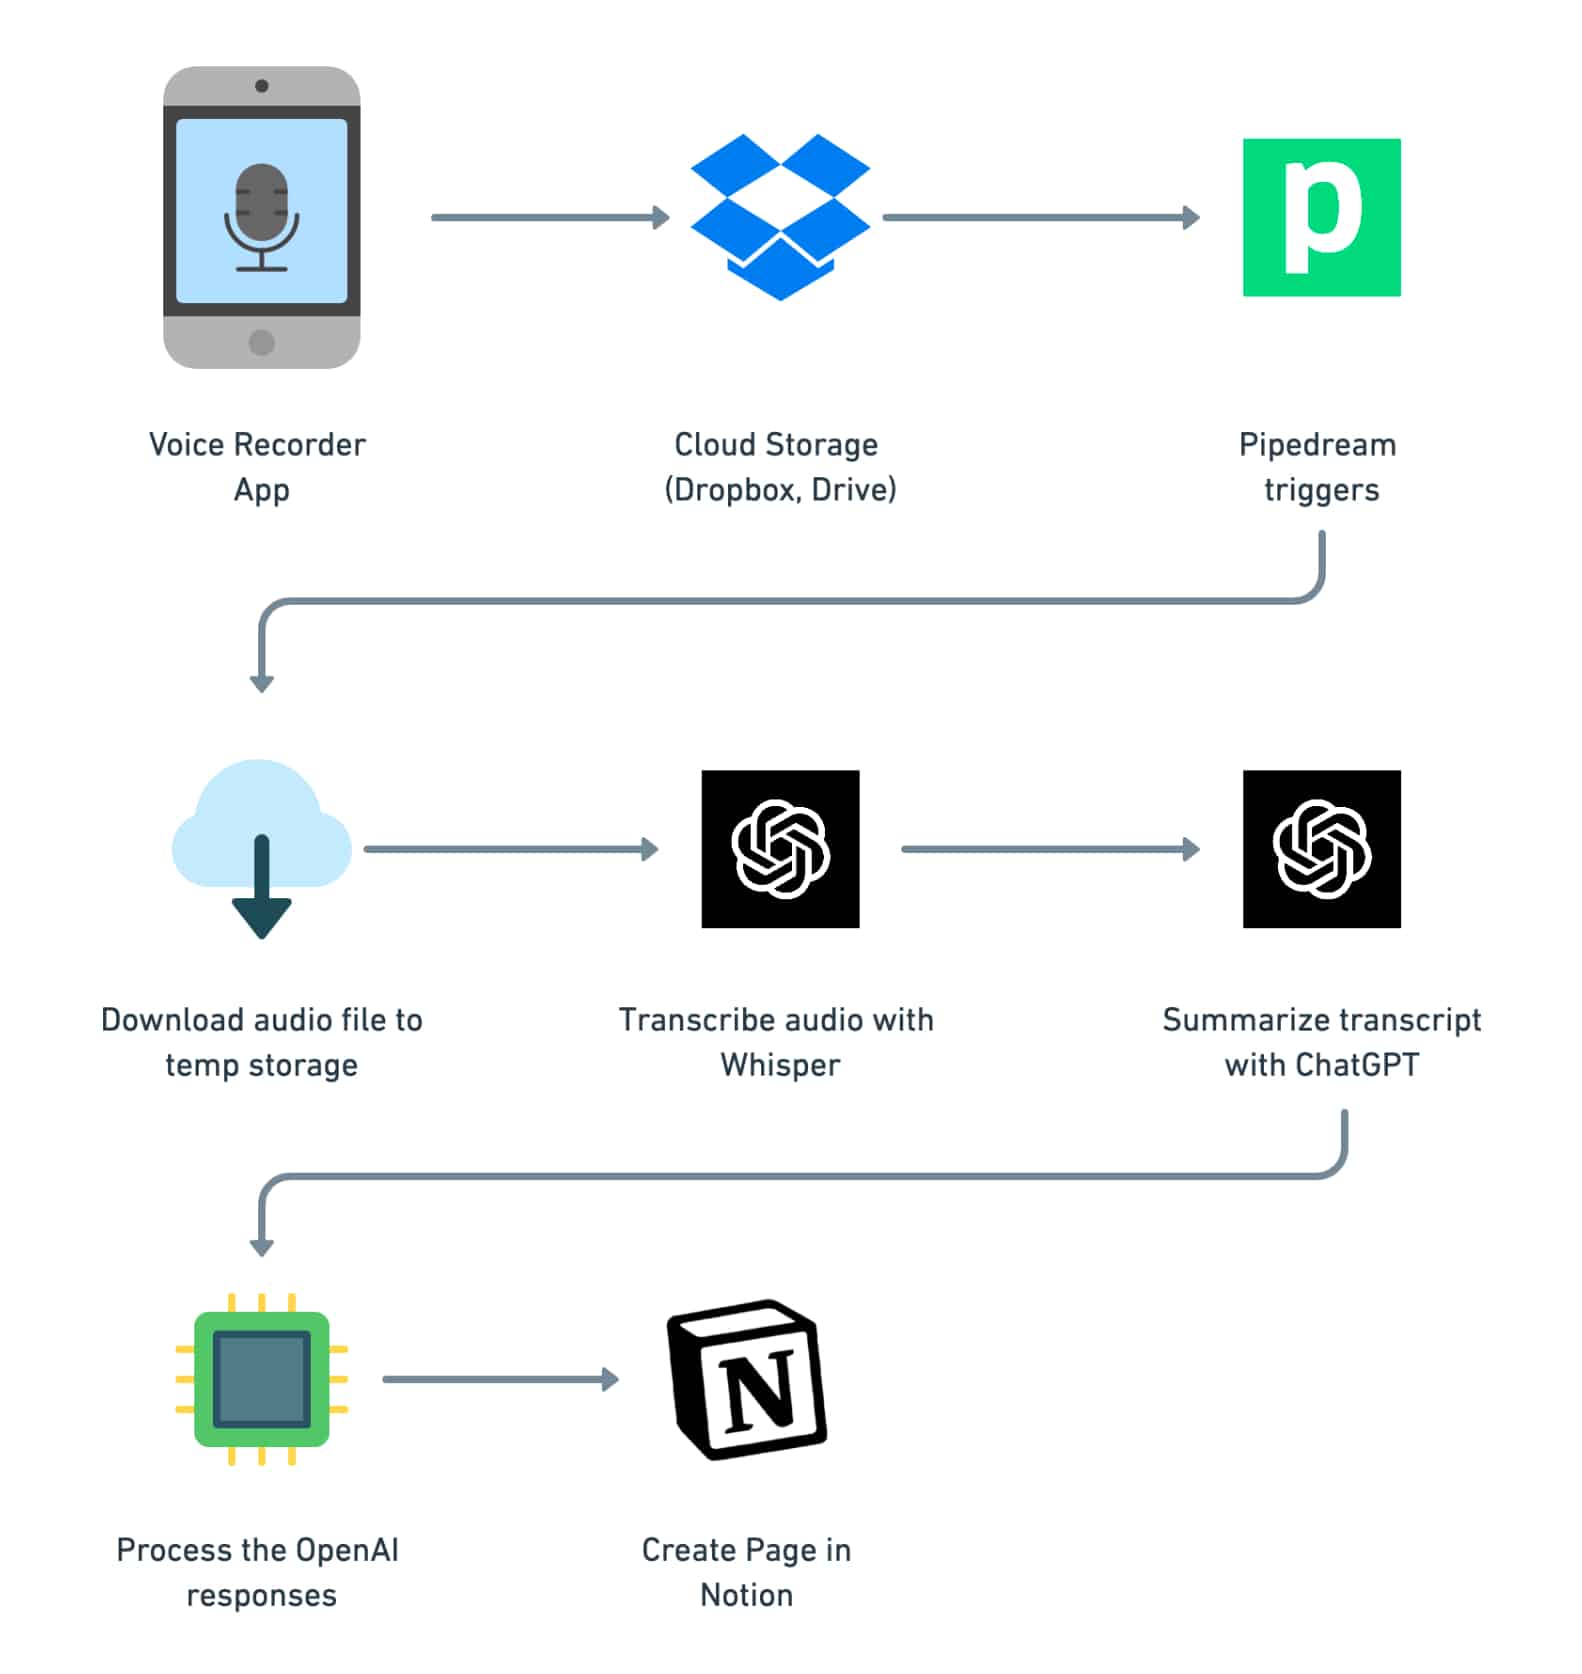
Here’s a look at how our Pipedream automation will work:
- When a new audio file is uploaded to Dropbox or Google Drive, the automation is triggered.
- The audio is downloaded into your Pipedream account’s temporary storage.
- We get the duration of the audio.
- The audio is fully transcribed using OpenAI’s Whisper speech recognition model.
- We send the transcript to ChatGPT to get a summary, title, and some useful lists (action items, follow-up questions, etc.)
- The transcript and ChatGPT response are formatted and checked for errors.
- We send everything to a new page in Notion.
Here’s a visualization of this workflow:
In this tutorial, I’ll show you how to build this automation in two ways:
- A (mostly) no-code method
- A code-heavy method, which is much less error-prone
In my testing, I’ve found that it is indeed possible to build this without writing any code.
So I’ll begin by showing you to do it this way – except we are going to add a single code step, as doing so will eliminate a lot of unnecessary extra costs you’d incur by going completely no-code.
Don’t worry – you’ll be able to completely copy and paste that one code step without needed to understand it.
Click here to jump straight to the no-code portion of the tutorial.
I’m also going to show you a second method, which uses code steps for nearly every part of the automation.
This “code-heavy” method is much more robust, and is the method I’m personally using.
The reason I’m using it is that the no-code method doesn’t currently have a good way of dealing with all the limits of the tools we’ll be working with.
In particular, it’s not good at dealing with ChatGPT’s token limit.
I’ll explain this in more detail later on in the article, but the gist is that ChatGPT can only handle roughly 3,000 words at a time. This limit includes the prompt, transcript (the “context”), and the response.
This means that it can’t natively handle a very long transcript. Want to transcribe and summarize a 1-hour podcast episode? The no-code method can’t handle it.
But the code-heavy method can.
So, if you’re not scared of copying-and-pasting some code blocks, I’d recommend using the code-heavy method. But the choice is up to you, and you can always start with the less-intimidating no-code method just to get your feet wet.
Click here to jump straight to the code-heavy portion of the tutorial.
One note: I’m not going to spend a ton of time deeply explaining the code in this tutorial. However, I do have an extremely detailed tutorial on the Notion API, which does deeply explain the code used:

The Complete Notion API Crash Course for Beginners
Learn how to work with the Notion API using JavaScript in this beginner-friendly and extremely detailed tutorial.
The API guide might be the longest post I’ve ever written, and it is a truly one-stop-shop for both learning how to code in JavaScript and learning the Notion API.
P.S. – You can always paste my code blocks into ChatGPT itself and ask for an explanation.
To successfully build this automation, you’ll need a few things:
You’ll also need an OpenAI API key, but I’d encourage you to create that later in the tutorial when it becomes relevant. You’ll only be able to see the key once on your OpenAI dashboard.
Finally, you’ll need to add your billing info in your OpenAI Dashboard.
Transcribing audio and working with the ChatGPT API are both extremely cost-effective, but they’re not free.
You can see the pricing for all of OpenAI’s models on their pricing page, but here’s a quick breakdown of the current (April 10, 2023) prices for the models we’ll be using:
| Model | Price |
|---|---|
| Whisper | $0.006 / minute (rounded to nearest second) |
| Chat (gpt-3.5-turbo) | $0.002 / 1,000 tokens |
Note: If you have gpt-4 access (via the API, not ChatGPT Plus), you can use that instead of gpt-3.5.turbo. If you do, your Chat cost will be somewhere between 15x-30x than the Chat cost listed above. I’ve updated both the no-code and code-heavy versions of the tutorial below to show you how to use gpt-4 rather than 3.5.
If you’re curious, a token is a fragment of a word. In general, 1,000 tokens is equivalent to 750 words.
You can get an accurate token count using OpenAI’s Tokenizer tool. It’s also possible to count tokens programmatically using the gpt-3-encoder npm package, which we’ll be using in the code-heavy section of this tutorial.
Here’s how the above pricing breaks down for the 14-minute audio file I shared in the intro to this tutorial:
| Model | Price |
|---|---|
| Whisper (transcription) | $0.084 |
| Chat (summarization) | $0.01 |
| Total cost | $0.094 |
Given this, we can set a general rule of thumb:
You’ll pay roughly $0.10 per 15 minutes of audio, or $0.40 per hour.
If you wanted to cap your spend at $10/mo, you’d get roughly 25 hours of audio transcription and summarization.
As you’ve no doubt noticed, transcription is by far the largest part of the cost here. As I mention in the privacy section below, Whisper is actually an open-source model, and there are already apps you can get that will run Whisper on your phone or local computer:
This means that you could easily transcribe audio on your own local device, cutting out a large portion of the already low price of this automation.
Personally, I prefer using OpenAI’s Whisper API, as it makes the automation much more seamless and hands-off.
On April 13, 2023 (two days after this article’s publish date), Deepgram announced the release of two new speech-to-text models:
- Deepgram Nova – their in-house model, which they claim is even more accurate than Whisper. Priced at $0.0043/min.
- Deepgram Whisper – Deepgram’s own self-hosted version of Whisper, which they claim is faster than OpenAI’s Whisper API. Priced at $0.0033/min
I’ll be testing these over the coming days. Notably, Deepgram’s Whisper API is about half the price of OpenAI’s Whisper API – $0.0033/min vs $0.006/min.
However, I’ll note that Pipedream’s free plan only allows for three connected accounts. The workflow detailed in this tutorial already uses three – Google Drive (or Dropbox in the code-heavy version), OpenAI, and Deepgram.
You can likely get around this limit while staying on the free plan by making API calls directly from your code with Axios, but if you want to stick with a mostly no-code workflow, adding Deepgram in to the mix would require upgrading to Pipedream’s $19/mo paid account.
Notion AI is a powerful suite of generative AI tools baked right into Notion. I covered a lot of what you can do with it in this post:

Notion AI is Here: 10 Ways to Use This Powerful New Tool
Notion’s new AI tools can translate text, generate blog posts, and more. Here are 10 ways to use Notion AI, plus all your questions answered.
I’ll also be making a lot more content around Notion AI in the future.
However, it’s not the right tool for this particular workflow. The reason is that we cannot currently create new Notion pages via the API that have a database template applied.
If we could, then we could add Notion’s new AI Buttons feature to a database template, and use them to add our AI-generated summary/lists to the page.
Until we’re able to do that, we need to work directly with the ChatGPT API to get this information and sent it to our Notion page.
That said, you could easily choose to send only the transcript from Whisper to Notion. From there, you could use Notion AI to summarize the text or create lists at your discretion.
TL;DR on this section: When you interact with OpenAI’s services, your data isn’t private. Keep this in mind when uploading audio recordings.
I’d like to mention this up-front before we get too far into the tutorial:
This automation should not be used for data that you want to keep private.
Since this automation utilizes both ChatGPT and OpenAI’s hosted version of Whisper, any audio that you send to is should not be assumed to be private.
As of March 1, 2023, OpenAI CEO Sam Altman stated that data submitted via the OpenAI API is not used for training models:
“data submitted to the OpenAI API is not used for training, and we have a new 30-day retention policy and are open to less on a case-by-case basis. we’ve also removed our pre-launch review and made our terms of service and usage policies more developer-friendly.”
However, Gizmodo’s article covering this change noted:
“The company retains API data for 30 days to identify any ‘abuse and misuse,’ and both OpenAI and contractors have access to that data during that time.”
Personally, I am fine with this. I’m using the automation primarily to brain-dump ideas that become public content, but I wouldn’t use it for confidential or extremely personal thoughts.
It should be noted that data submitted via the actual ChatGPT website is used to train models. We’re not using the ChatGPT site for this tutorial, but you may want to be aware of that fact if you use it for other purposes (as I do).
OpenAI has released the Whisper speech recognition model under an open-source license, and it’s actually possible to run it entirely on your own local device.
There are even apps that already do this, including:
If you were inclined, you could also deploy Whisper to your own server within a web app, and build your own APIs to handle this entire workflow (sans ChatGPT call) on it.
Getting summaries and action items from your transcripts in a privacy-friendly way is a bit harder.
One model, BLOOM, is an open-source model that is similar to GPT-3. You can learn more about it in HuggingFace’s announcement post.
I have not deeply investigated the feasibility of practical use or privacy implications of BLOOM (or any other open model), but I’m mentioning it here in case you want to explore further.
There is also a project called BlindAI, which seeks to improve user privacy while interacting with AI models. Again, I do not have a deep understanding of this project or how well it works, but I’m including it here for reference.
New: The Pipedream team has provided a link that should copy this no-code workflow directly into your account. Once you have a Pipedream account, click this link to automatically add the entire workflow to your account. You’ll still need to authenticate all the apps. If you run into issues, try following this guide step-by-step instead.
Let’s start building!
In this part of the tutorial, we’ll craft nearly the entire automation using no-code tools.
There is one step that will use a bit of code, but you’ll be able to copy and paste it into your automation without needing to make any changes.
To get started, create a Pipedream account if you don’t already have one. You’ll be asked to create a workspace, which you can name whatever you want.
I’m using Pipedream in this tutorial for three reasons:
- Pipedream has become my personal favorite automation-builder platform.
- I want to have tutorials for all the major automation builders on this site, and I already have multiple tutorials that use Make.com (one on sending YouTube data to Notion, and one on automating recurring tasks in Notion).
- Pipedream is vastly cheaper to use than Make.com.
I’m going this route even though Make.com has an affiliate program and Pipedream doesn’t! That’s how much I like Pipedream. (Though I will note that Make is more powerful than Pipedream if you only want to use no-code tools. Pipedream has some great no-code tools, but it’s really all about the code windows.)
It may be possible to replicate this workflow on Make.com (as well as Zapier, n8n, or any other automation platform), but I haven’t tried.
As for why I prefer Pipedream now:
First, Pipedream is built for coders, and last year I learned JavaScript. Now that I know how to code, I find that it’s often easier to build automations with code than with (sometimes clunky) no-code tools.
Second, Pipedream is very, very cheap. In fact, I’d bet you’ll never have to pay for it.
Make.com’s free plan gives you 1,000 operations per month. This is much more generous than Zapier, but your operations can still run out quickly. That’s because every step in your Make.com scenarios consumes operations.
For example, if you have a scenario with a step that updates 100 Notion pages, that step alone will consume 100 operations.
If that scenario runs once a day, that’s already 3,100 operations – well past the free plan’s 1,000-operation limit.
By contrast, Pipedream’s free plan gives you 100 credits per day. And credits are only spent to kick off an entire workflow.
That means running a workflow with multiple steps will only consume a single credit. This is true even if you have steps that call an API many times.
The only way you’ll spend more than one credit per workflow-run is if it needs more compute time or memory. A credit gets:
- 30 seconds of compute time
- 256mb of memory
If your workflow needs more time or memory, it can consume more credits.
I’ve found that this tutorial’s particular workflow often needs 1-2 minutes (mostly due to Whisper’s slow speeds), but doesn’t need more than 256mb.
After creating your workspace, you’ll be immediately taken to a brand-new workflow. This is where you’ll build your automation.
Start by giving it a name. I’ve chosen “Speech to Notion (No-Code)”, but the name really doesn’t matter much.

Every Pipedream workflow starts out with a trigger. This is an event that kicks off the workflow and causes all the subsequent steps to be executed.
Triggers can take several forms:
- An event happening at a connected app (e.g. a file being uploaded to Google Drive)
- An incoming webhook
- A specific time of day
- An email being sent to your special Pipedream email address
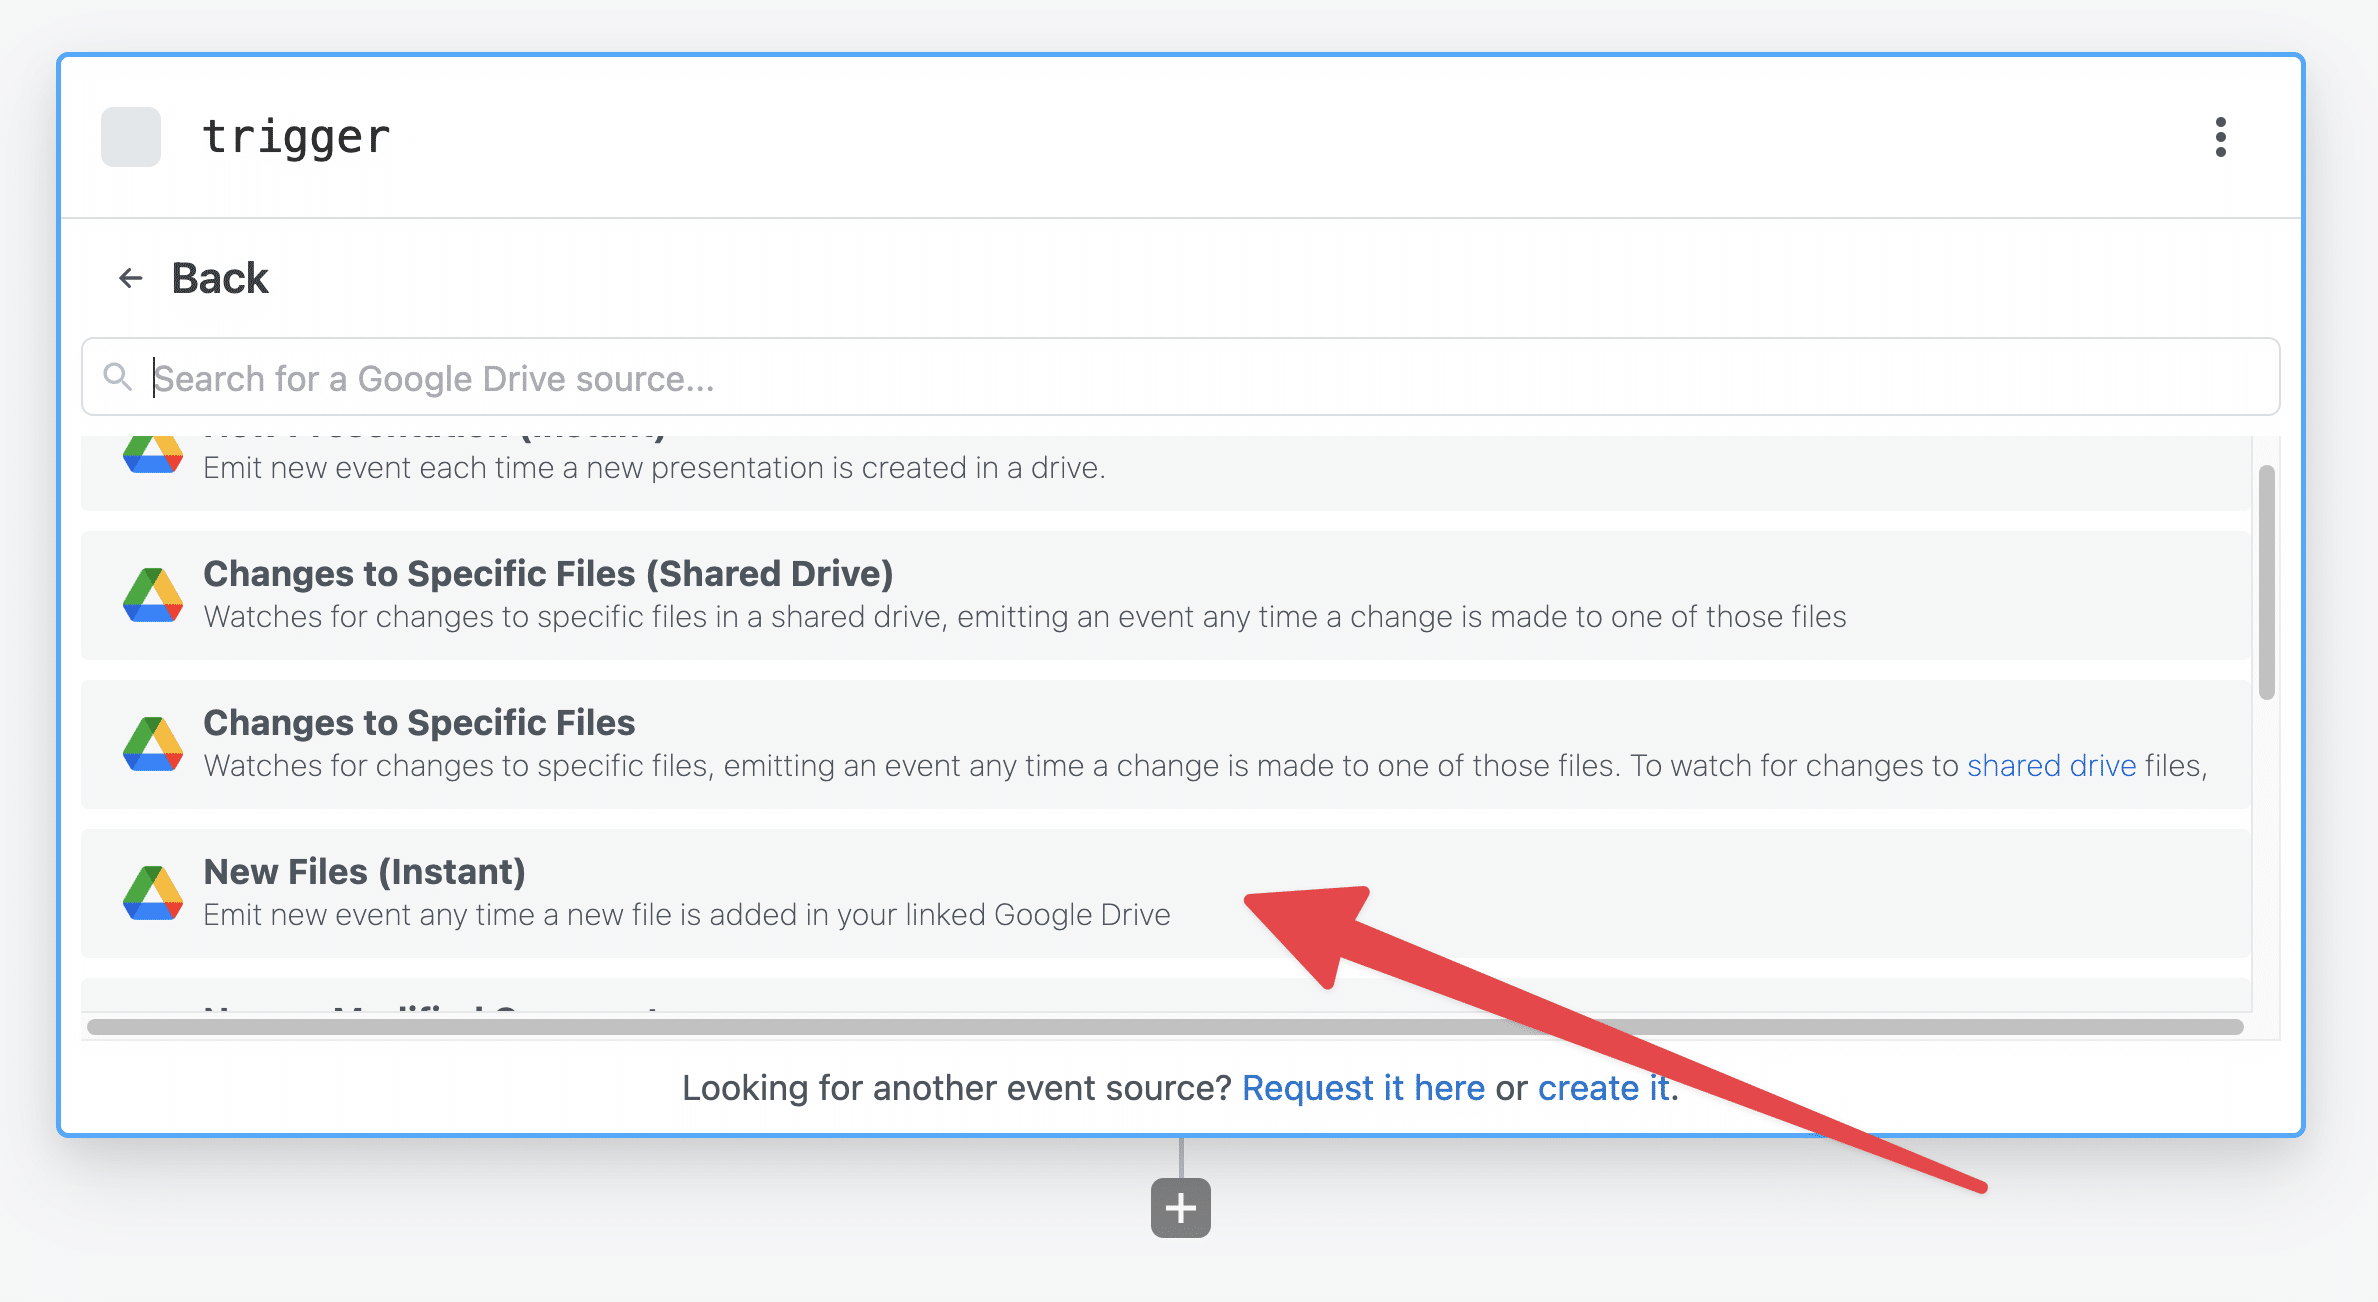
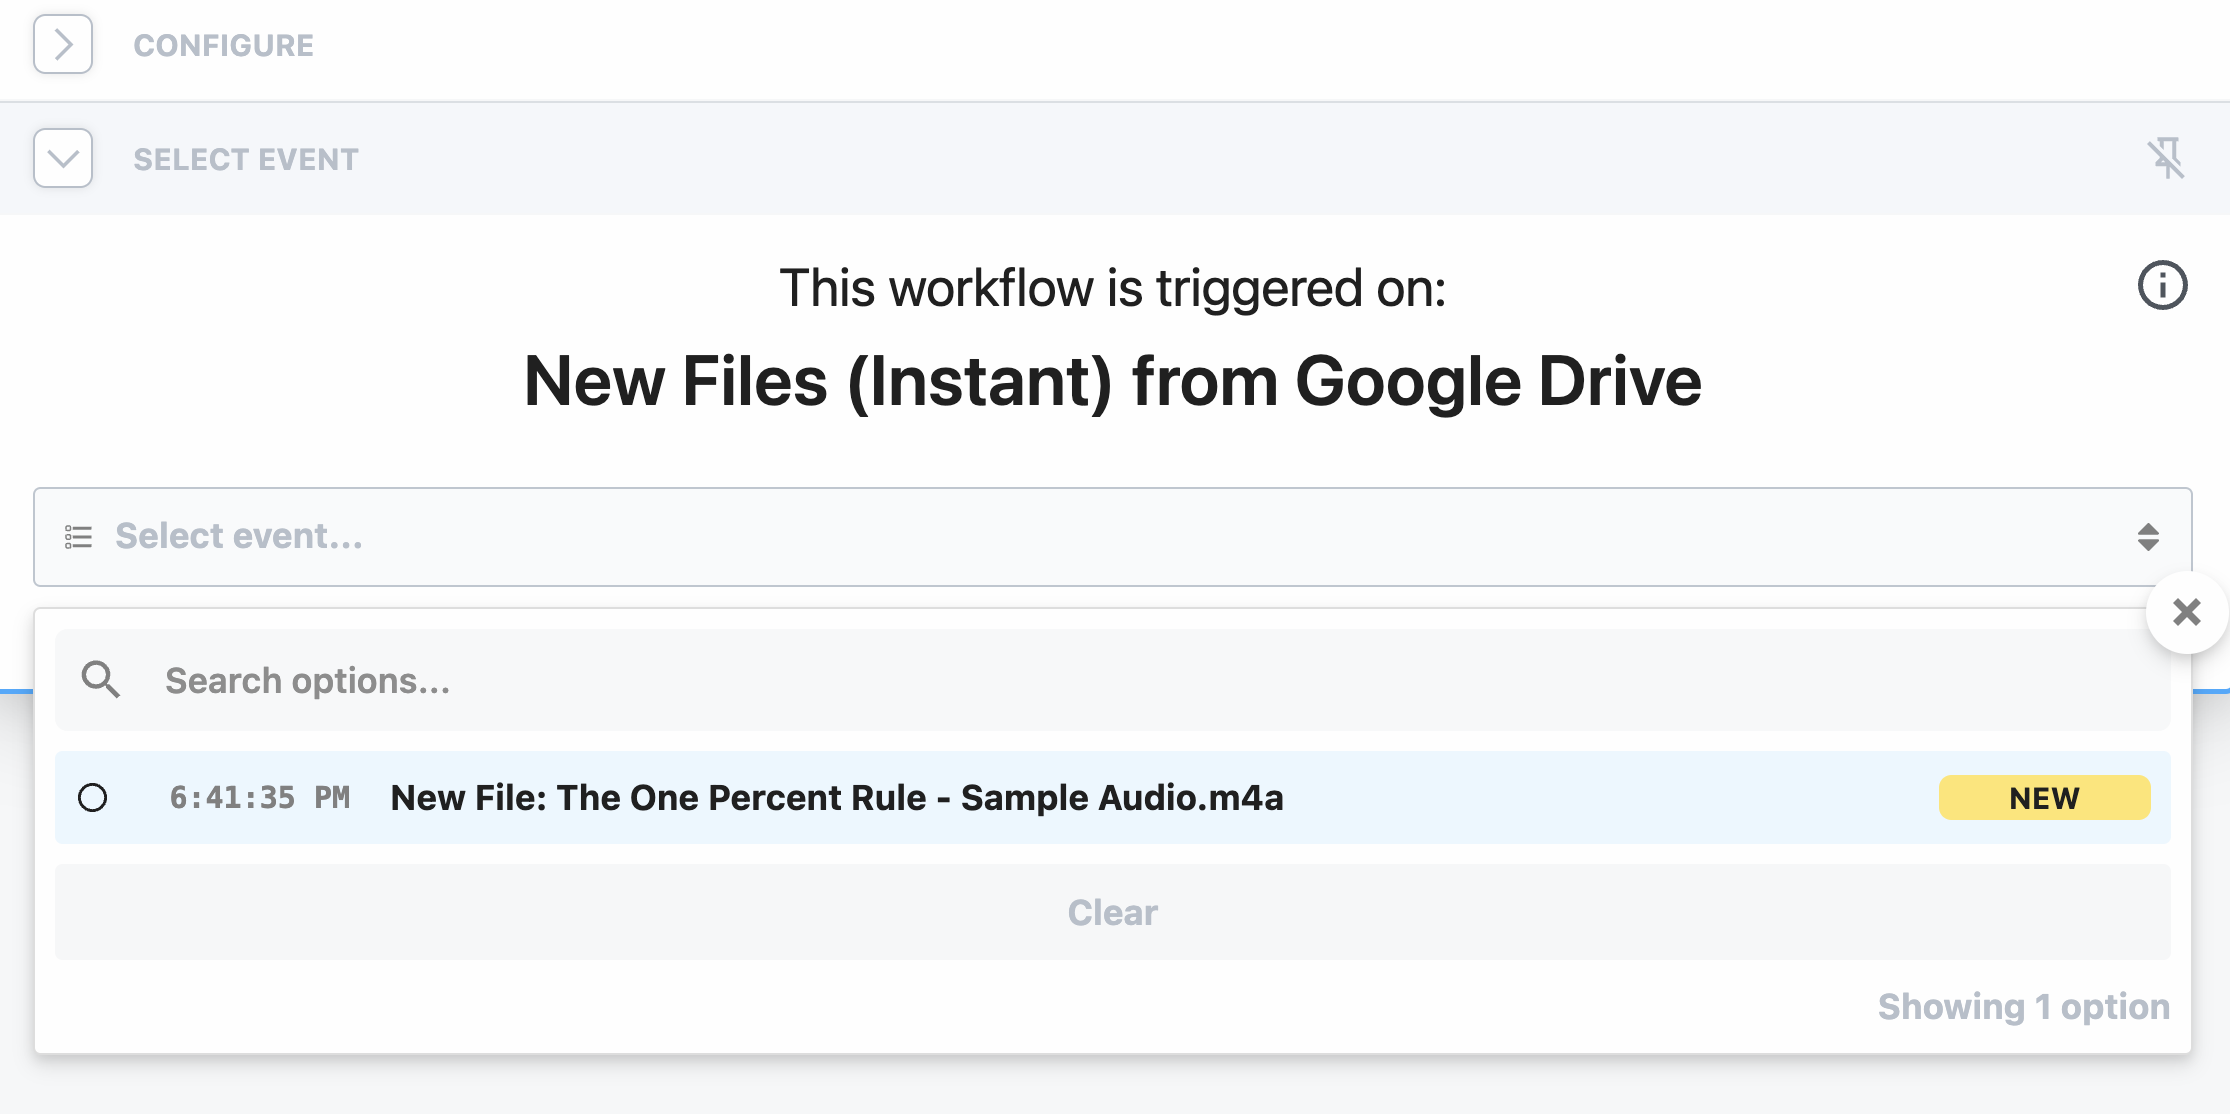
In this case, the trigger we want to use is the New Files trigger for Google Drive:
- In the trigger step’s list of apps, select Google Drive.
- Then select New Files (Instant).
Connect the trigger module to your Google Drive account. By default, it’ll choose your “My Drive” drive, rather than any Shared Drives.
I also recommend adding the optional Folders field, so that your automation will only trigger when audio files are uploaded to a specific folder:

From there, you’ll be able to select the folder that you want the automation to watch.
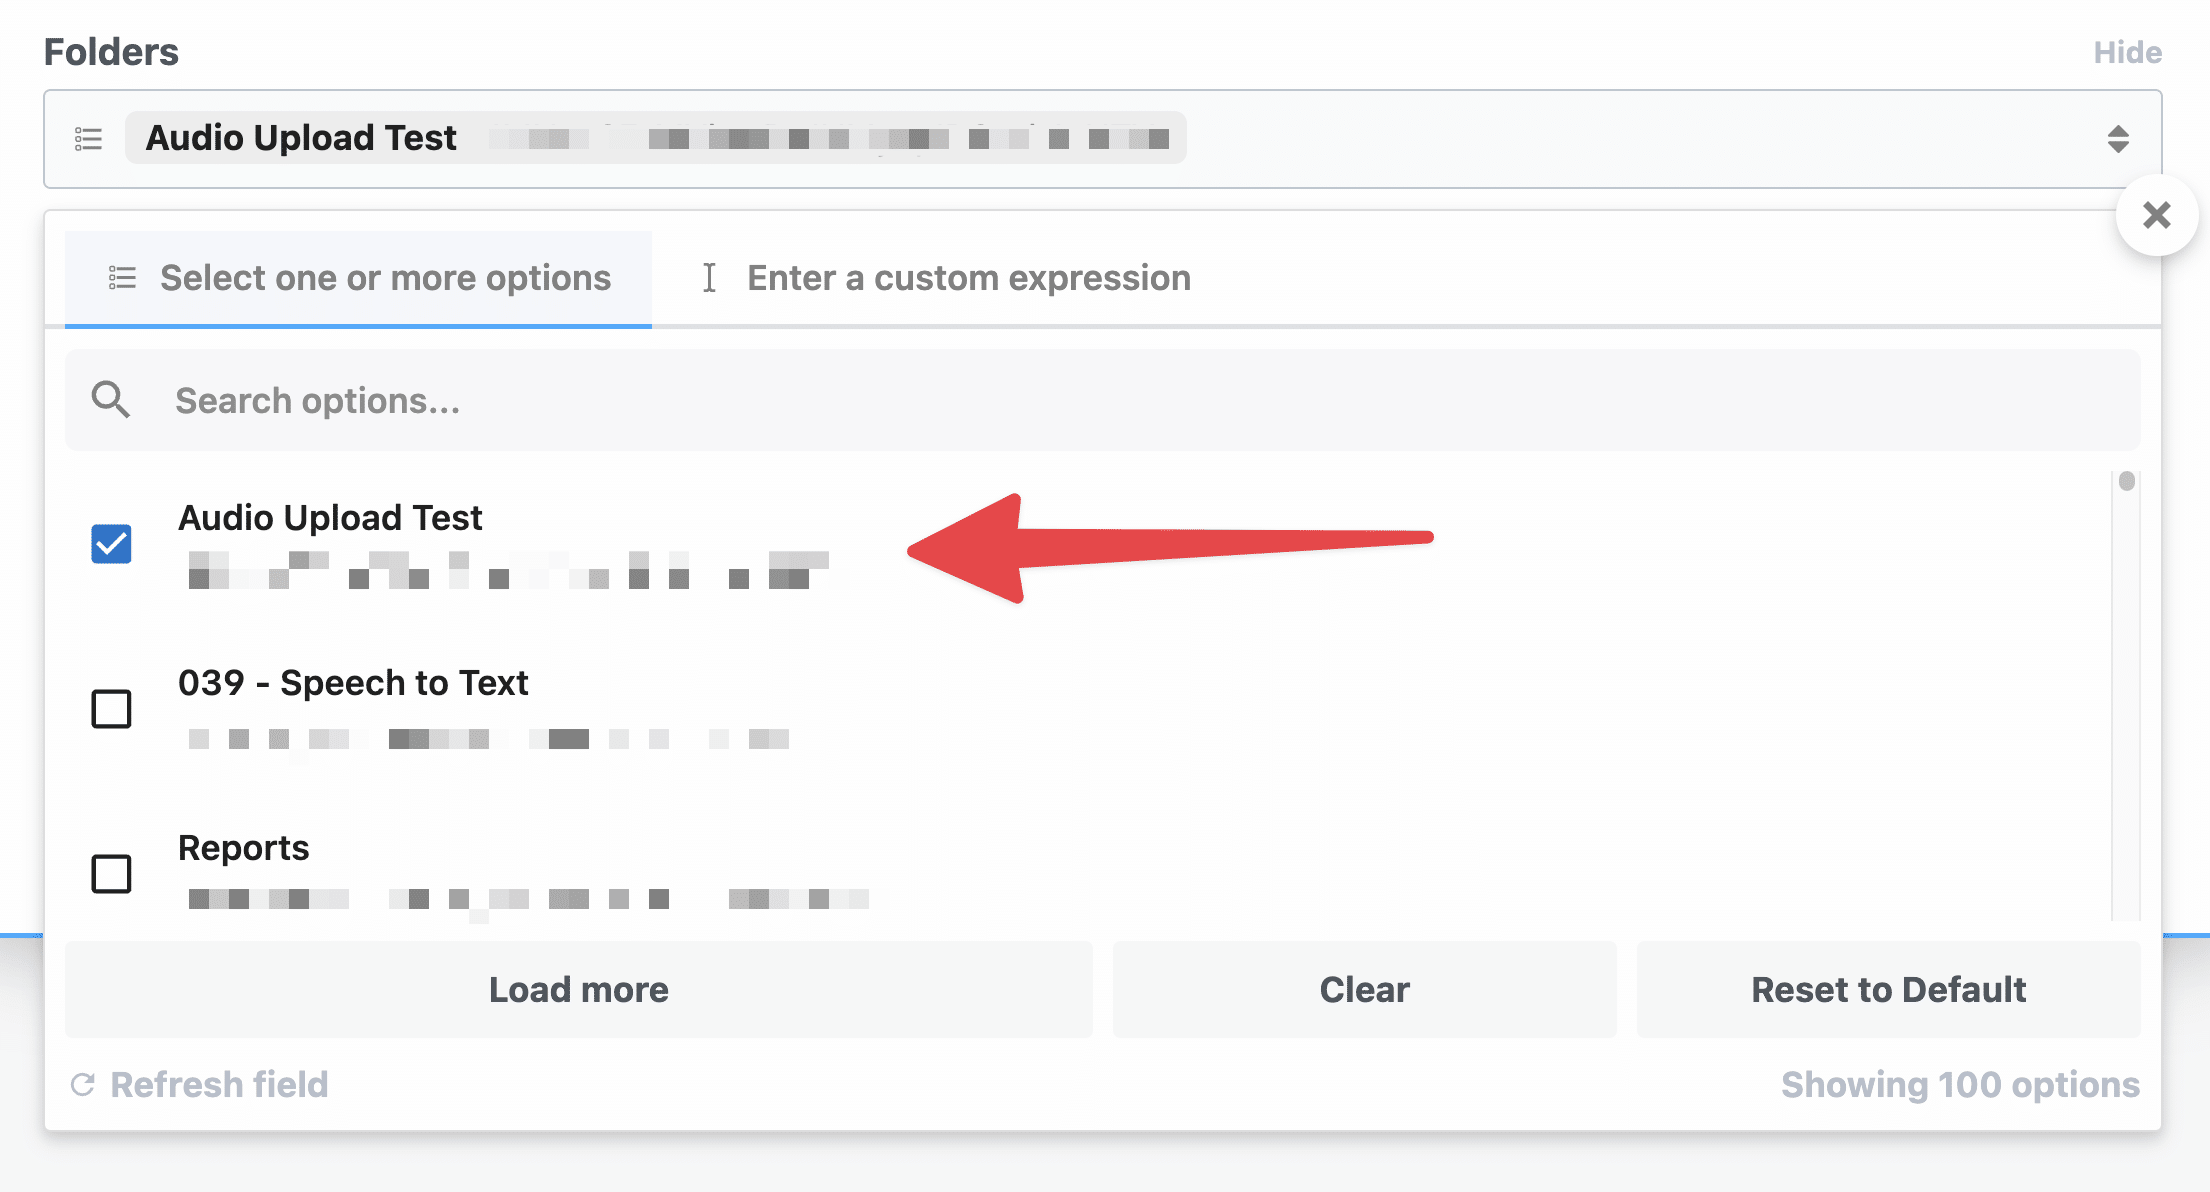
Once you’ve selected a folder, click Create Source.
Before we can continue, you’ll need to generate a test event by uploading an audio file to your selected Google Drive folder.
I’d recommend uploading an mp3 or m4a file, though technically you can use any file type supported by Whisper.
If you need a test file to use, feel free to download this one that I made. (It’s a quick narration of my article on the 1% Rule)
Once you’ve uploaded an audio file to your Drive, you should see a new Event pop up in your trigger module.
If all goes well, you’ll see a Success message, along with a bunch of information in the Exports tab of the module.
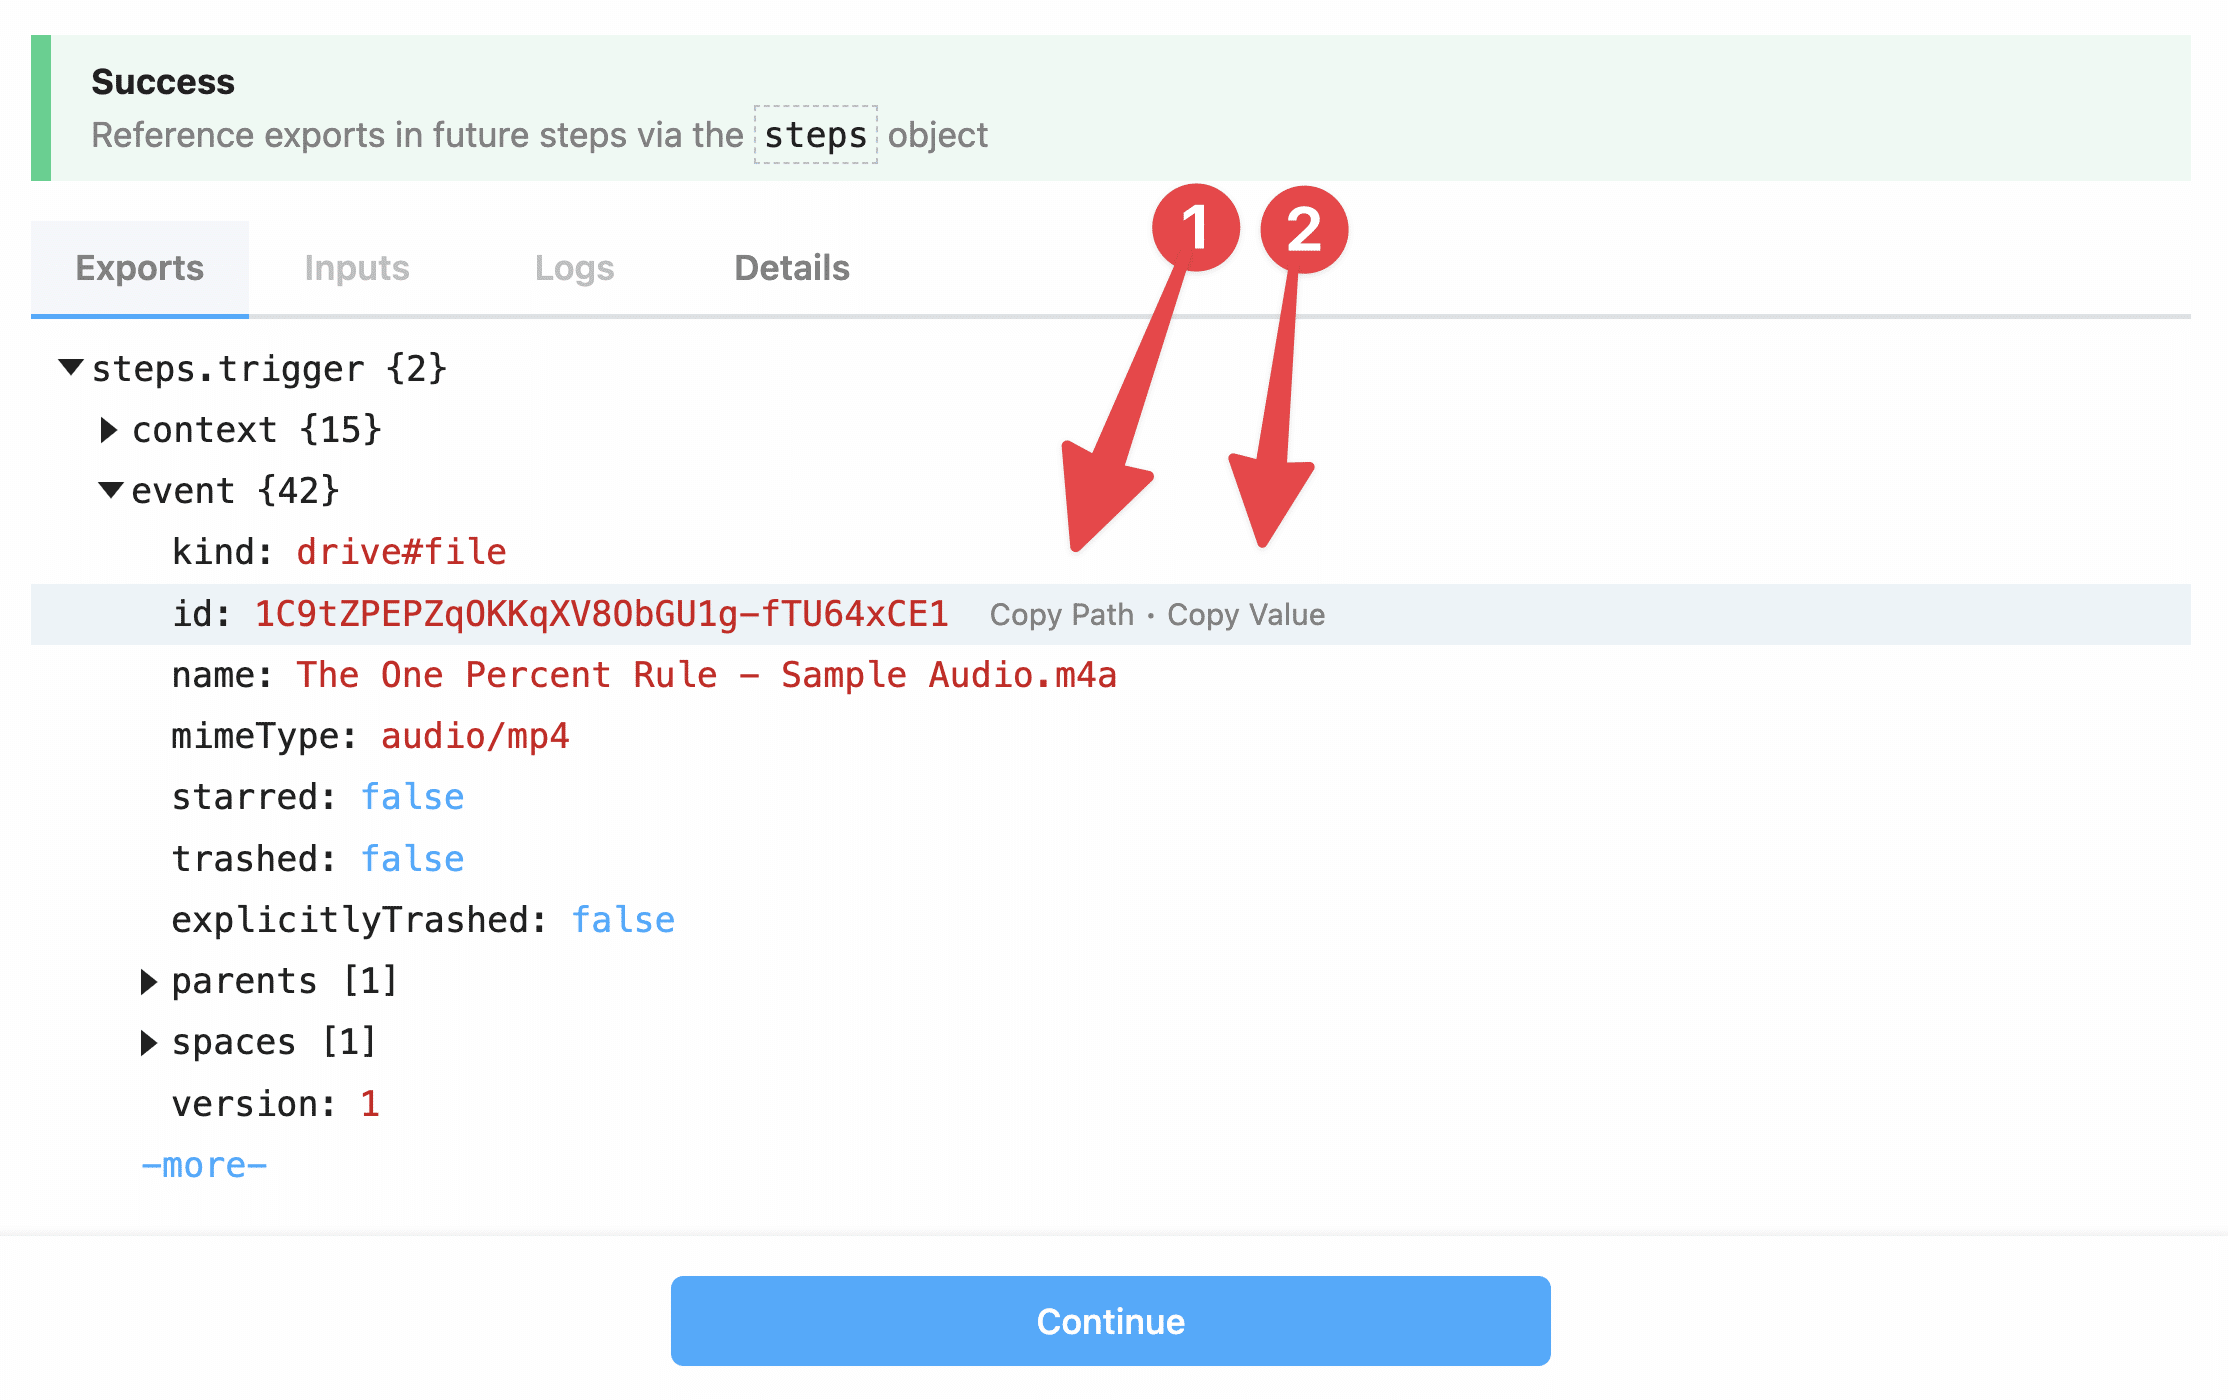
Modules in Pipedream typically export an object, the name for which always starts with steps and then continues with the name of the step.
Since this step is called “trigger”, the exported object is called steps.trigger.
You can also drill down into this object and access its property values. Pipedream gives you two ways to do this:
- Copy Path – typically the option you’ll choose. Allows you to reference this value dynamically in future steps.
- Copy Value – copies the actual value from this run of the workflow.
For now, click Copy Path for the steps.trigger.event.id line, then click Continue.
Next, we need to download the audio file from Google Drive into your Pipedream account’s /tmp directory, which is meant to temporarily store files that you use in your workflows.
We need to do this so that Whisper will be able to access your audio file and transcribe it. Whisper can’t directly access the file in Google Drive. It’s private by default, and while you authenticated Pipedream to access your Drive, that permission doesn’t extend to Whisper.
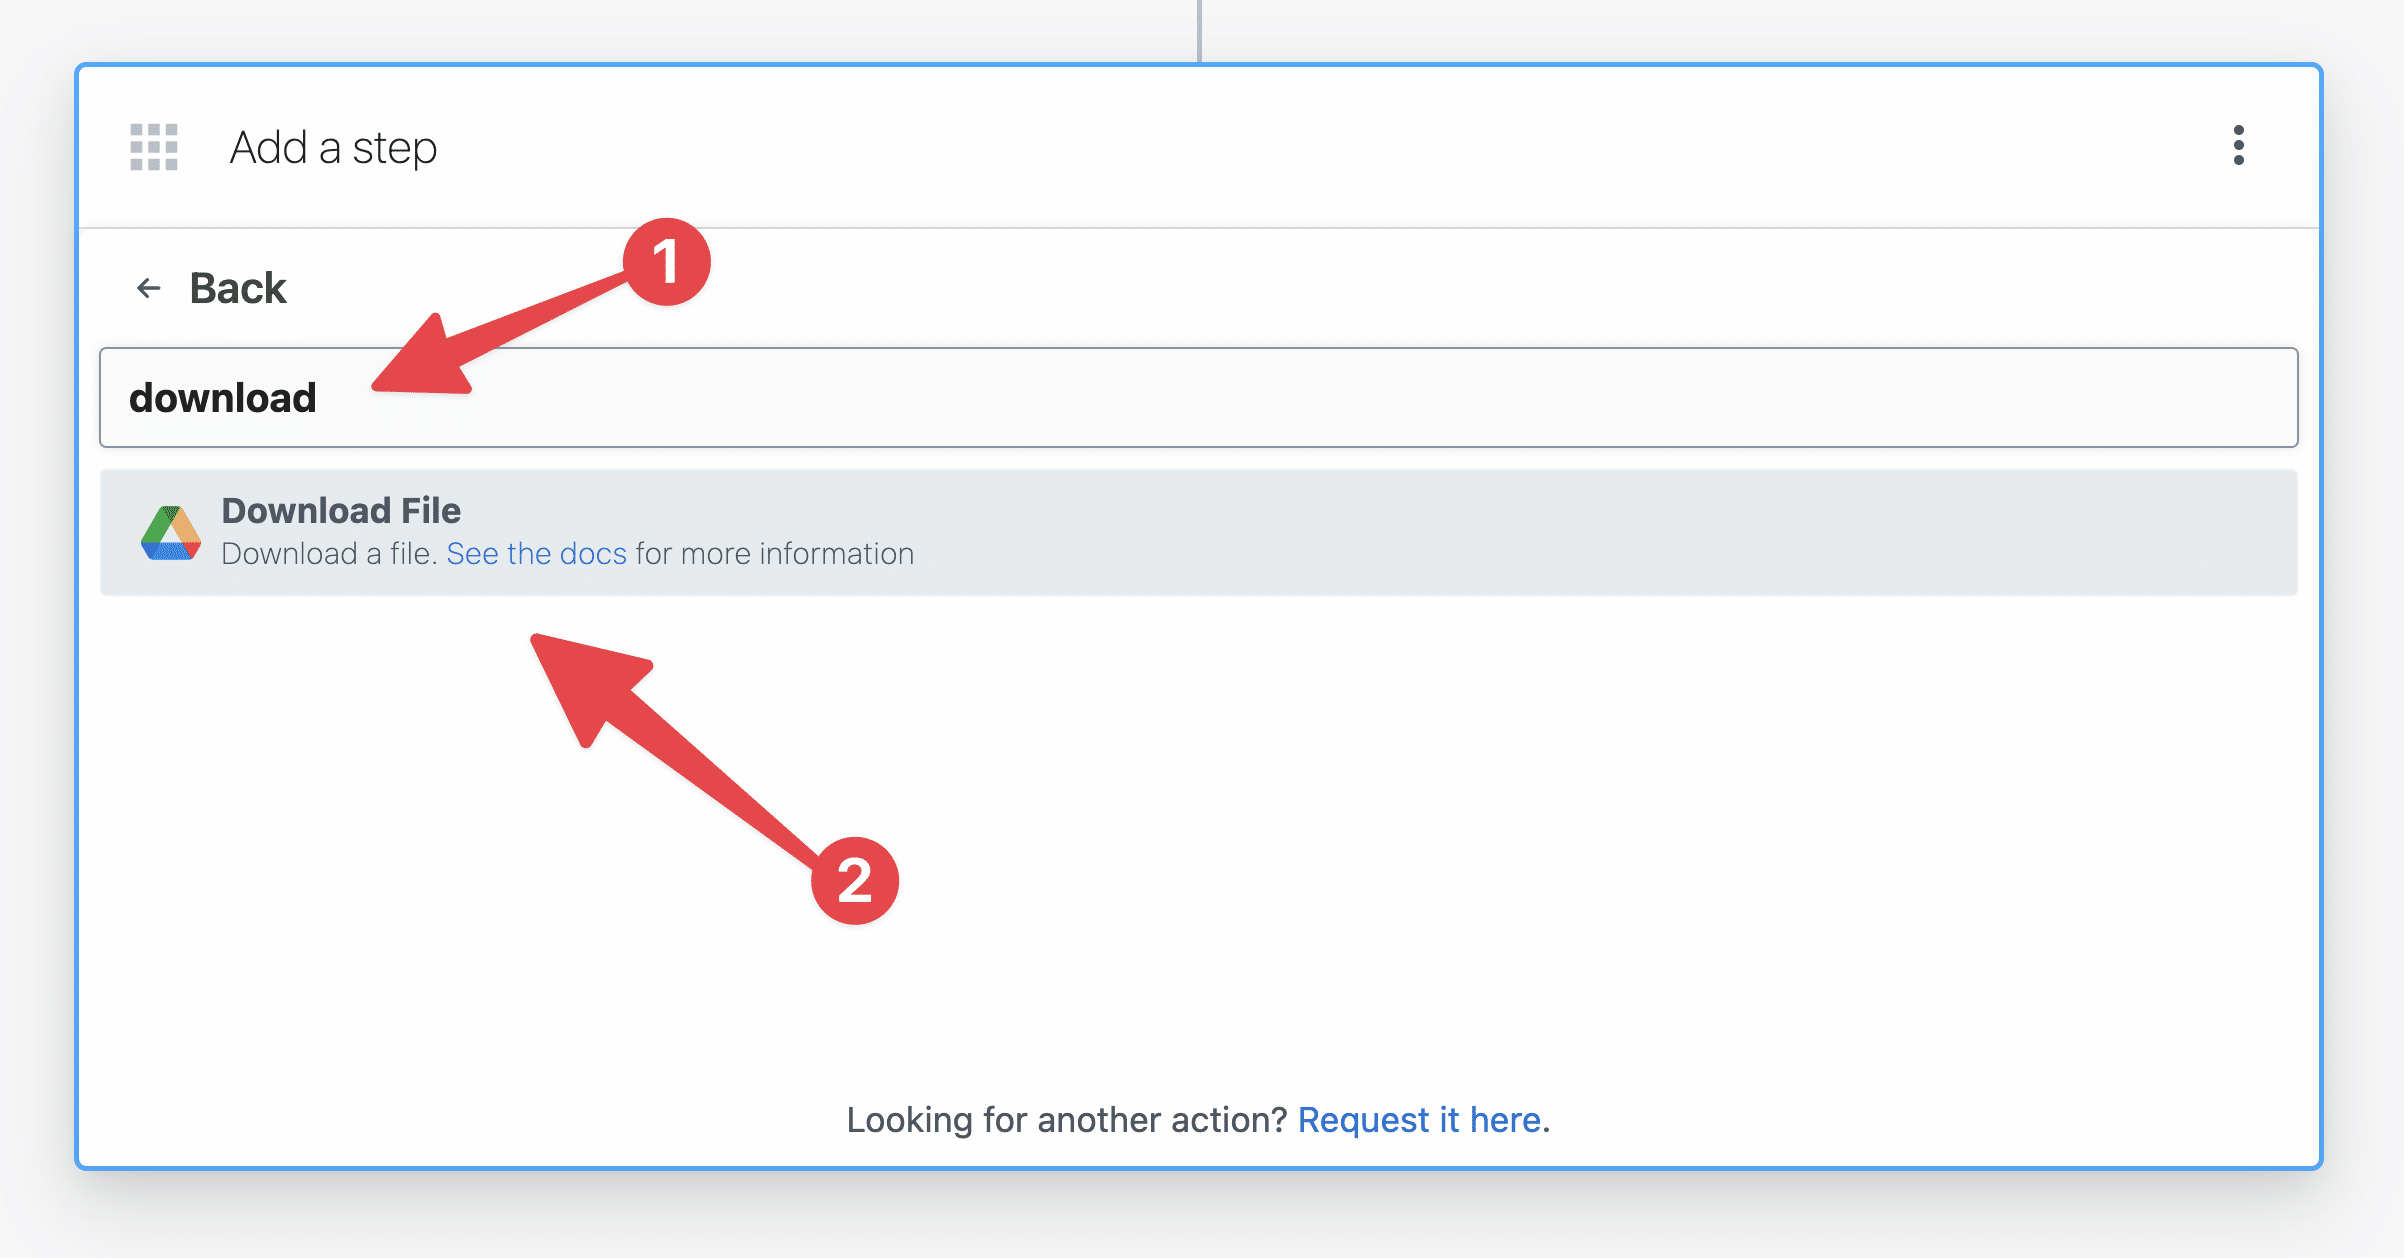
To do this, select Google Drive once again in your second step. Then search for, and choose, the Download File action.
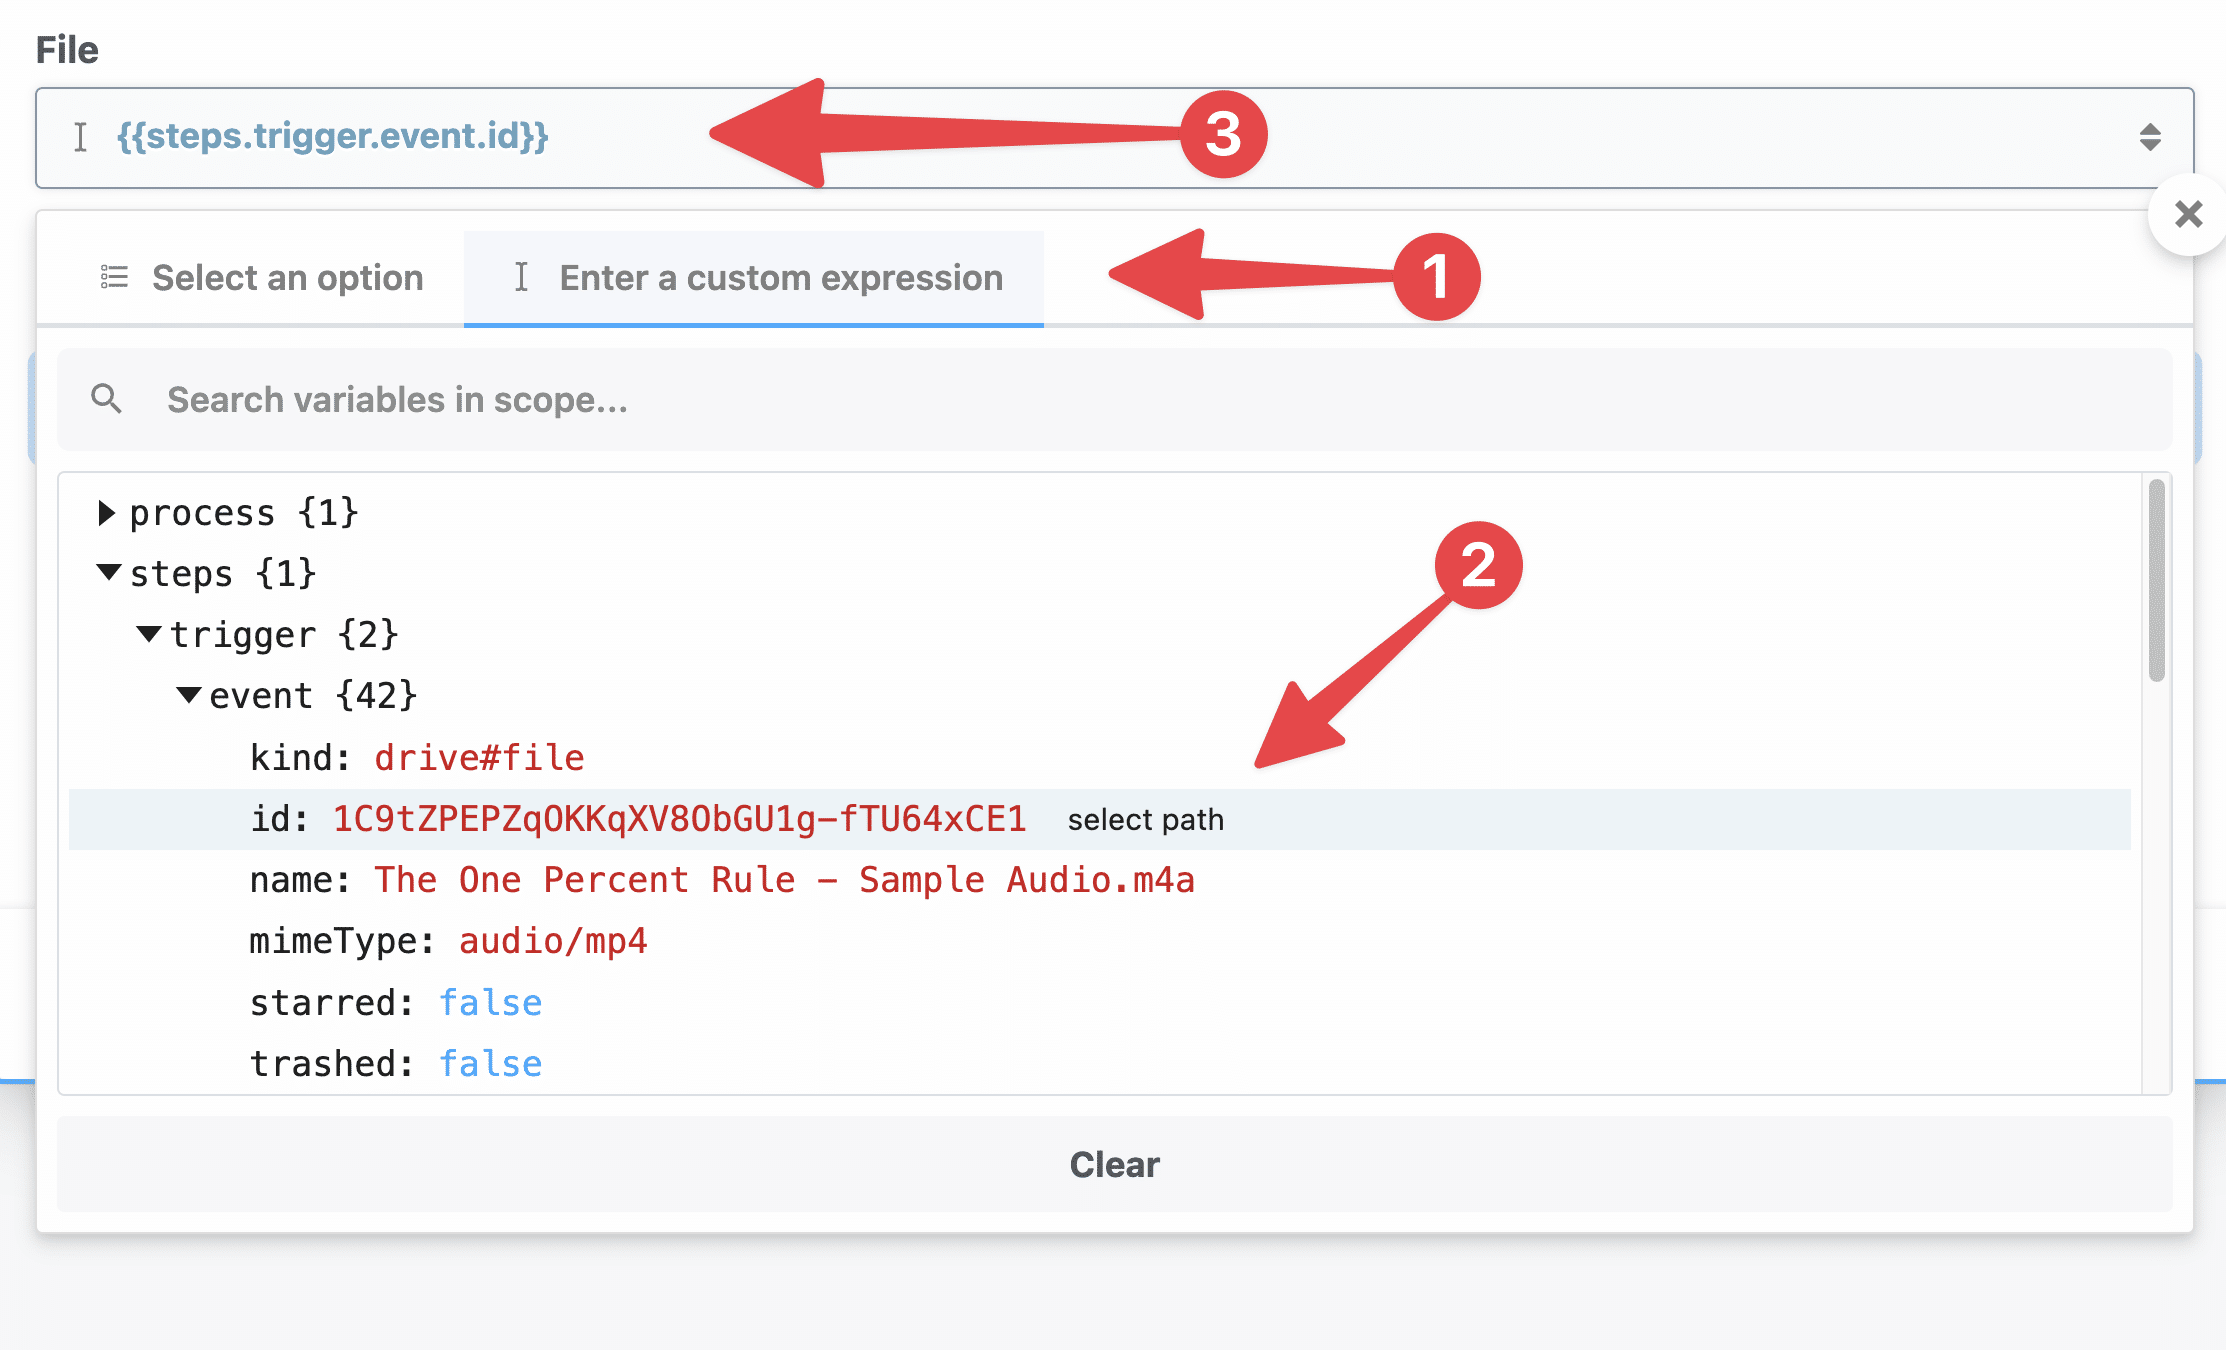
In the File field:
- Select the Enter a Custom Expression tab
- Paste in the
steps.trigger.event.idpath
Alternatively, you can locate that path in the dropdown menu and click Select Path.
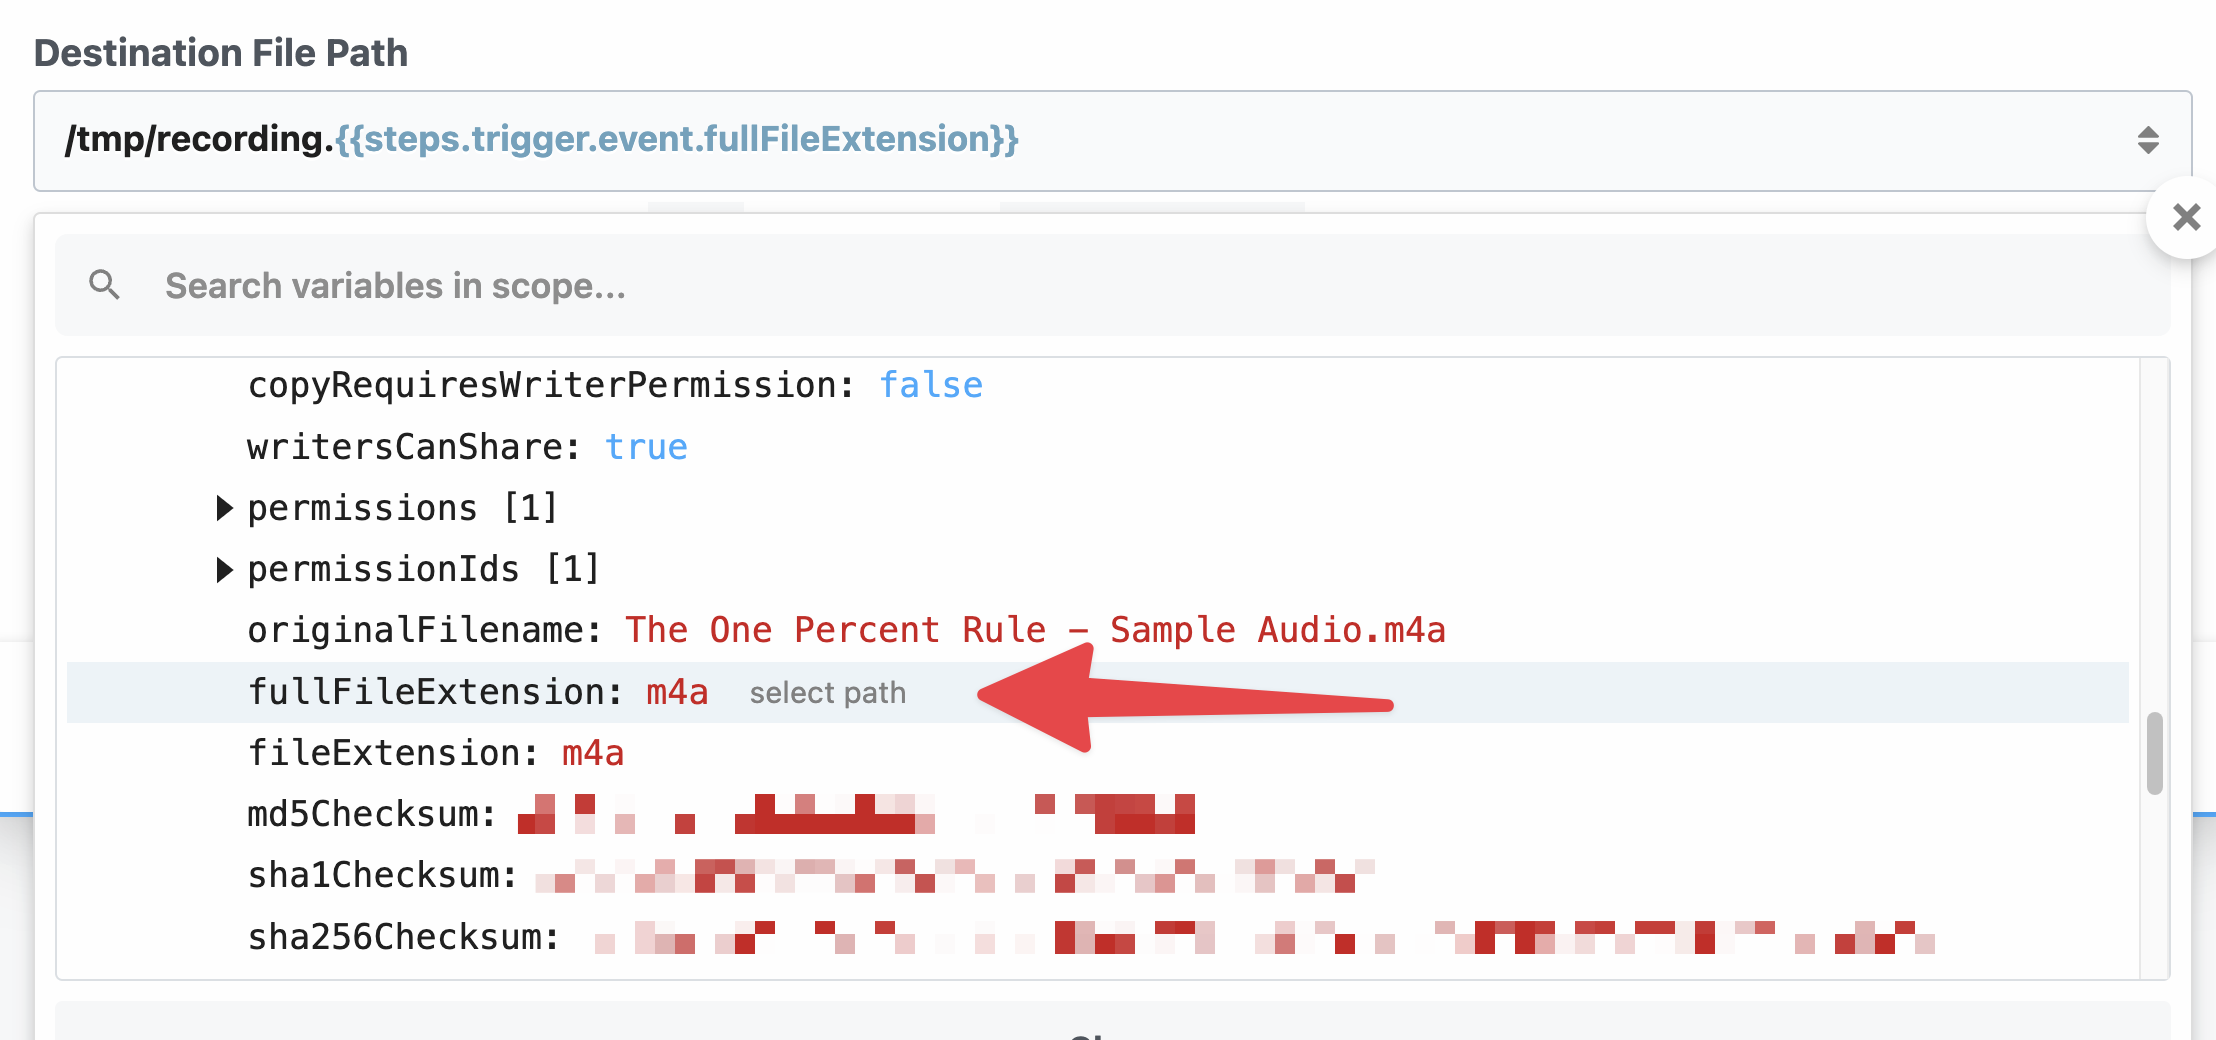
Next, in the Destination File Path field:
- Type in
/tmp/recording. - Then find the
steps.trigger.event.fullFileExtensionproperty in the dropdown menu and select it.
The full Destination File Path value should be /tmp/recording.{{steps.trigger.event.fullFileExtension}}.
Note: If you know you’re only going to be uploading m4a files (or mp3 files), you could hard-code the file extension – e.g. /tmp/recording.mp3.
But I want to ensure our automation can handle multiple file types, so I’m dynamically setting the extension.
If you’re curious as to why we have to set a file name and extension in the first place, it’s because this no-code action is just a UI wrapper for using Node.js’ createWriteStream() function, which requires a specified filename. Learn more here:
Make HTTP Requests with Node.js
Pipedream Documentation – Connect APIs, remarkably fast
Finally, note that your step’s name is automatically set to download_file. You can change it if you want – in fact, you can set a custom name for every step in a workflow except the trigger step.
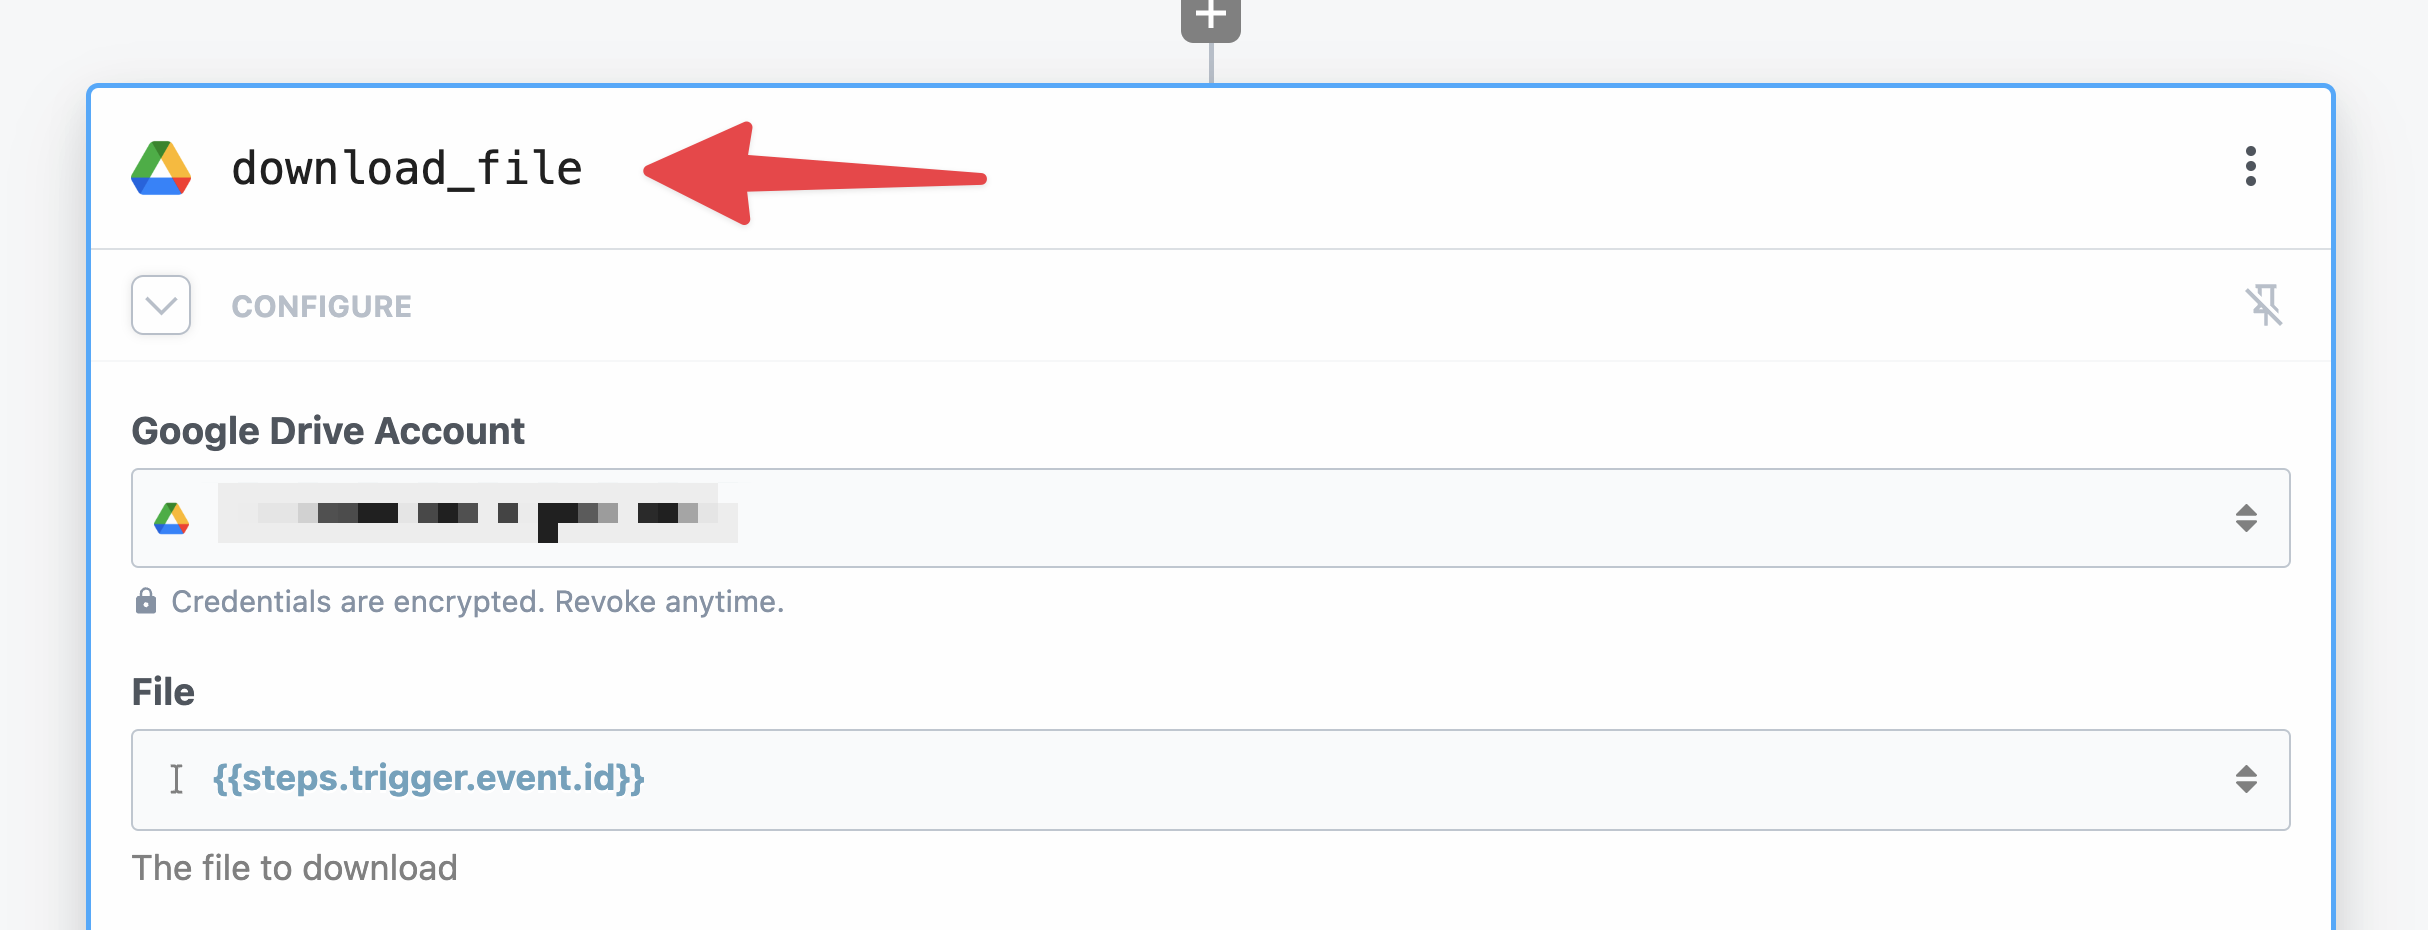
However, note that will affect the path to any values that you might want to reference later in the workflow.
To see why, go ahead and hit Test on this step:
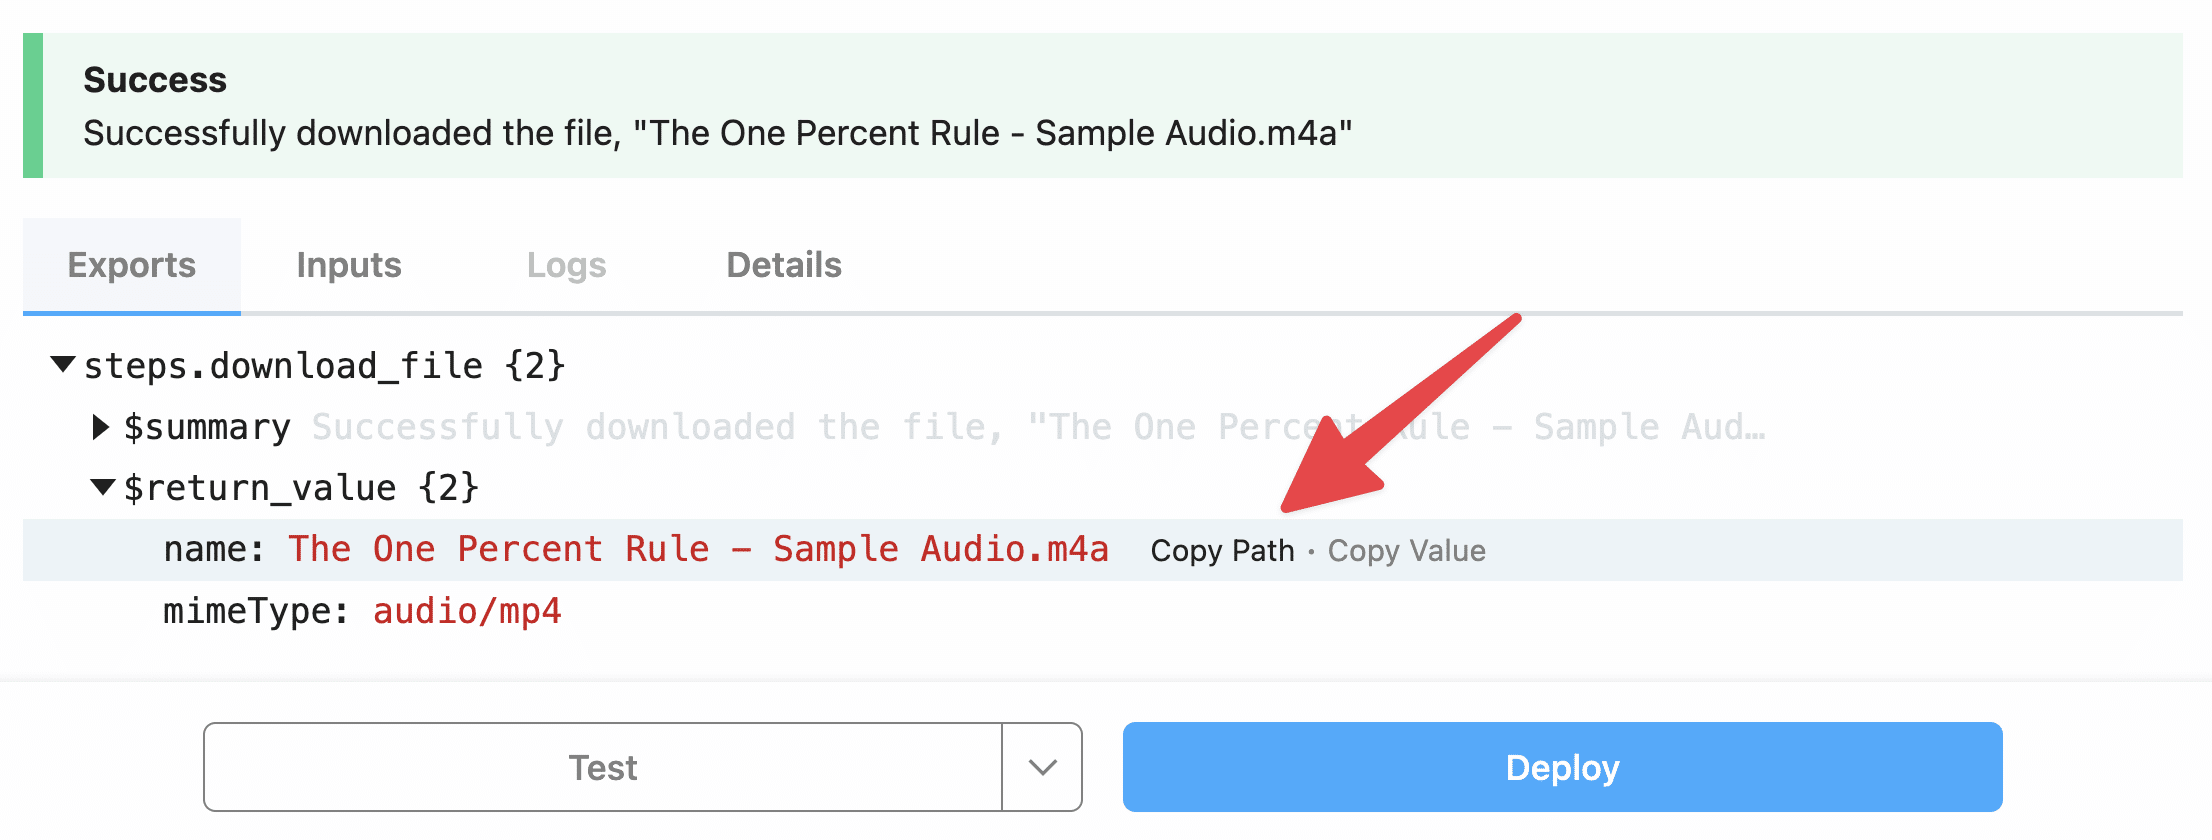
If you hit Copy Path on the name property, you’ll get this path: steps.download_file.$return_value.name
Note how the second part – download_file matches the name of the step!
This is important, because if you change the name of a step after referencing one of its Export properties later in the workflow, you can break the workflow.
So just remember: If you change the name of a step, you’ll need to update any subsequent steps where you’ve referenced it’s output values.
In this particular step, though, we actually specified a (somewhat) hard-coded value for our downloaded audio file: /tmp/recording.{{steps.trigger.event.fullFileExtension}}.
The only dynamic part of that file path is the file extension, which is determined by the trigger’s export value, not any of this step’s values.
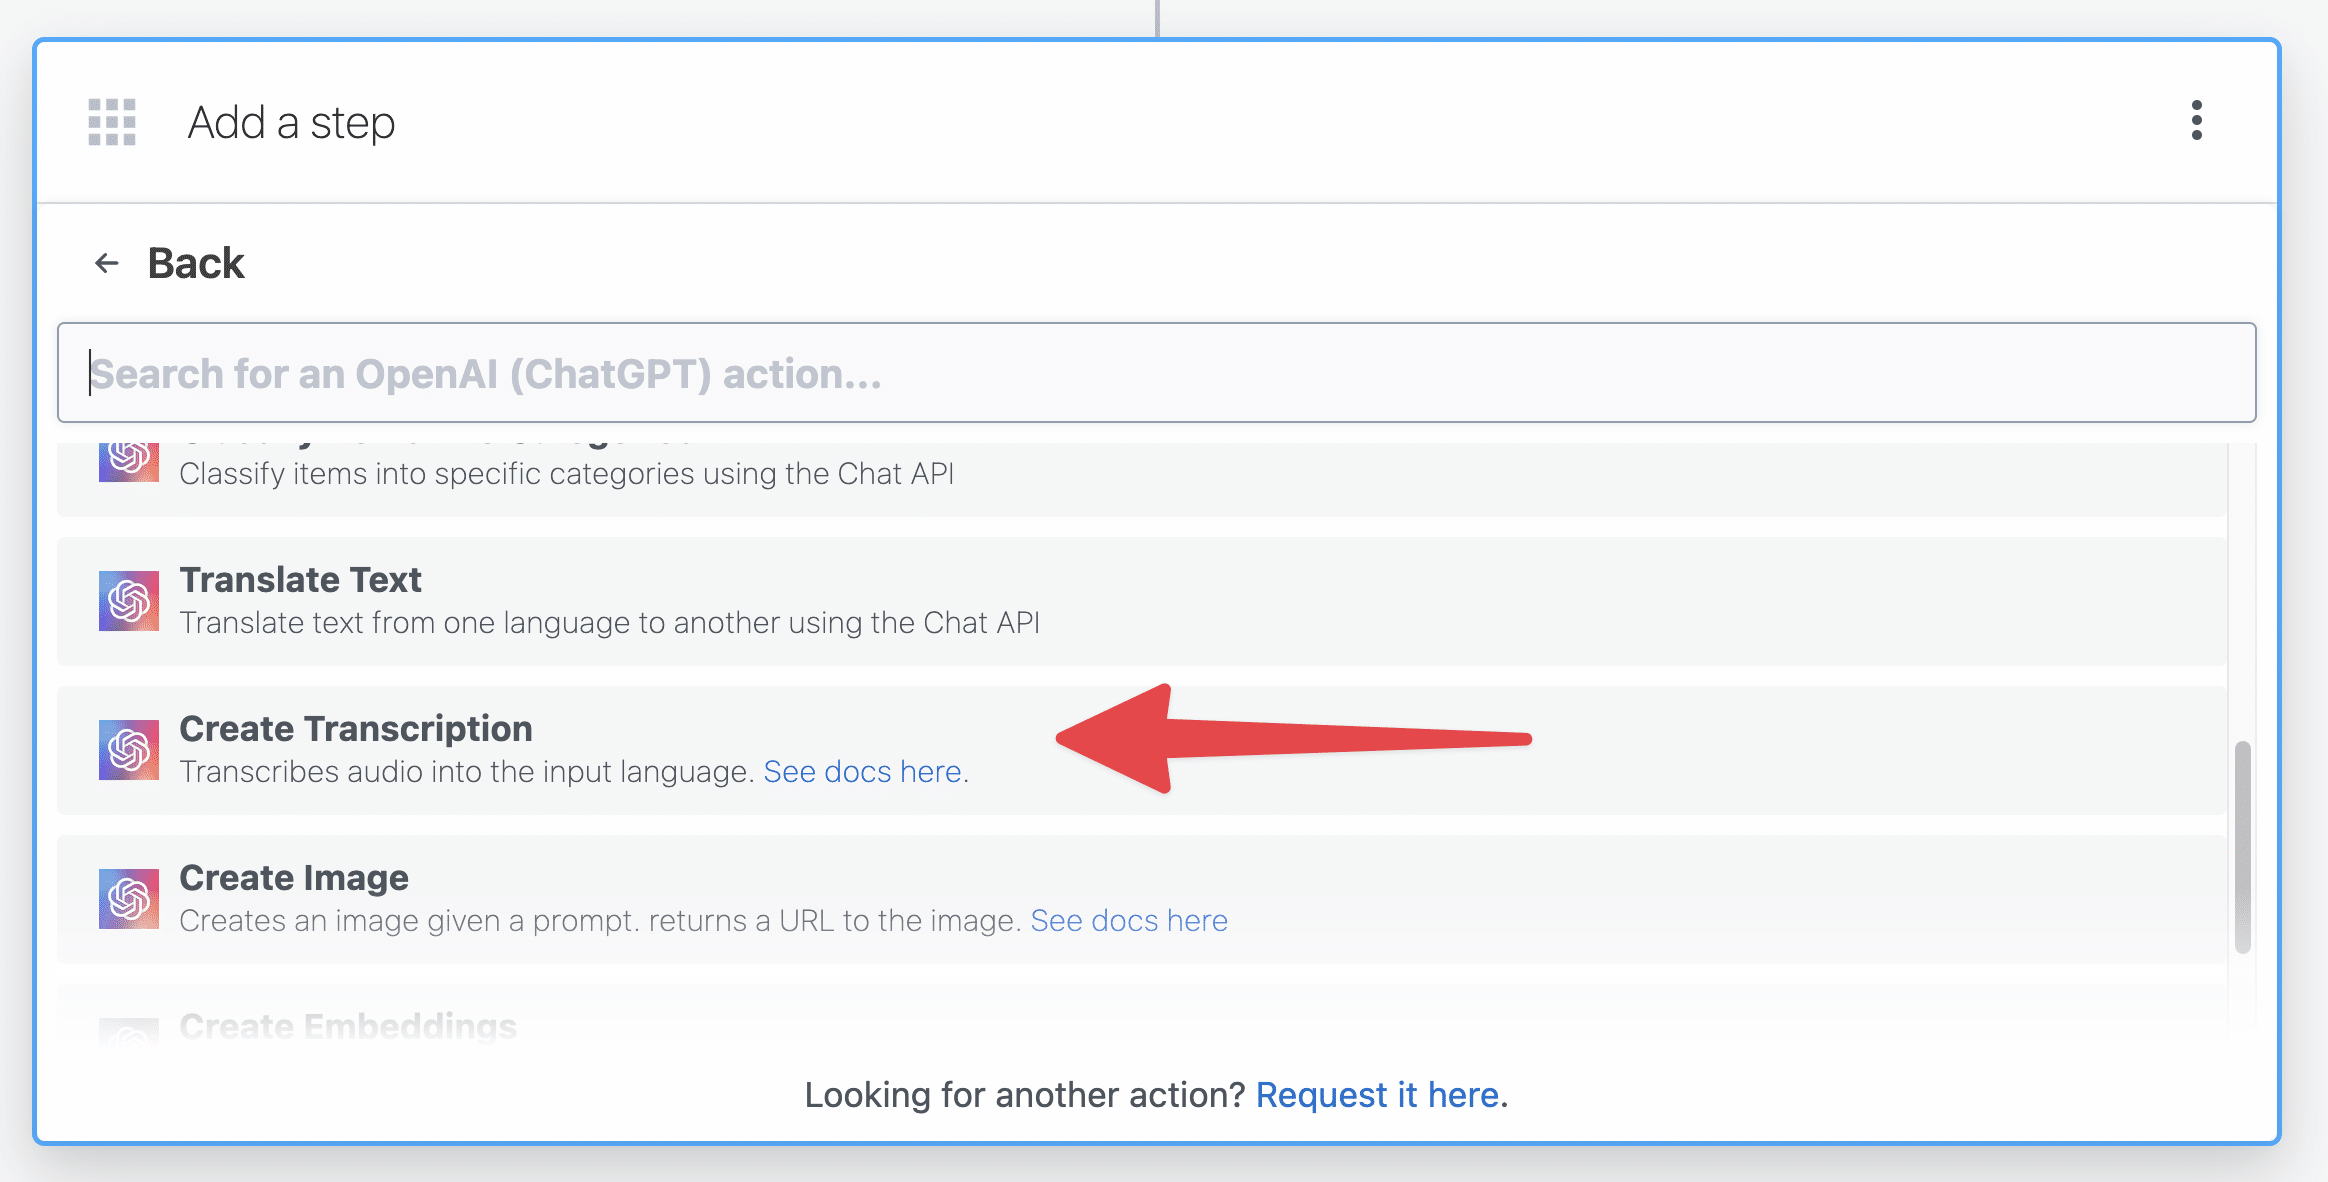
Next, hit the + button to add another step. This time, find the OpenAI (ChatGPT) app and select the Create Transcription action.
Before you can use Whisper to transcribe your audio file, you’ll need to do two things:
- Create an OpenAI API key
- Upgrade to a paid OpenAI account
You can create an API key from your API Keys page in your OpenAI user settings.
Note that you won’t be able to see it again after generating it, so be sure to copy it and paste it into Pipedream immediately.

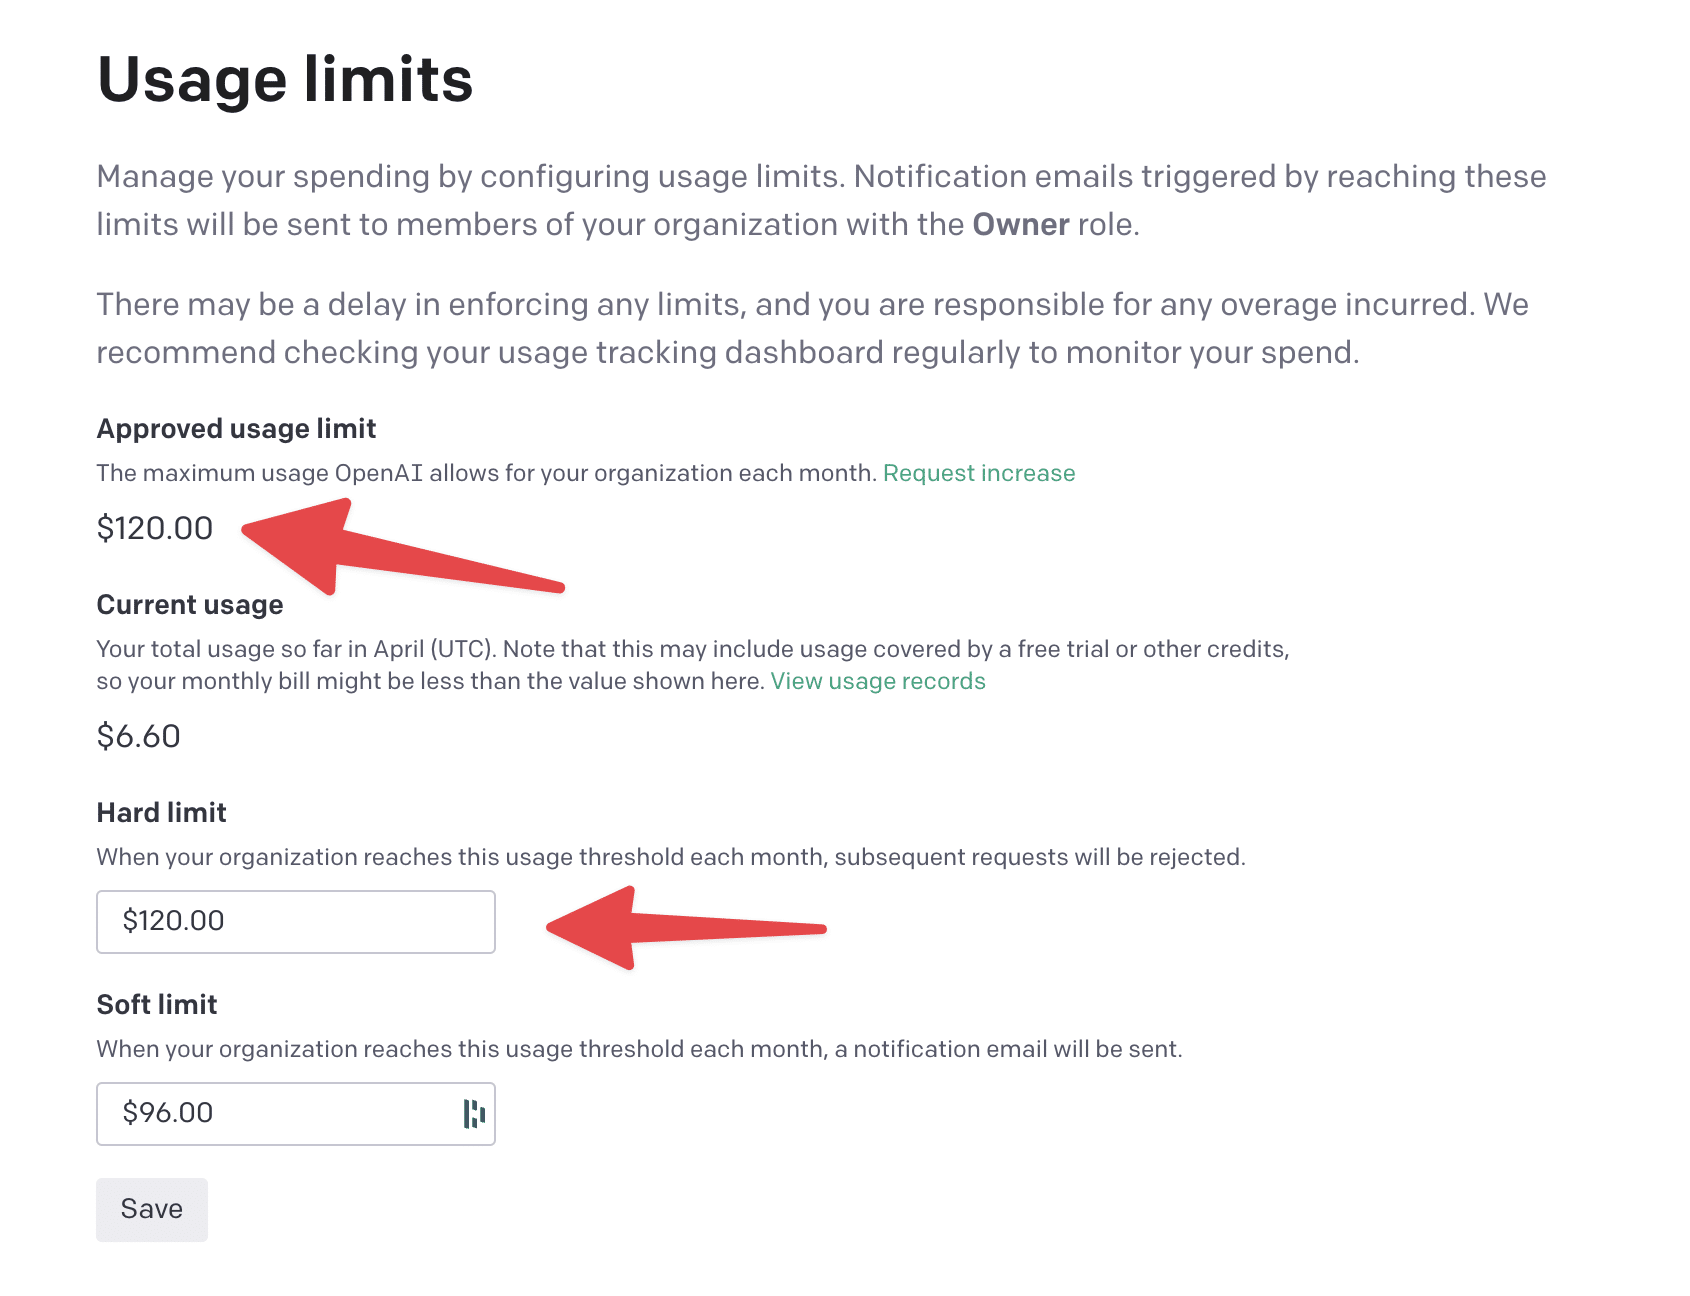
You can add your billing details and upgrade to a paid account from your Billing Overview page.
As of this writing, OpenAI currently gives you an “approved usage limit”, which is a monthly cap on spending. Mine is currently $120/mo.
You can also choose to set your own Hard Limit if you want to ensure you don’t go over a certain amount of spend each month.
Once you have your API key, copy and paste it into the connection field in order to authenticate with OpenAI.
Then set the following values:
- Audio Upload Type: File
-
File Path:
/tmp/recording.{{steps.trigger.event.fullFileExtension}}
You should be able to copy that file path right from the line above, or from the File Path field in your download_file step.

Next, hit Test to transcribe your file.
Note: Whisper has a 25mb file size limit. While prepping this tutorial, I worked with the Pipedream team to get the Create Transcription action updated so that it will split large audio files into chunks. This means you can upload files larger than 25mb – however, in our testing, we’ve still found that files over 100mb can cause errors. As a result, I’d recommend keeping your files under 100mb.
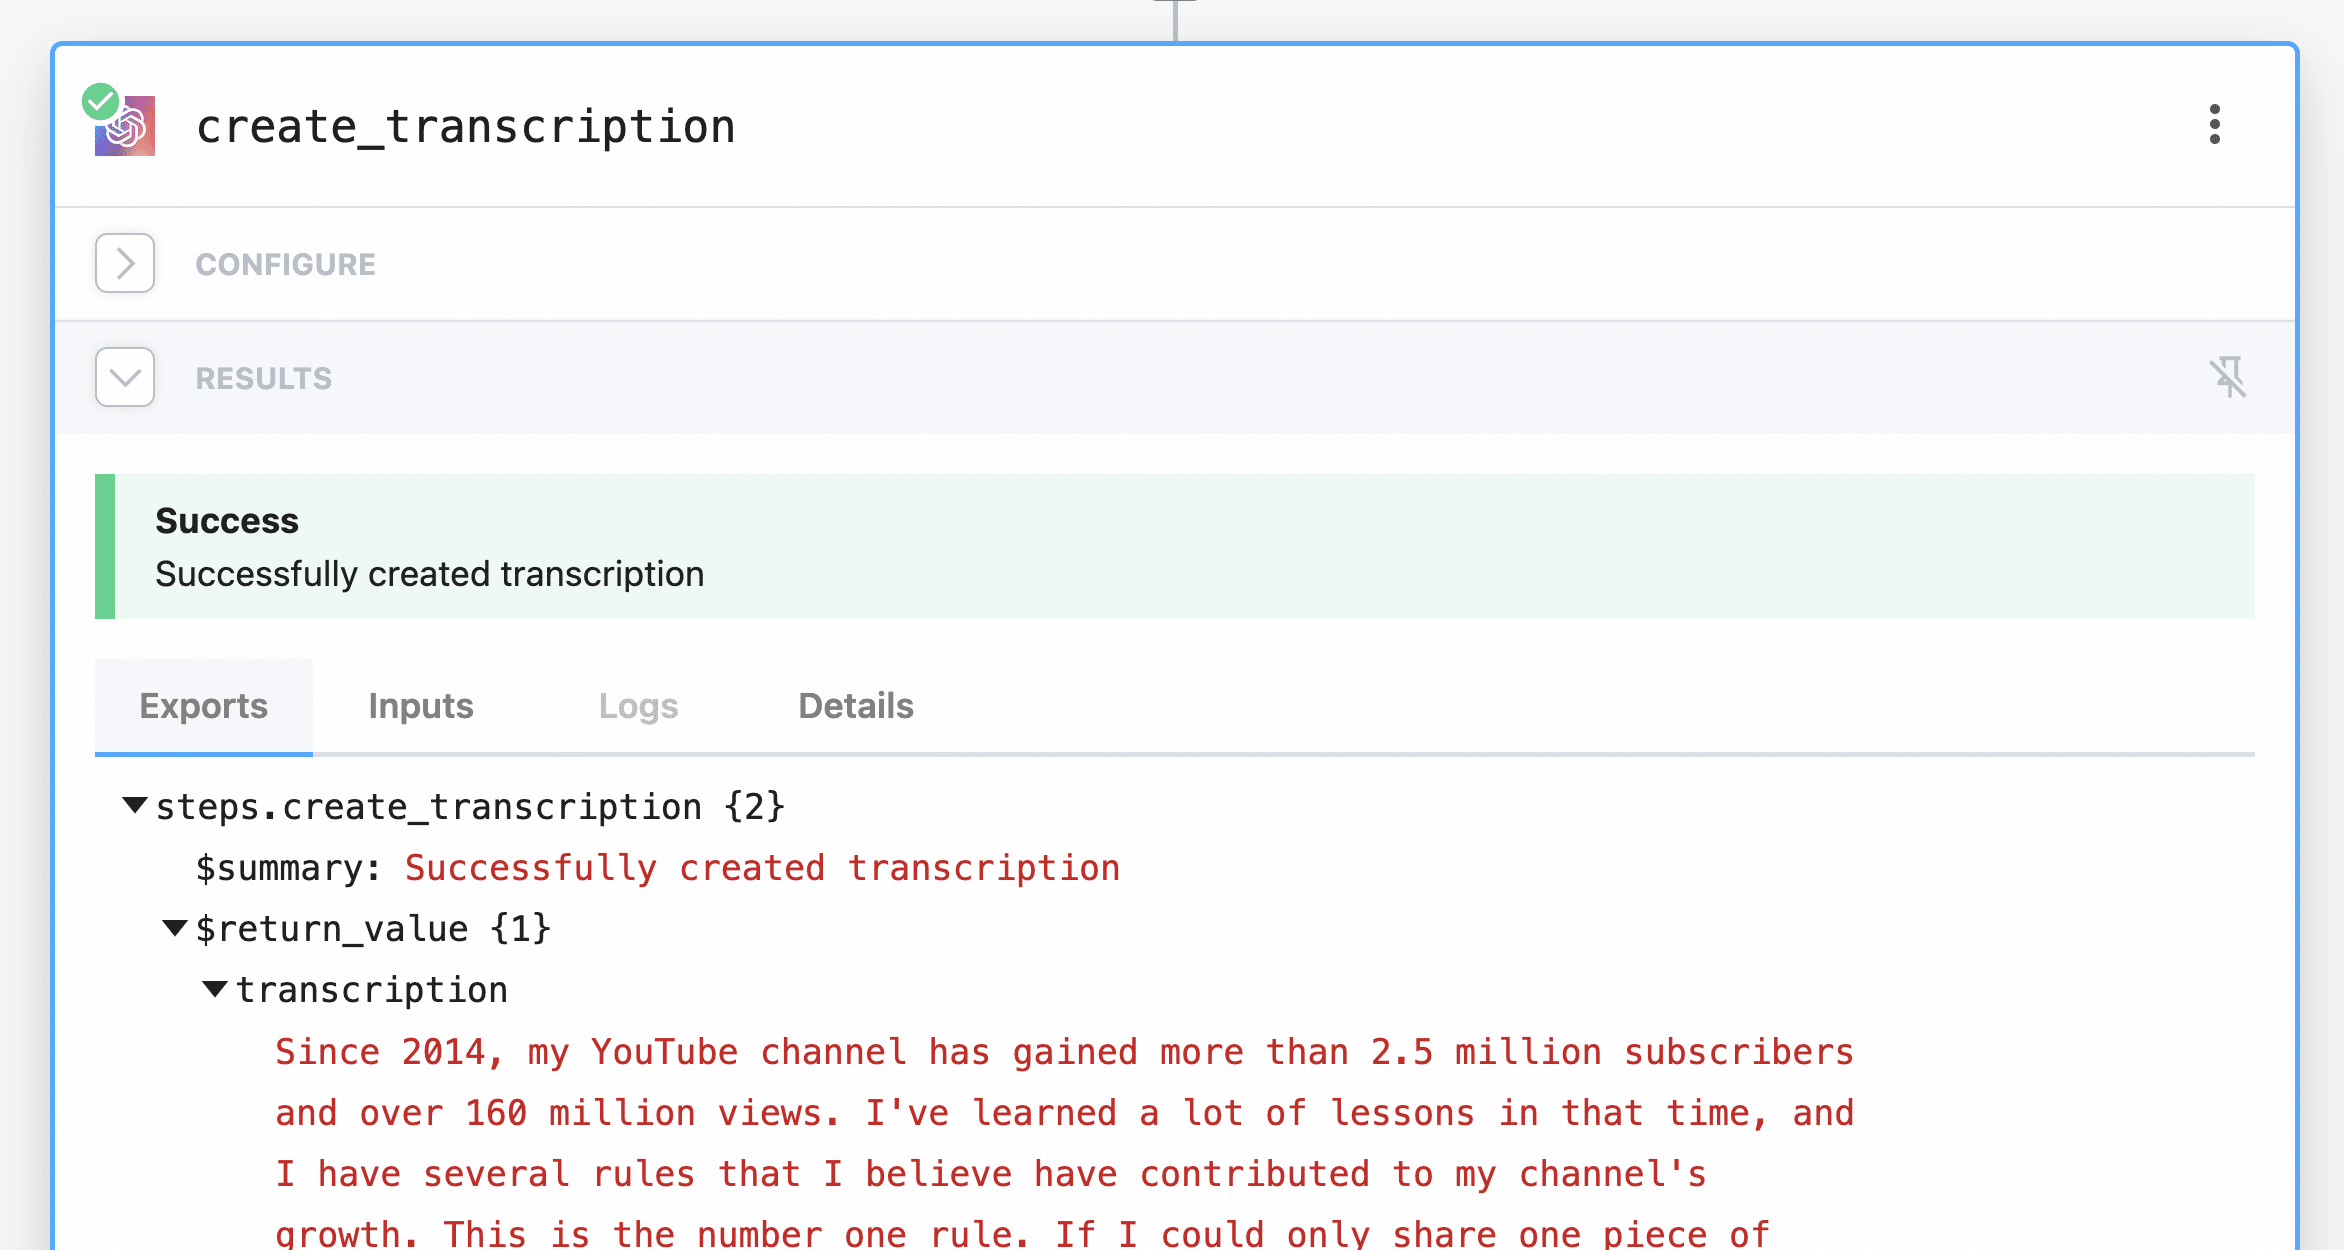
If all goes well, you’ll get another exported object like this:
If you get “Error: /tmp/recording.m4a does not exist” when you do this, you’ll need to upload another file to Drive, then go up to your trigger step and select that new event. You’ll then need to re-test each of your steps. This can happen when you’re building your workflow, as files don’t stay in the /tmp directory for long.
The steps.create_transcription.$return_value.transcription property contains your entire transcription.
Next, let’s summarize it!
Note: This is the main area where this no-code version of the automation can fail. ChatGPT’s gpt-3.5-turbo model has a limit of 4,097 tokens (roughly 3,000 words), and that limit includes the prompt, question, and output. This means you’ll only be able to summarize transcripts around 2,000-2,500 words. That’s roughly 13-16 minutes of audio if you speak at the average speed of 150 words per minute. If you want to work with longer files, you’ll want to go with the code-heavy version of this tutorial.
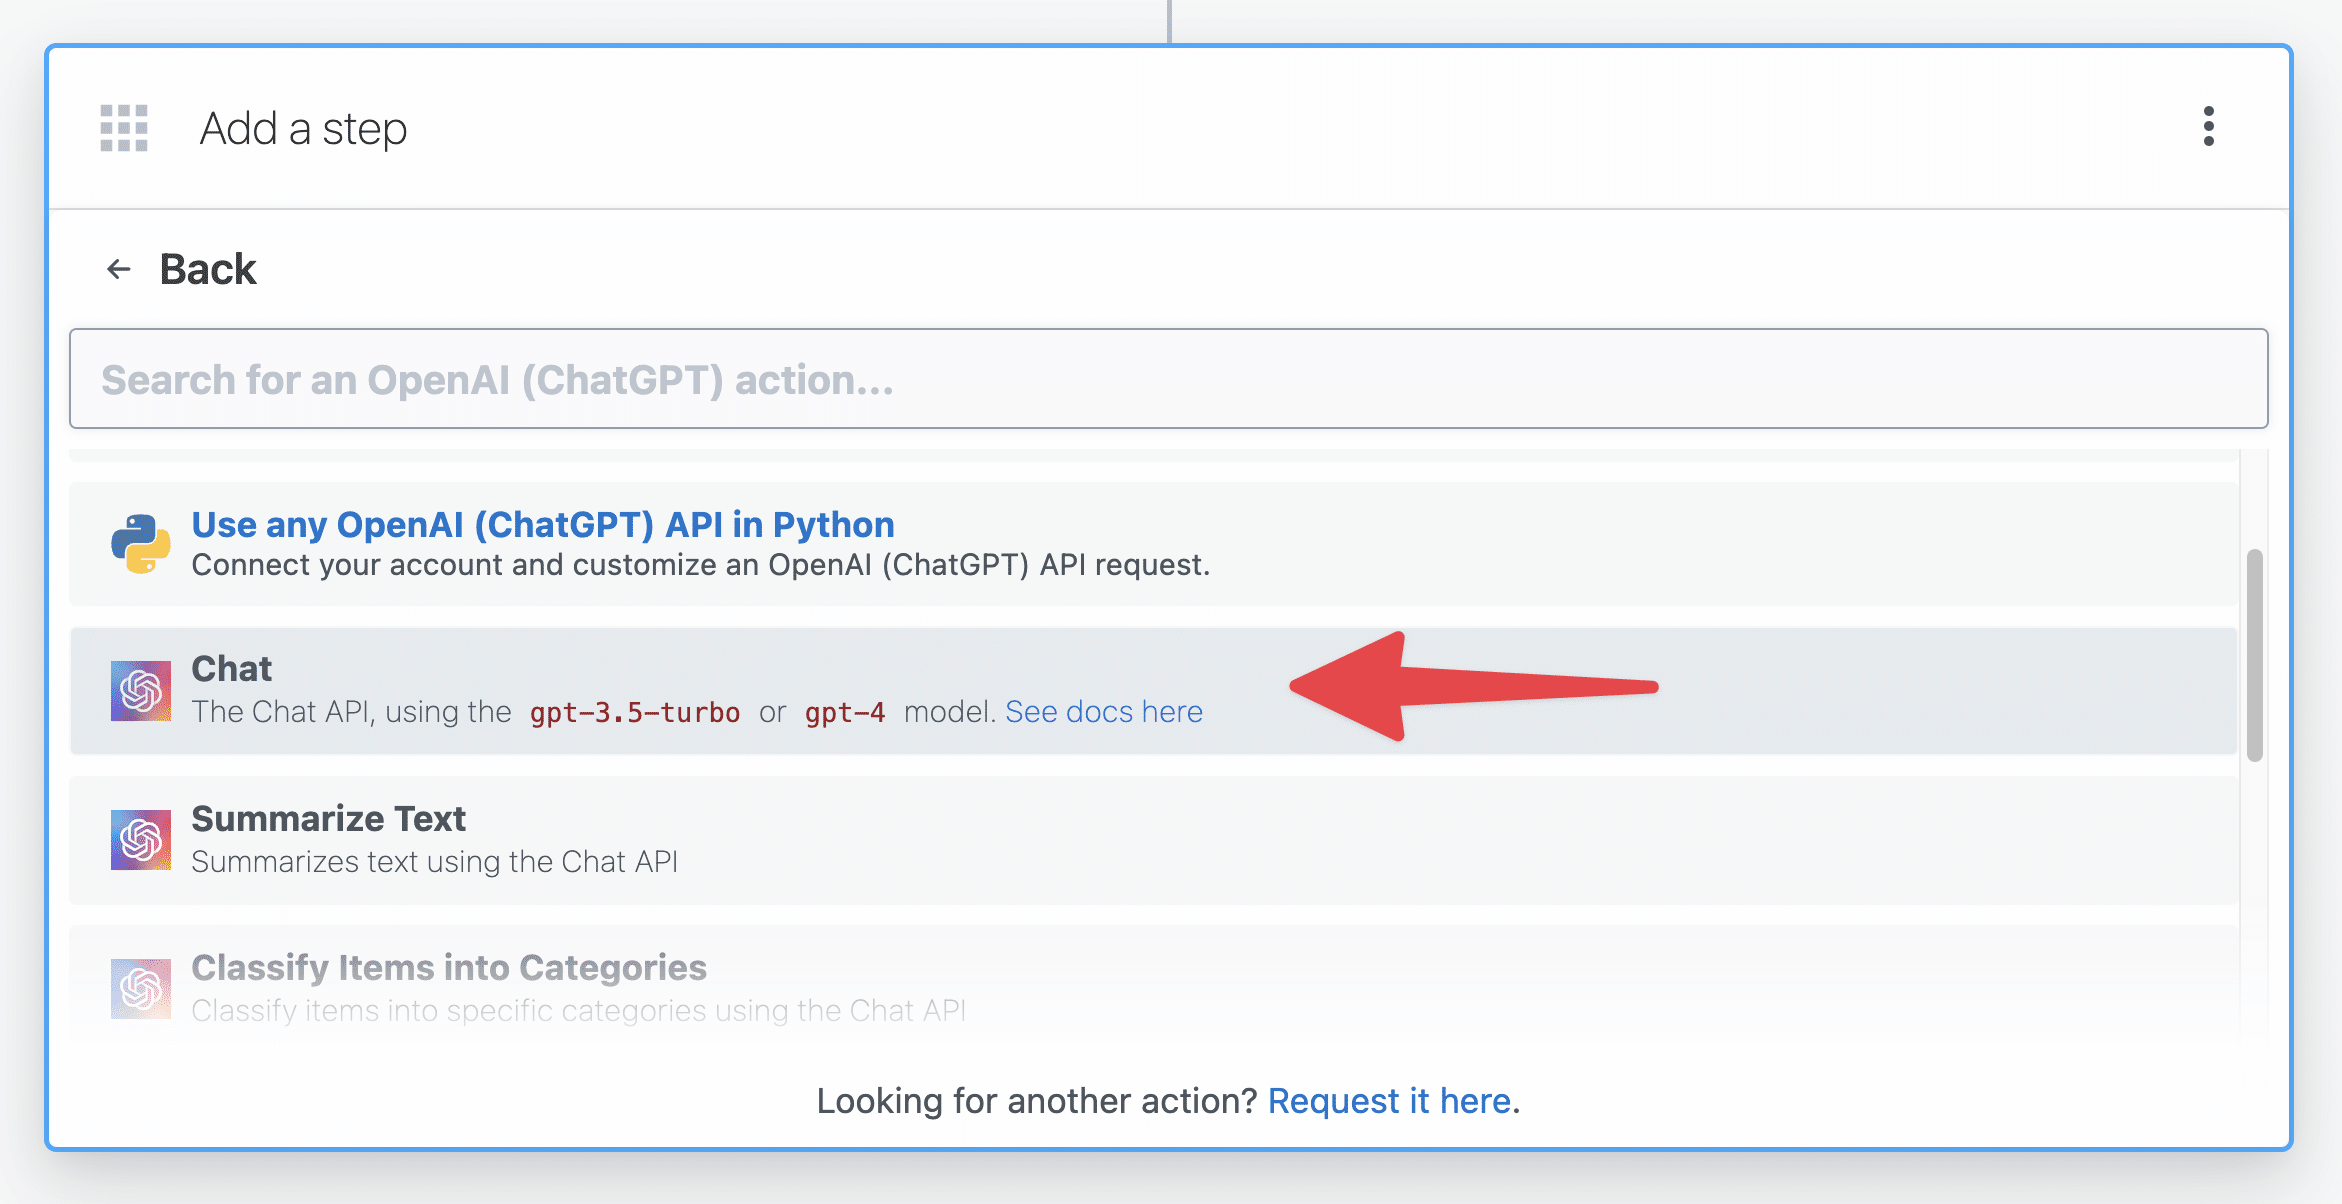
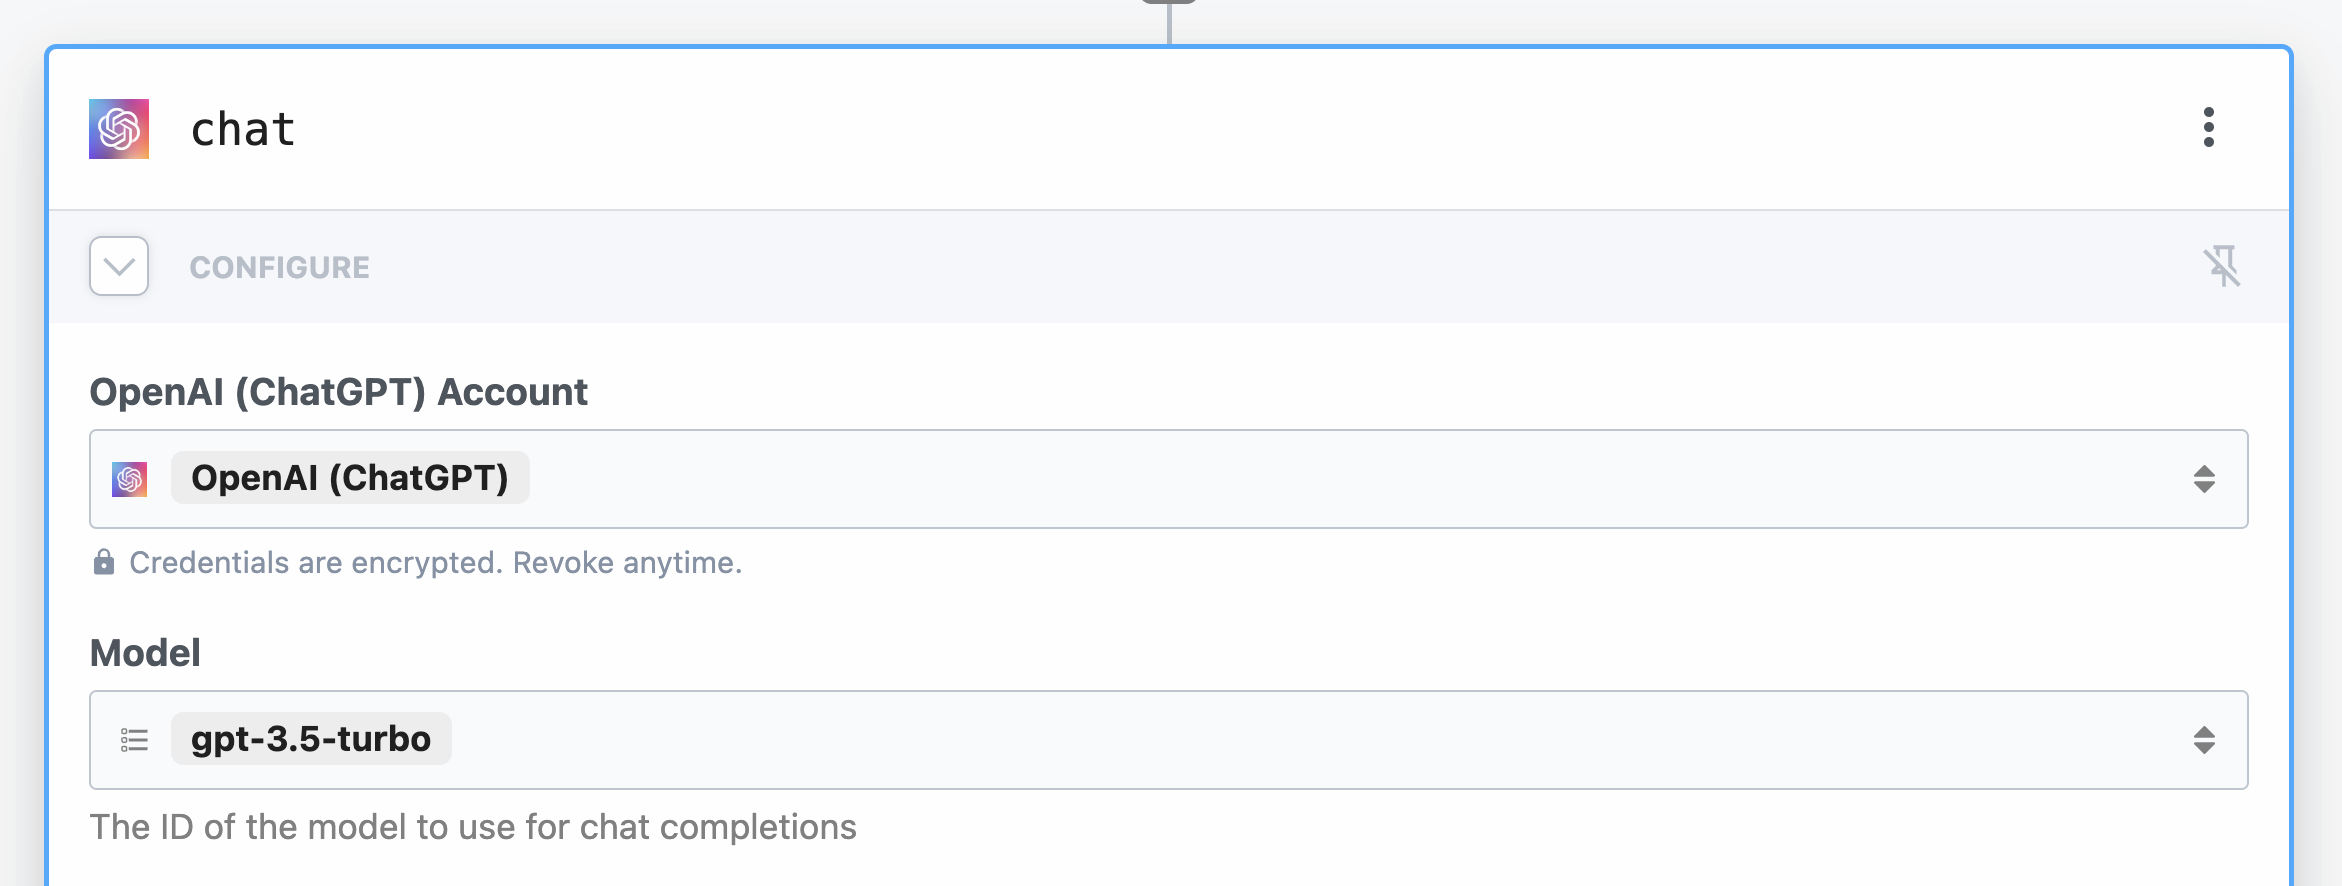
Add another step to your workflow with the + button. This time, choose the OpenAI (ChatGPT) app, then choose the Chat action.
Your OpenAI account should already be authenticated, since it’s the same one used in the previous step with Whisper.
For Model, choose gpt-3.5-turbo. If you happen to have access to GPT-4 through the API (not ChatGPT Plus, as that does not grant API access to GPT-4), you could choose that as well – though it is 15-30x more expensive than GPT-3.5 Turbo.
Next, set the User Message. This is also known as the prompt.
Here’s the exact user message I’ve set. I’d recommend copying it to start, though you’re welcome to make modifications down the road.
Write a Title for the transcript that is under 15 words.

Then write: "--Summary--"

Write "Summary" as a Heading 1.

Write a summary of the provided transcript.

Then write: "--Additional Info--".

Then return a list of the main points in the provided transcript. Then return a list of action items. Then return a list of follow up questions. Then return a list of potential arguments against the transcript.

For each list, return a Heading 2 before writing the list items. Limit each list item to 100 words, and return no more than 5 points per list.

Transcript:

{{steps.create_transcription.$return_value.transcription}}
Here’s a quick primer on prompts. A prompt technically has three parts:
- Query (aka User Message) – this is the user’s question or prompt.
- Context – the context, or additional information that the model should take into account.
- Instructions (aka System Instructions) – how the model should respond and format its output.
When you’re working with the ChatGPT website, these are all dynamically interpreted from the prompt you submit (though labeling each part can get better results).
The API is a bit different. The User Message field here in Pipedream covers the Query and Context of the prompt; however, the Instructions are set in a separate field.
Add the System Instructions option:
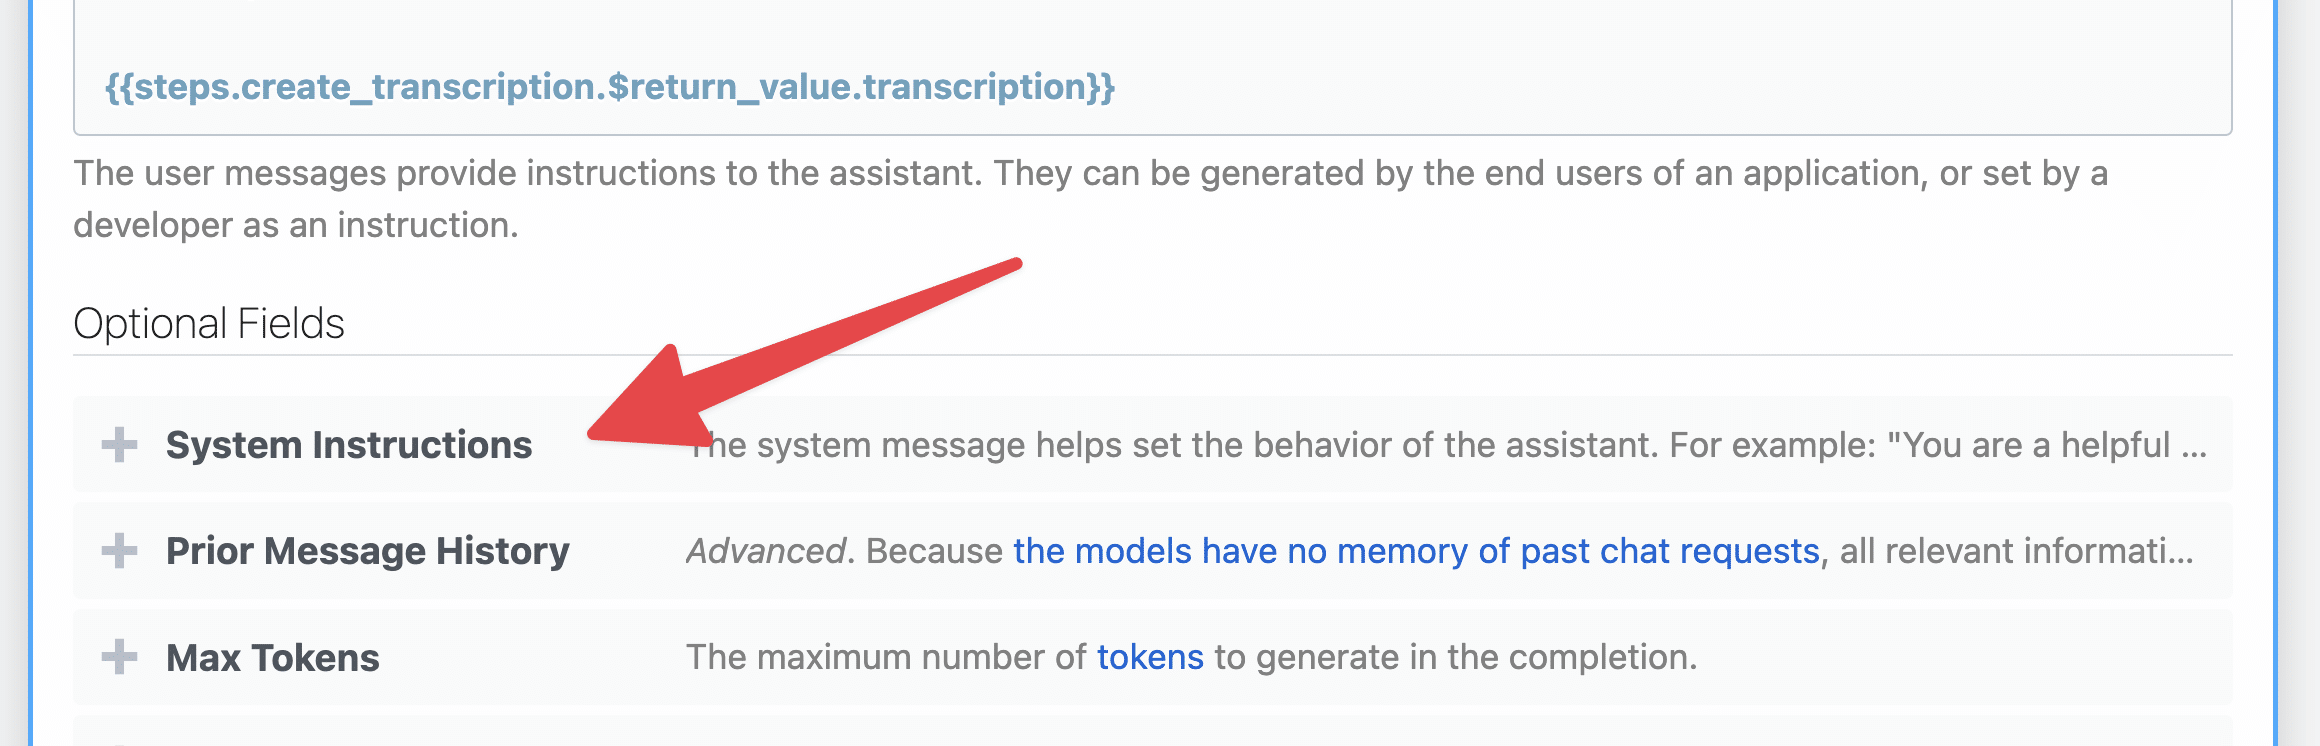
In this field, add the following instructions:
You are an assistant that only speaks in Markdown. Do not write text that isn't formatted as markdown.

Example formatting:

Testing No-Code Workflow

--Summary--

This audio recording documents a test of a no-code workflow using Google Drive and a single code step to reduce calls and improve efficiency.

--Additional Info--

## Main Points

- point 1
- point 2

## Action Items

- point 1
- point 2

## Follow Up Questions

- point 1
- point 2

## Potential Arguments Against

- point 1
- point 2
Behind the scenes, this field’s content will be set as the System Instructions for the prompt.
When you set System Instructions, your GPT responses will be much more consistent and in line with what you want. This is especially true if you provide example formatting in the System Instructions, as I have above.
Optional: To make your responses even more consistent, you can set the Temperature option to a low value like 0 or 0.2. Read more about temperature here.
In this case, we need ChatGPT’s output to be entirely formatted as Markdown. Future steps in the automation depend on it.
Once you’ve set these fields, hit Test.
If all goes well, you’ll find your prompt response in the steps.chat.$return_value.choices[0].message.content property.
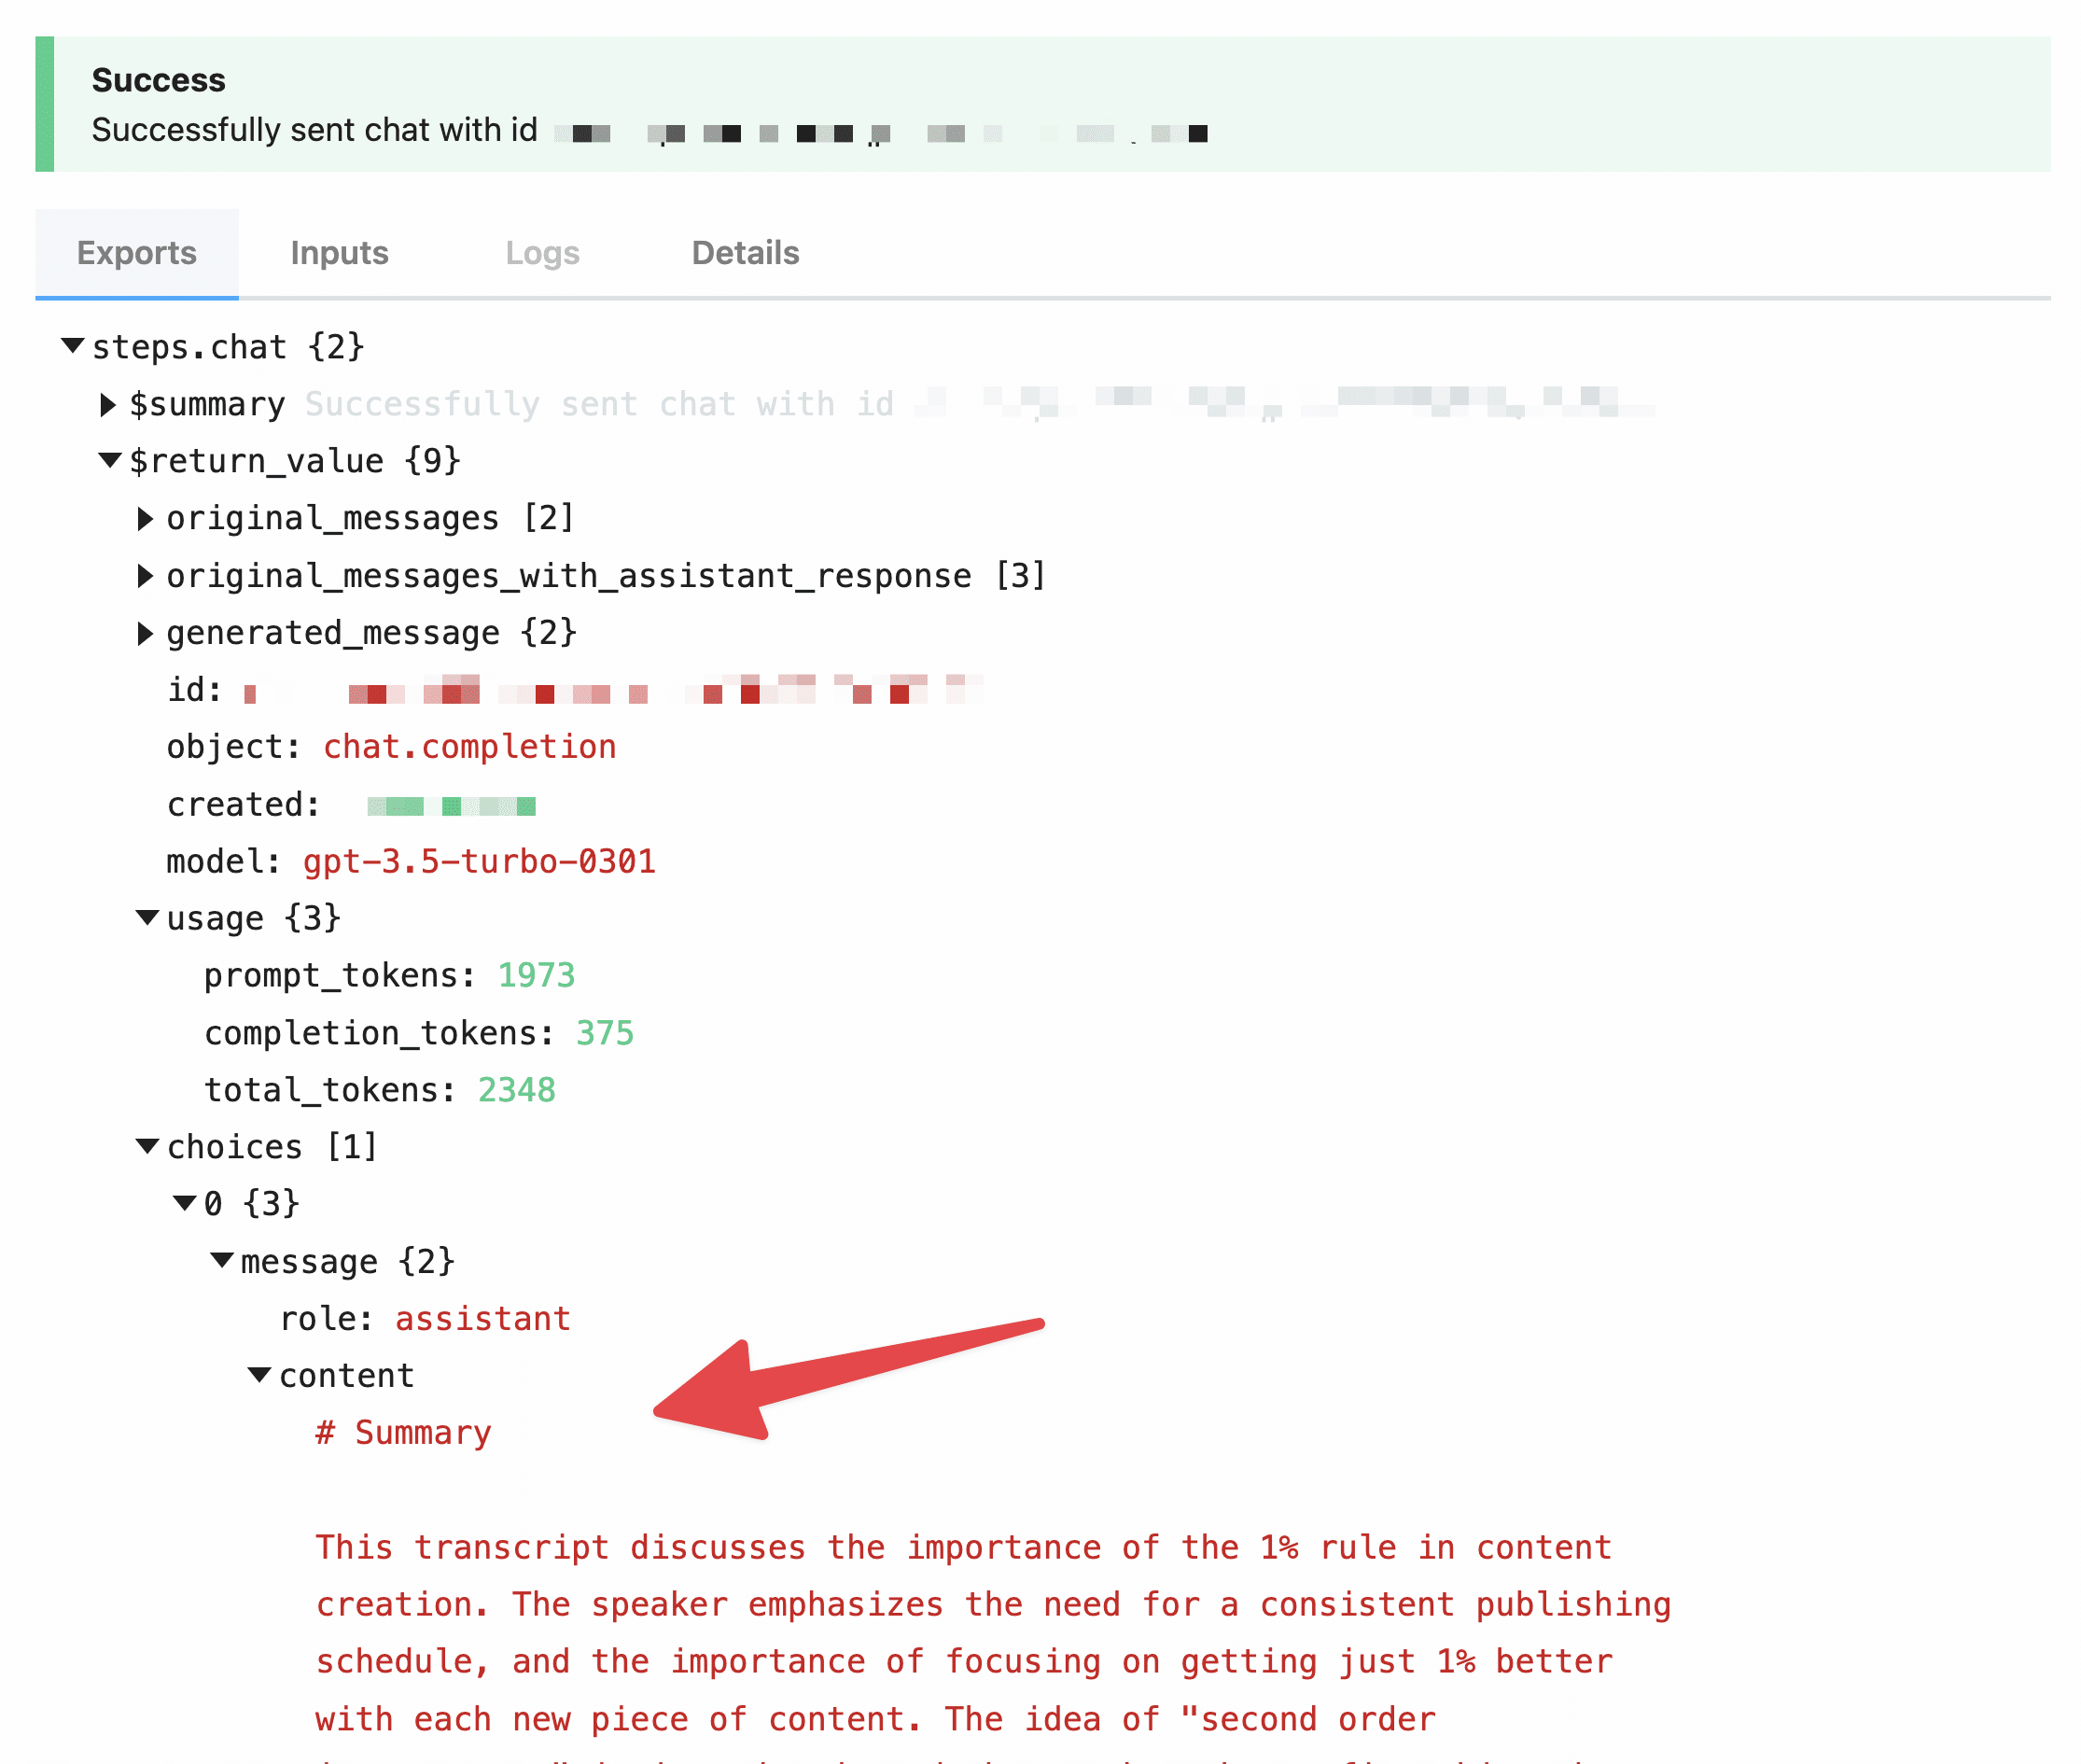
Copy that value’s path, and let’s move on to the next step.
Format the Title, Summary, and Transcript
Note: Before continuing onto this step, make sure you have tested all previous steps. Testing each step will provide valid properties for the next steps to use, and failing to test can cause errors.
We’re going to add a single code step to this automation that does two things:
- Splits the transcript into paragraphs of three sentences each.
- Separates the title, summary, and lists from the ChatGPT step
Doing this will allow us to format our Notion page much more elegantly.
Technically, we could skip this code step – but doing so will have two costs:
- Your transcript will be a single, gigantic wall of text in Notion
- You’d need to make three separate calls to ChatGPT to keep your title, summary, and lists separate.
The latter cost is especially wasteful, as it would mean sending the entire transcript to ChatGPT three times for context (once each for Title, Summary, and Lists).
Remember: the context is counted for token usage, which isn’t free!
Hit the + button to create another step. This time, select the Node app, then select the Pass Data Between Steps action.
This will create a code window with the following code pre-set:
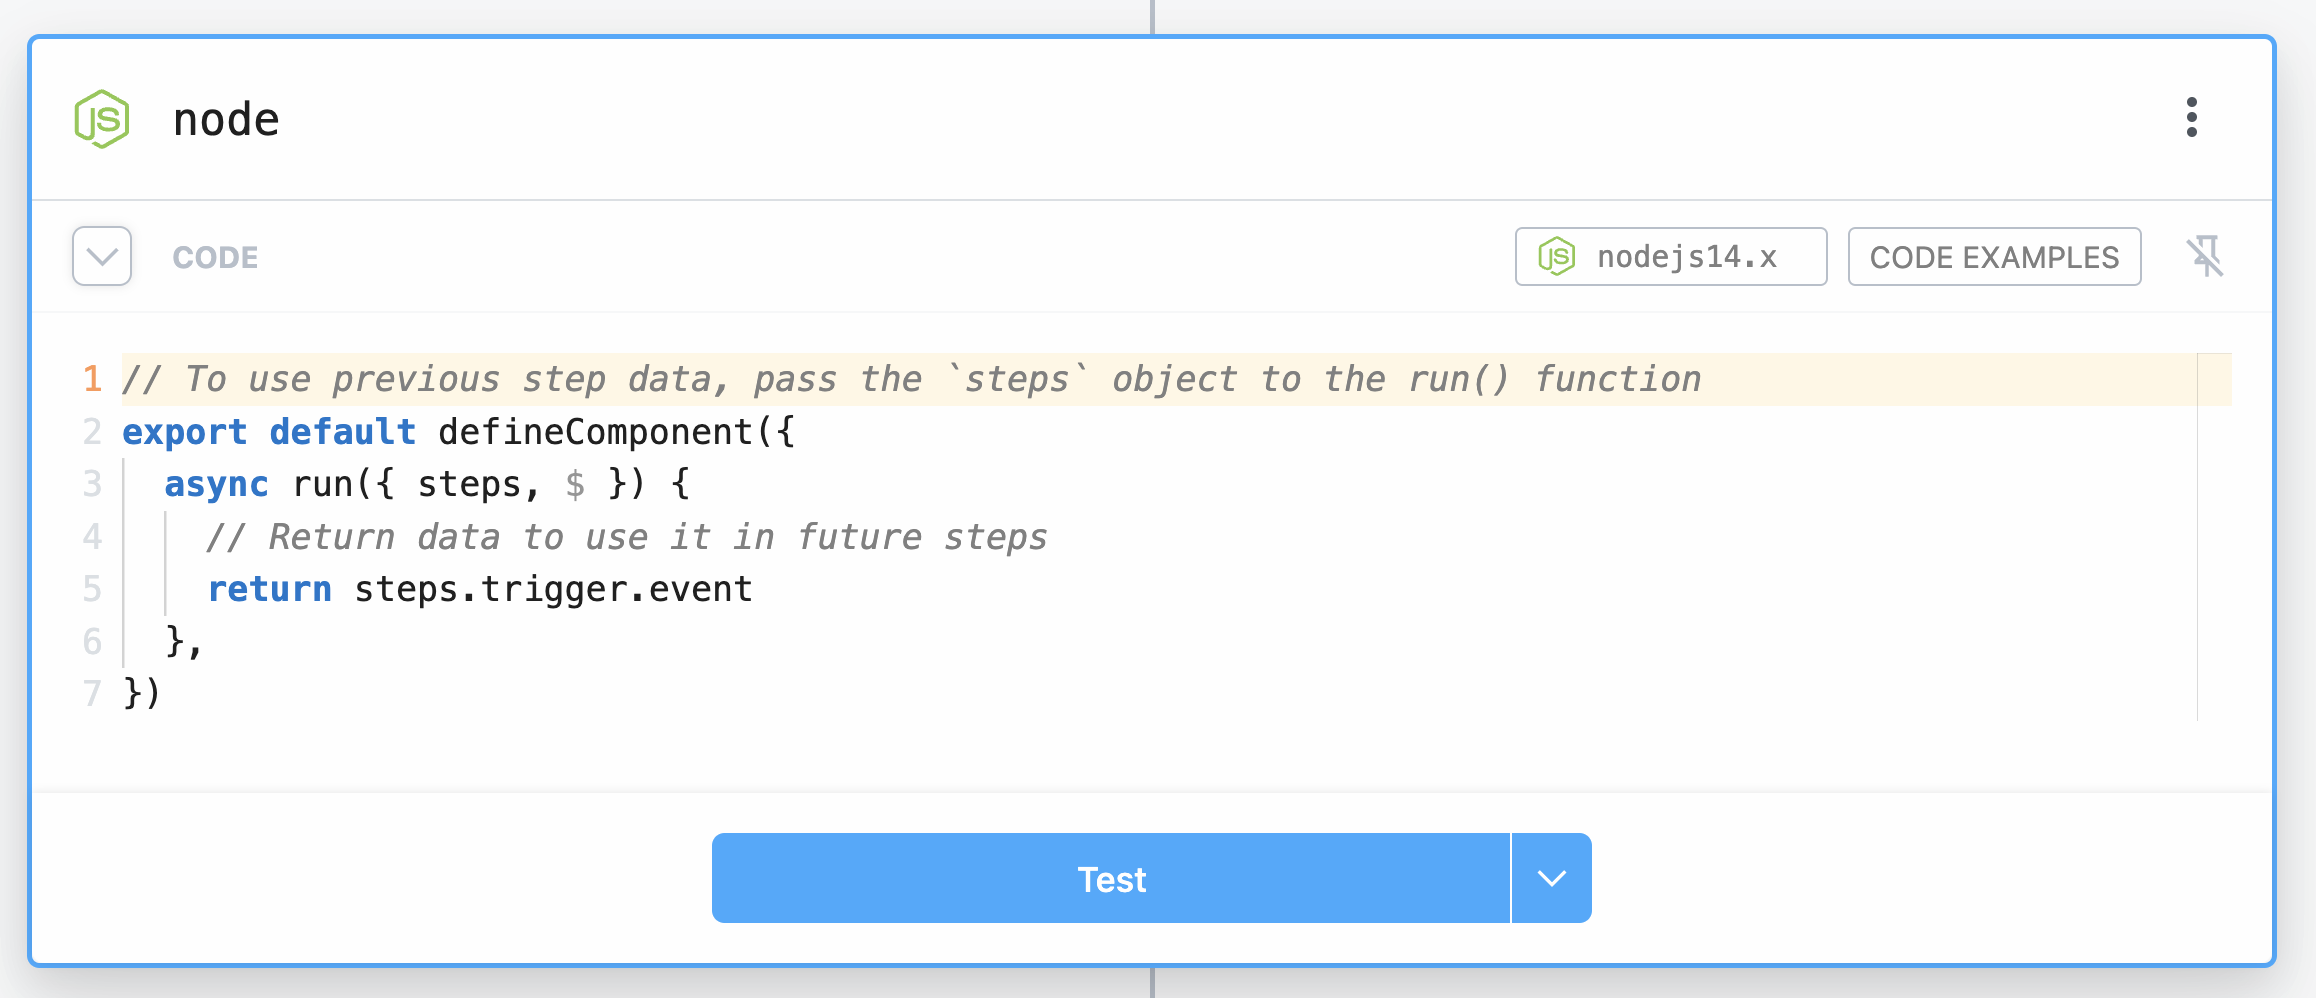
Select all the code here, delete it, and paste in the following code block:
export default defineComponent({
  async run({ steps, $ }) {

    const results = {
      title: "",
      transcript: "",
      summary: "",
      additional_info: ""
    }


    const originalTranscript = steps.create_transcription.$return_value.transcription

    function splitStringIntoSentences(str) {


      if (!str) {
        const noTranscript = ["Null argument"]
        return noTranscript
      }


      if (str.match(/(?:^|[^.!?]+)[.!?]+s?/g) == null) {
        str += str + "."
      }


      const sentences = str.match(/(?:^|[^.!?]+)[.!?]+s?/g) || []


      const result = []

      if (sentences.length > 1) {


        for (let i = 0; i < sentences.length; i += 3) {
          result.push(sentences.slice(i, i + 3).join(' '))
        }
      } else {


        const maxLength = 800;
        const words = sentences[0].split(' ');
        let currentLine = '';

        for (let i = 0; i < words.length; i++) {
          const word = words[i];
          const lengthWithWord = currentLine.length + word.length;

          if (lengthWithWord <= maxLength) {
            currentLine += (currentLine.length === 0 ? '' : ' ') + word;
          } else {
            result.push(currentLine);
            currentLine = word;
          }
        }

        if (currentLine.length > 0) {
          result.push(currentLine);
        }
      }

      return result
    }

    function joinArrayWithBlankLine(arr) {
      return arr.join('nn')
    }


    const transcriptArray = splitStringIntoSentences(originalTranscript)

    results.transcript = joinArrayWithBlankLine(transcriptArray)


    const summary = steps.chat.$return_value.choices[0].message.content

    function splitSummary(str) {
      const titleDelimiter = /^.*nn/
      const summaryDelimiter = /ns*?--Summary--s*?ns*/
      const additionalInfoDelimiter = /ns*?--Additional Info--s*?ns*/;

      const titleMatch = str.match(titleDelimiter)
      const summaryMatch = str.match(summaryDelimiter)
      const additionalInfoMatch = str.match(additionalInfoDelimiter)

      if (!titleMatch || !summaryMatch || !additionalInfoMatch) {
        console.log("One or more delimiters not found")
        return str
      } else {
        const titleIndex = titleMatch.index
        const summaryIndex = summaryMatch.index
        const additionalInfoIndex = additionalInfoMatch.index

        results.title = str.slice(0, titleIndex + titleMatch[0].length).trim().replace(/^#s*/,"")
        results.summary = str.slice(summaryIndex + summaryMatch[0].length, additionalInfoIndex).trim()
        results.additional_info = str.slice(additionalInfoIndex + additionalInfoMatch[0].length).trim()
      }
    }

    splitSummary(summary)


    return results

  },
})
As mentioned above, this code does two things.
First, it splits the transcript into an array of 3-sentence paragraphs. It then merges all those array elements back into a single string, but with a blank line inserted between each paragraph, like so:
Since 2014, my YouTube channel has gained more than 2. 5 million subscribers and over 160 million views.  I've learned a lot of lessons in that time, and I have several rules that I believe have contributed to my channel's growth.

This is the number one rule.  If I could only share one piece of advice with you, it would be this one.  I call it the 1% rule.

Here it is.  Put yourself on a publishing schedule.  Daily, weekly, once a month, whatever it is, the right schedule for you is going to vary, but having a schedule is key.
This will allow the Pipedream’s no-code module for Notion to send each paragraph as a separate text block, rather than sending one massive wall of text to Notion.
Secondly, the extractSummary() function splits the ChatGPT response into three sections:
- Title
- Summary
- Lists (action items, main points, etc.)
Before hitting test, you may want to rename this step using the title field at the top. node isn’t very descriptive, so I’m renaming it formatter.
Once you’ve set a name, hit Test, and you’ll see that this step returns an object with four properties – title, transcript, summary, and additional_info.

Next, we’ll send all of these to Notion!
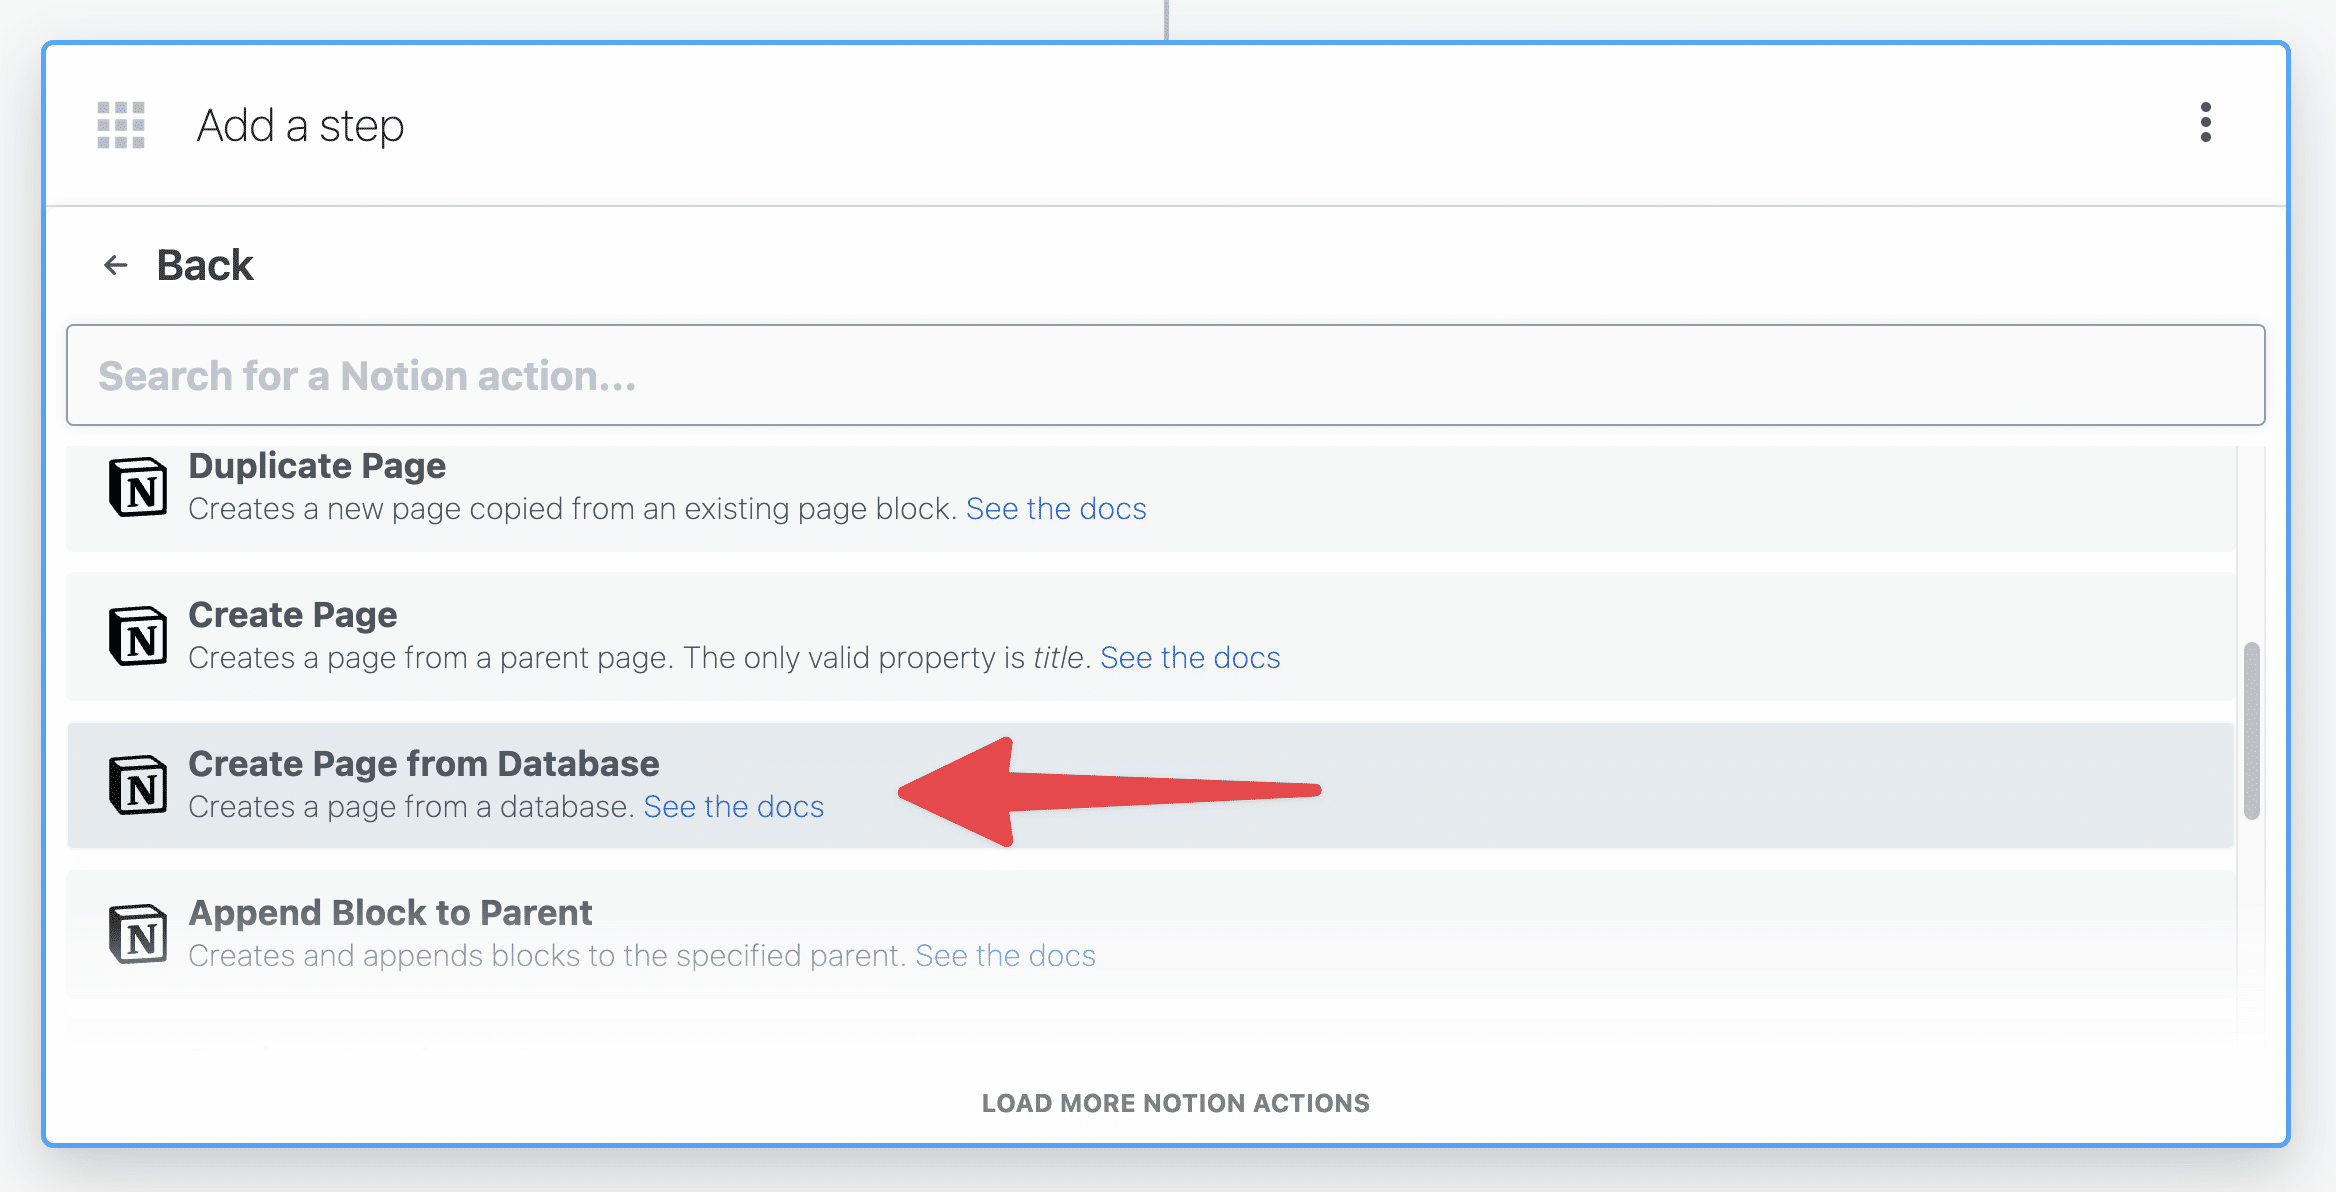
Hit the + button to add another step. Select the Notion app, then choose the Create Page from Database action.
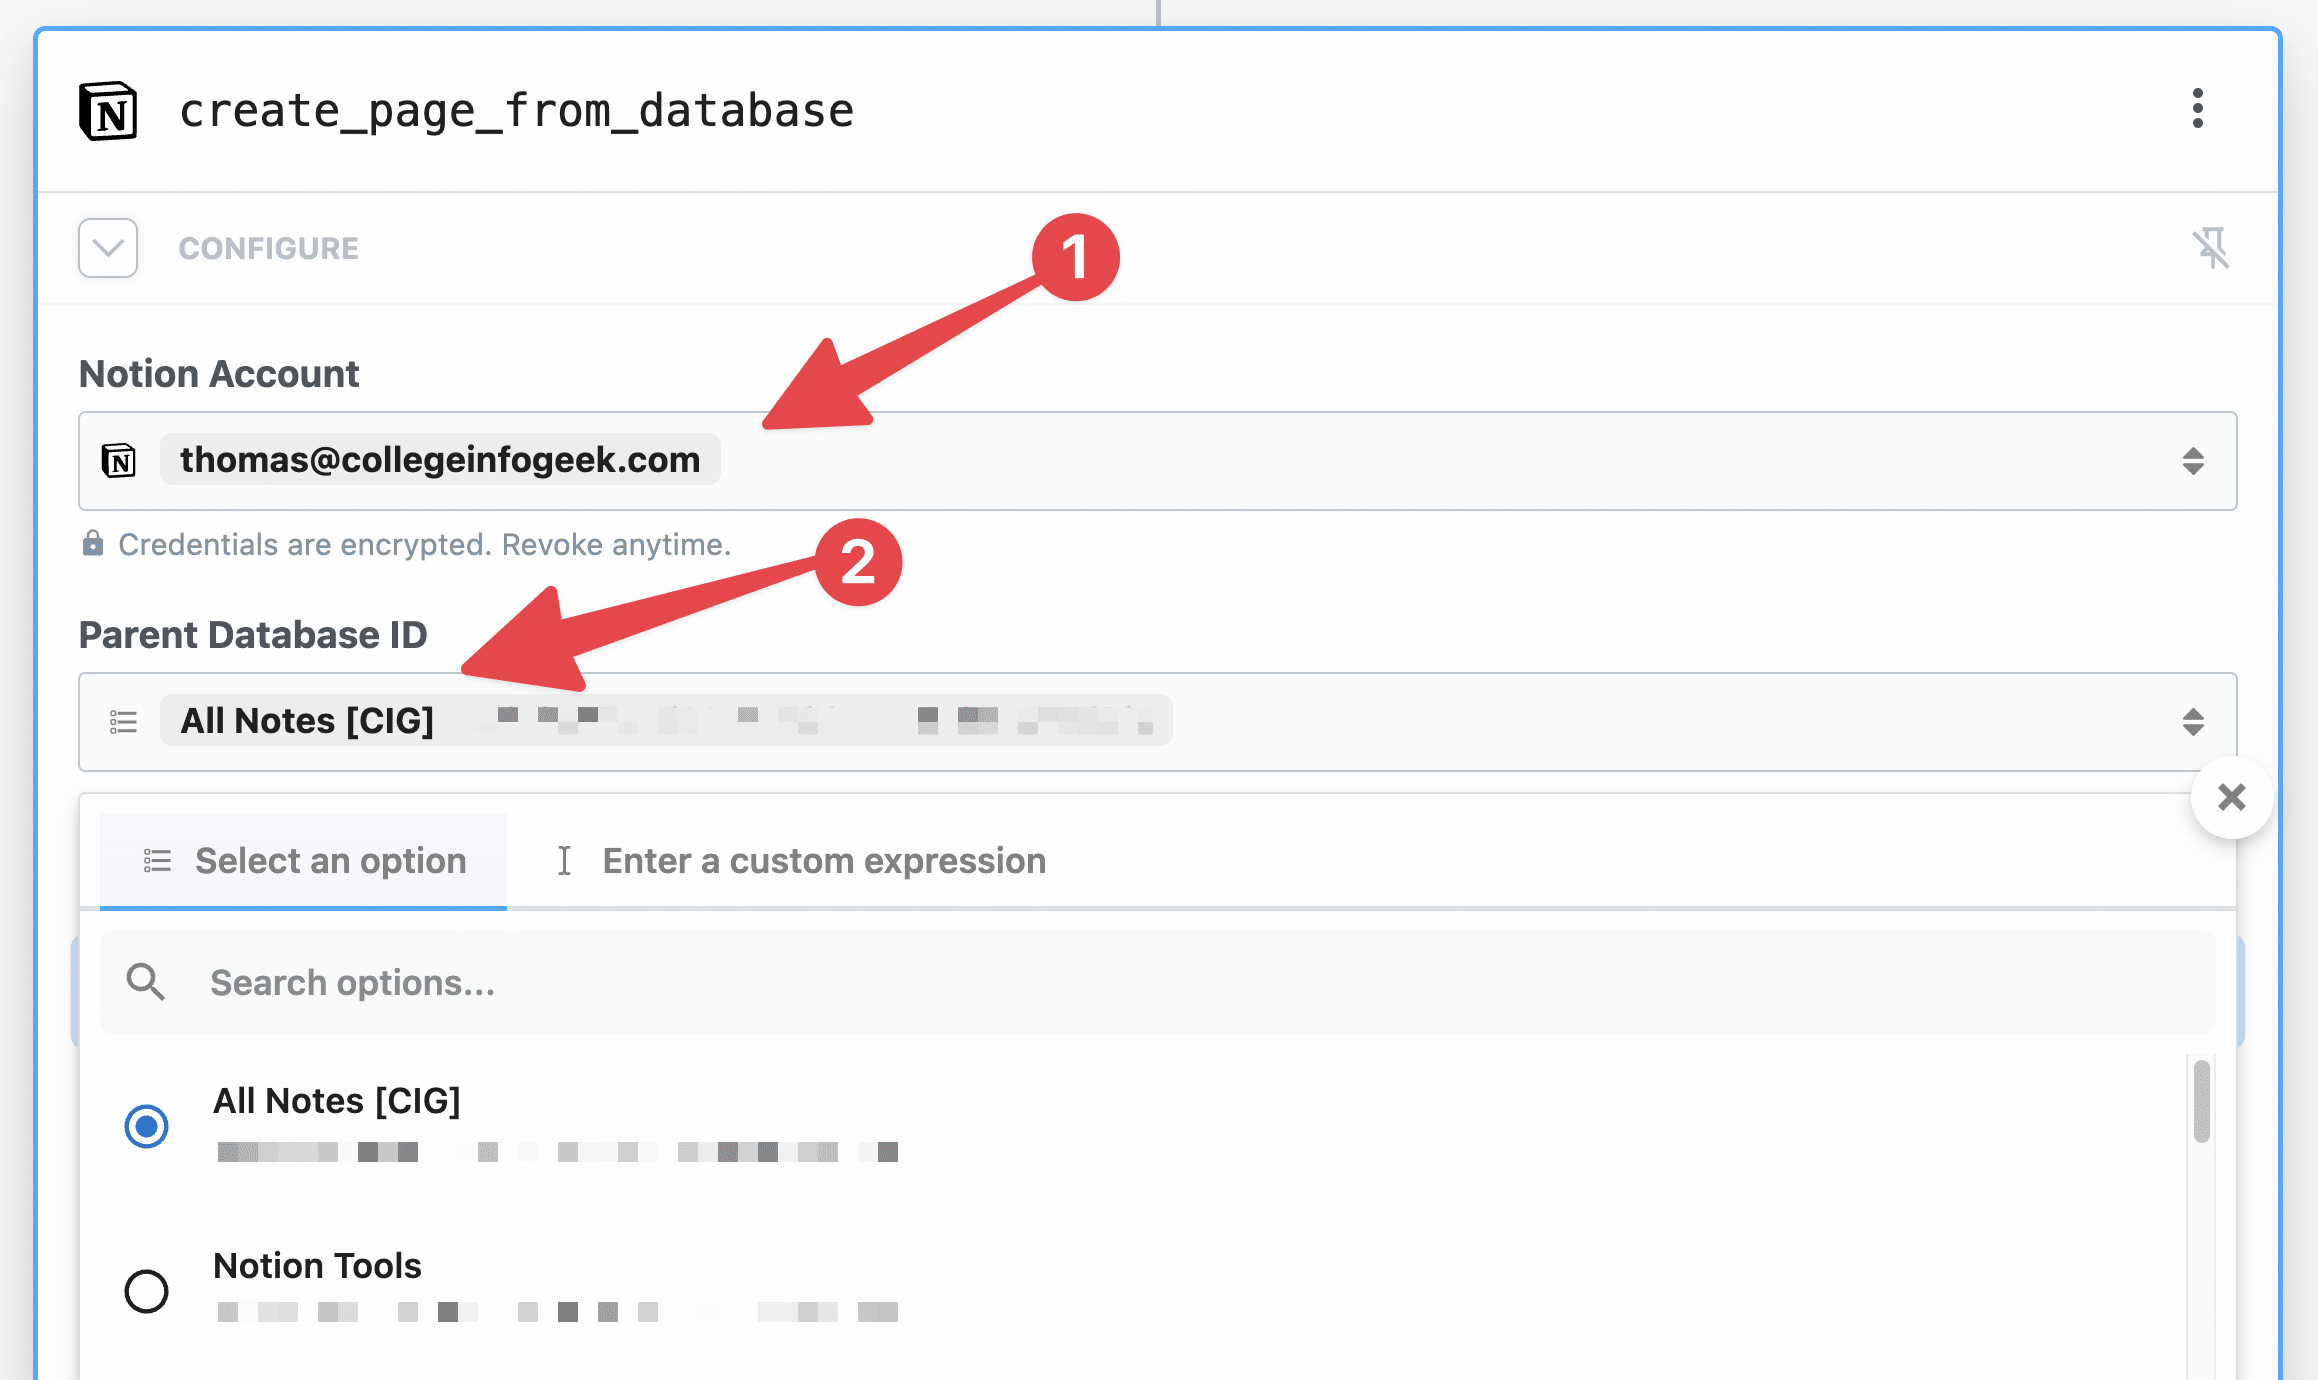
Do the following:
- Authenticate your Notion account.
- Be sure to give Pipedream access to the database you want to use for these new pages.
- Select your target database in the Parent Database ID field.
If the Select an Option tab doesn’t work correctly, you can also enter your database ID manually. Here’s how to find it.
From your Notion database’s home page (not a page containing a linked database view), click the ••• menu and click Copy Link.
This will copy the entire URL of your database to the clipboard. It will look something like this:
https:
Your database ID is the bolded portion of the snippet above – it is the string of characters after the final / character and before the ?v= characters.
This means that my database’s ID is:
8a37b5ad471a4153921eae0aaadb2c20
If I paste this string directly into the Parent Database ID field, it’ll work perfectly.
In the Page Content field, we can start to build the structure of our page. Pipedream has done a lot of the heavy lifting for us here, so we can just write Markdown text. We can also use Paths from previous steps to bring in dynamic content.
Provided your steps are named the same as mine, you should be able to copy this text directly in:
{{steps.formatter.$return_value.summary}}

# Transcript

{{steps.formatter.$return_value.transcript}}

# Additional Info
{{steps.formatter.$return_value.additional_info}}
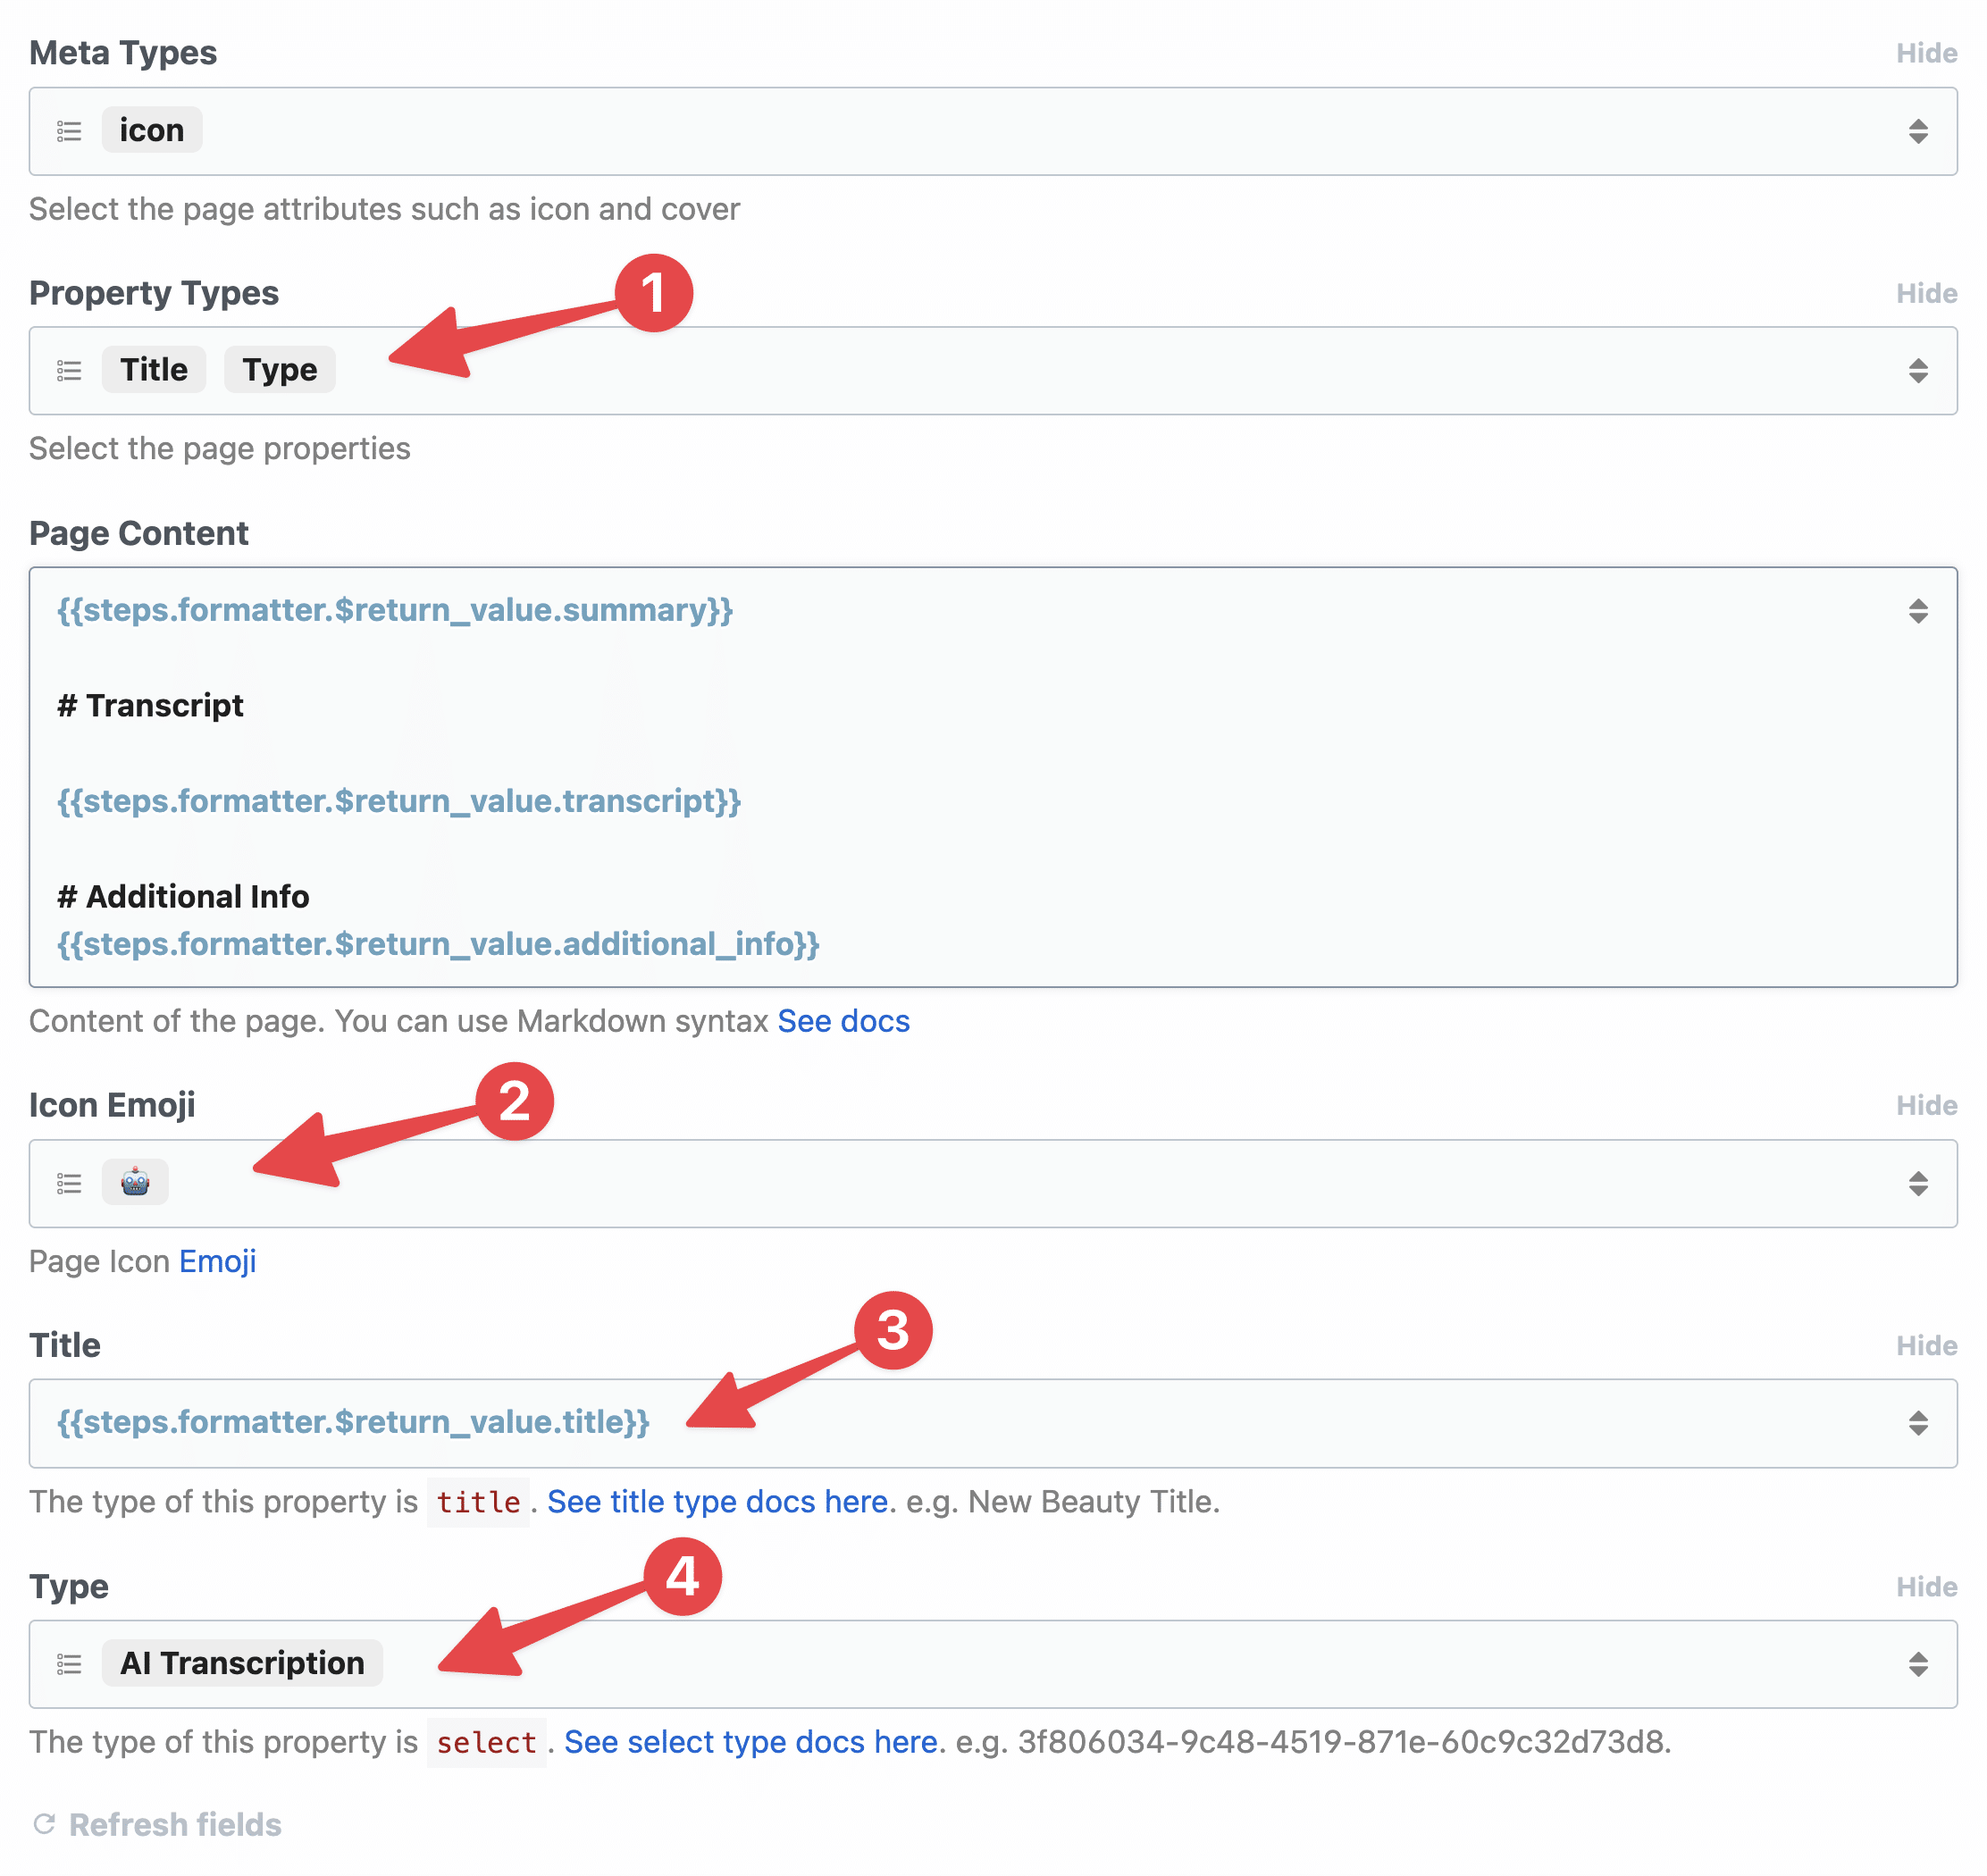
In the Optional Fields section, click Property Types. This will allow you to set the values of different properties in your database. You can also add the Meta Types option if you want to set a Page Icon or Page Cover.
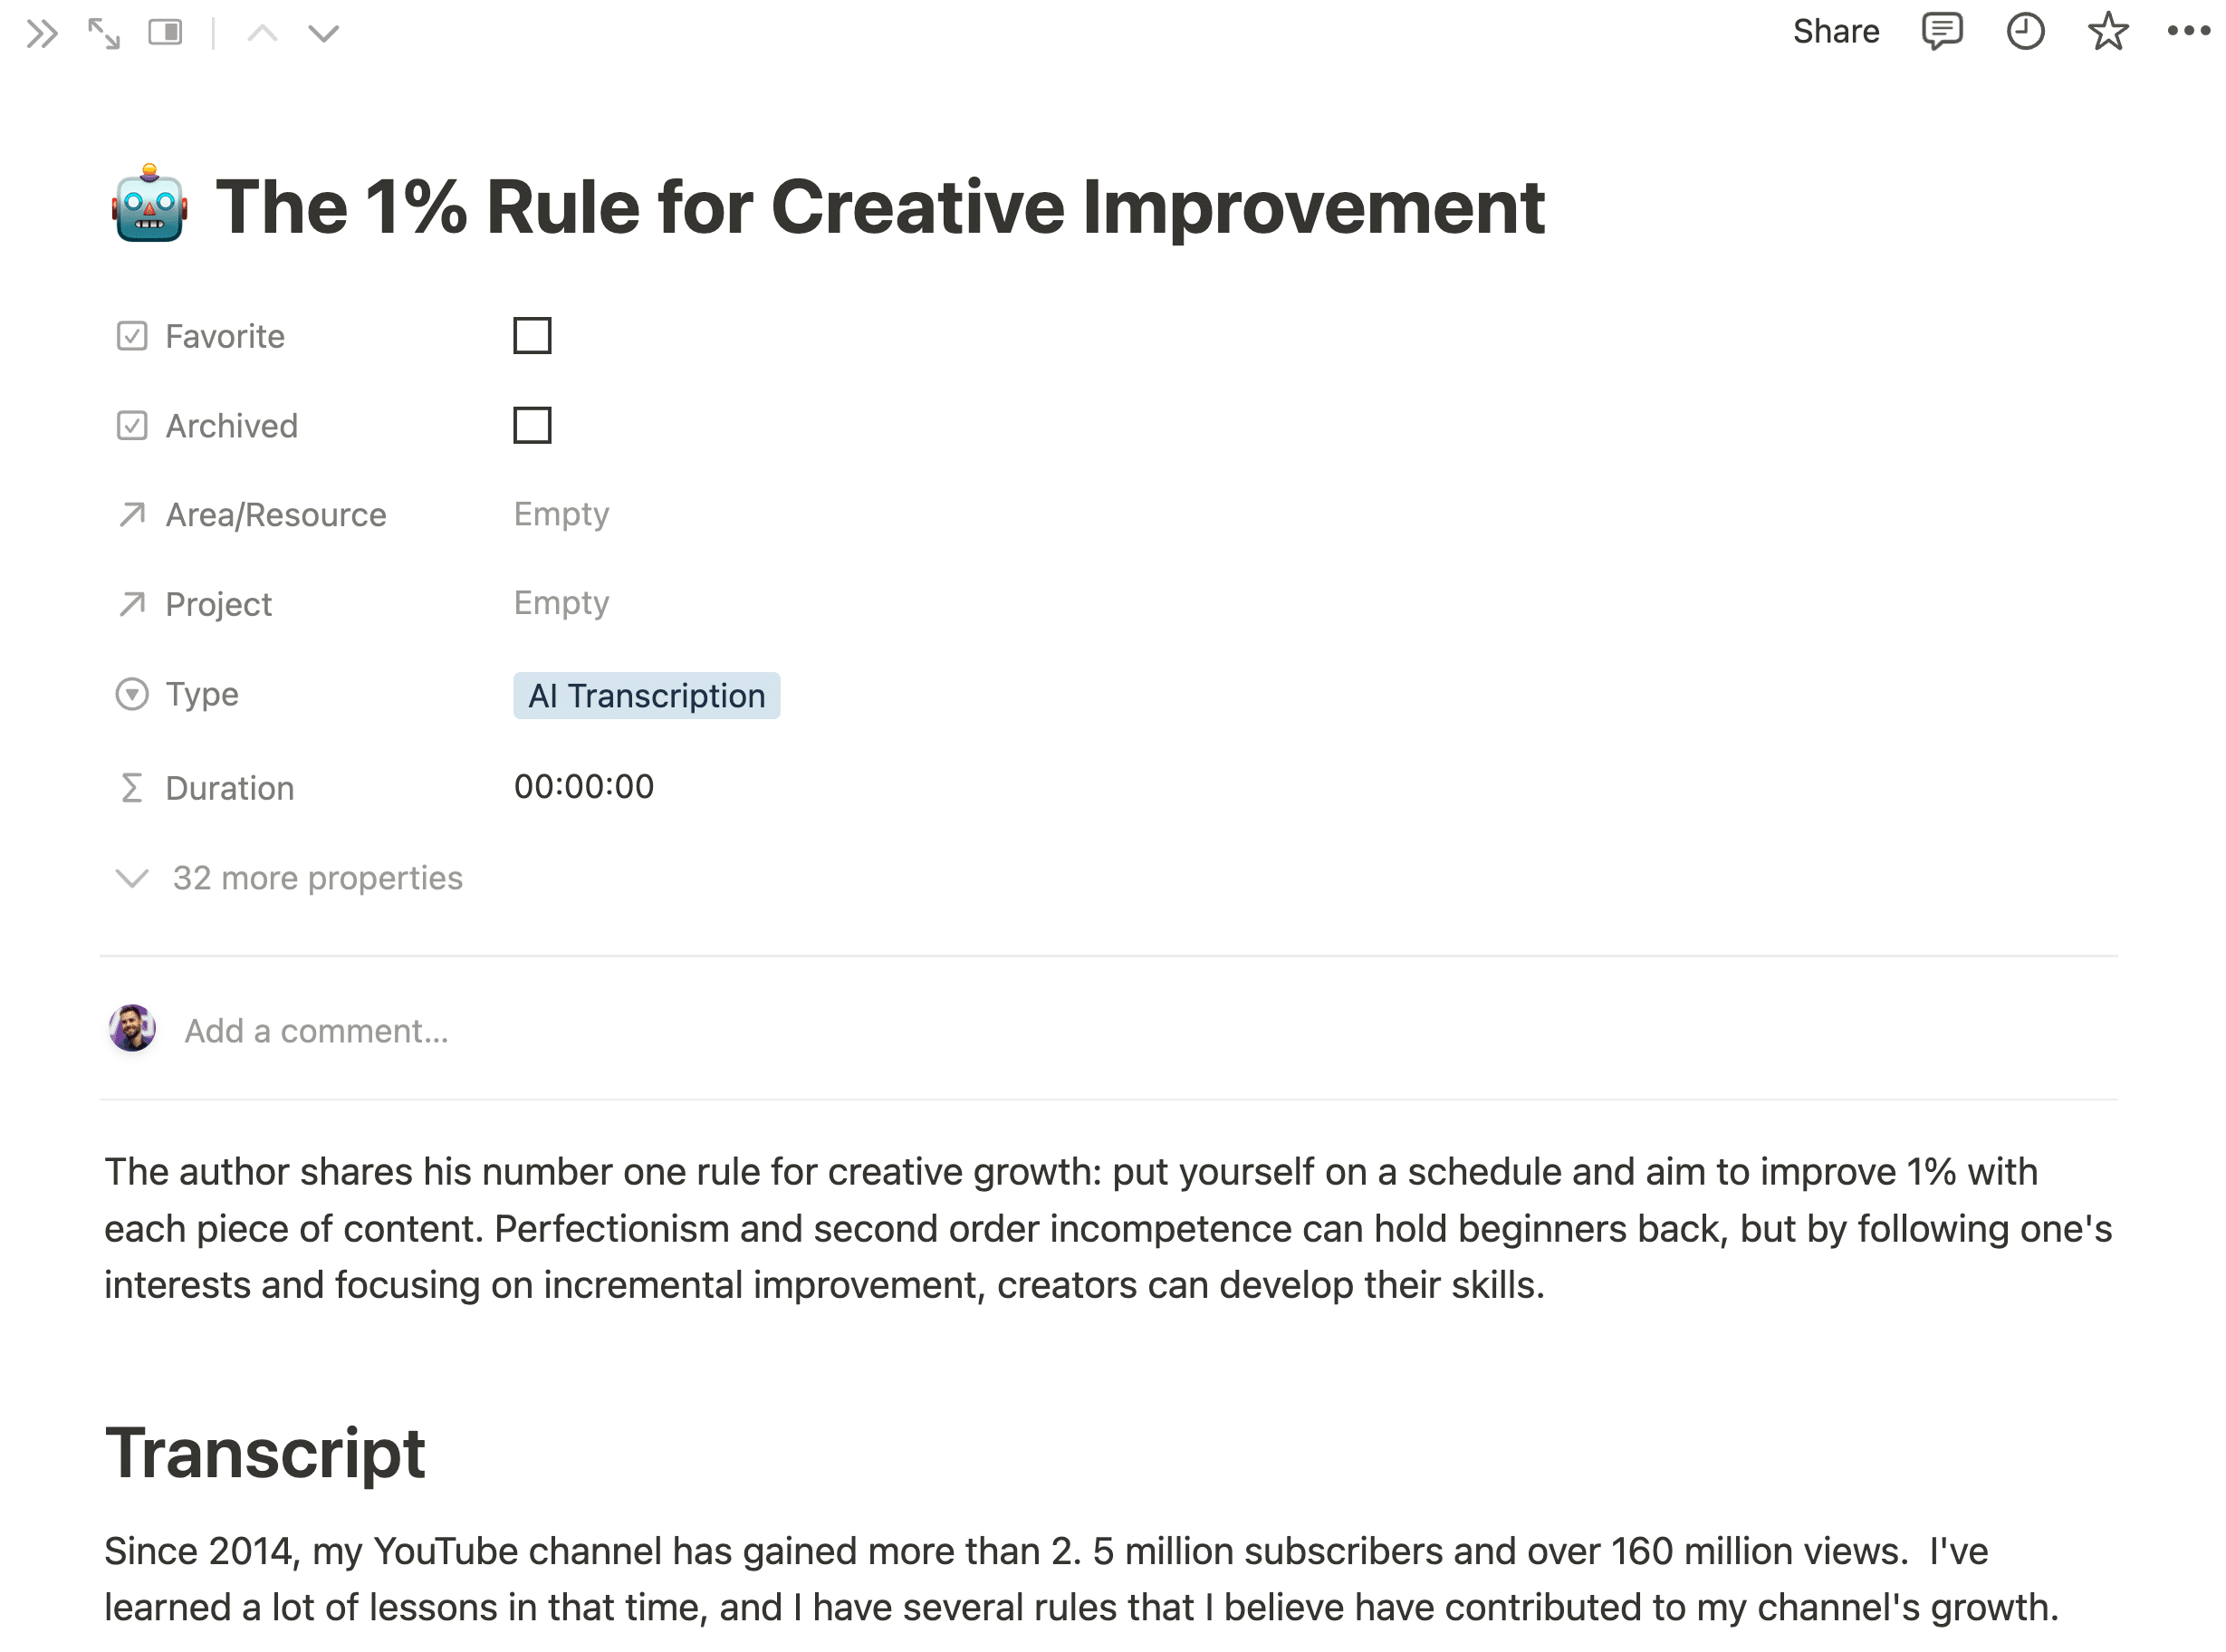
I’ve done so, and set my page to have the following values:
- Meta types: Icon
- Property types: Title (usually is “Name” in Notion databases), Type (a multi-select)
- Icon emoji: 🤖
- Title:
{{steps.formatter.$return_value.title}} - Type: “AI Transcription”
Note: Your property options will depend on the properties you have set in your Notion database. I’m using Ultimate Brain, which has a robust Notes database that includes the Types property.
Once you have all these fields set up, hit Test!
If all goes well, you’ll get a success message:
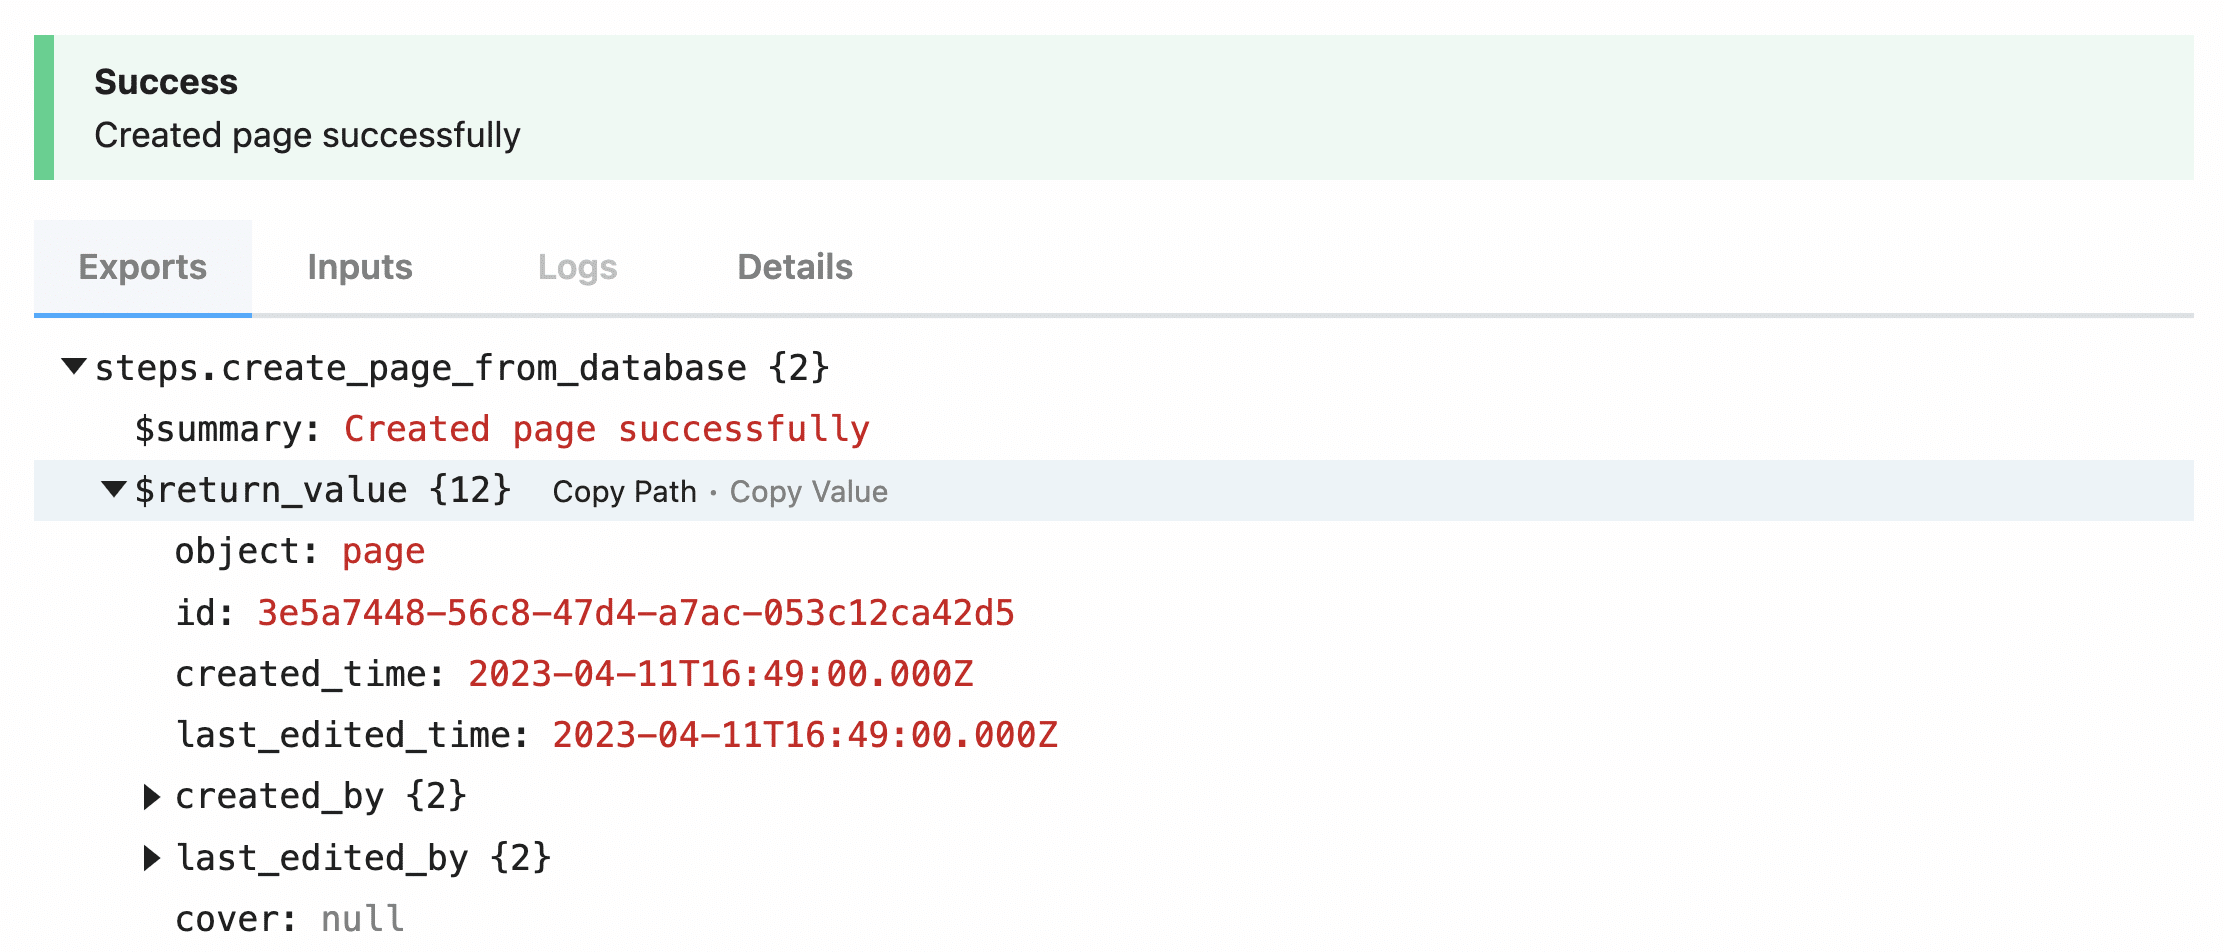
You’ll also see your new Notion page within your selected database. Congrats!
Deploy the Workflow and Adjust Timeout
To get your workflow ready for prime-time, hit the Deploy button near the top of the page.
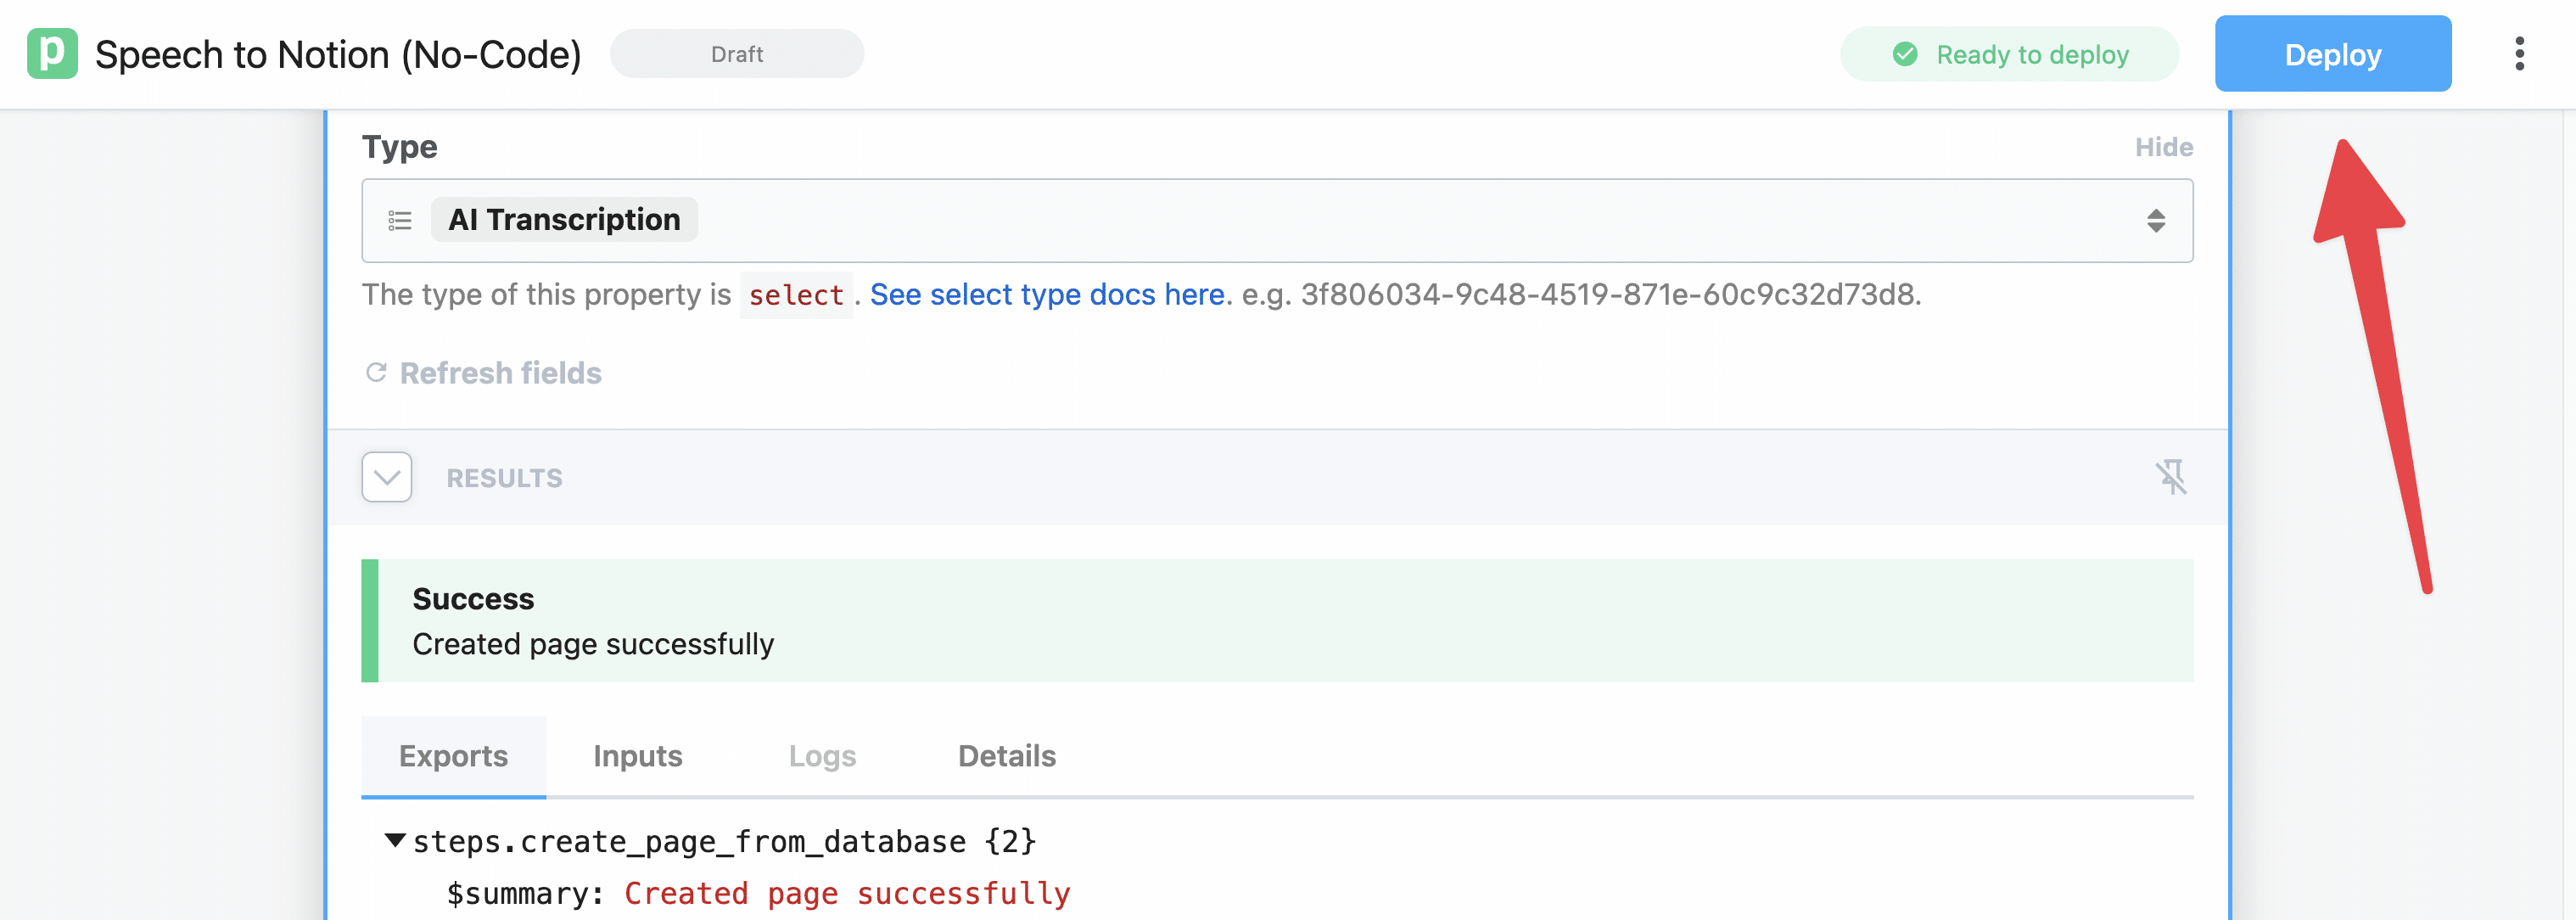
This will switch your workflow from Test Mode to Live Mode. Once deployed, the workflow will trigger anytime the trigger module receives a new event.
From here, you can simply upload voice memos and other audio files to your chosen Google Drive folder, and they’ll be automatically transcribed and summarized.
However, you may run into one common error.
By default, Pipedream workflows will time out if they aren’t completed in 30 seconds.
Whisper often takes longer than that to finish lengthier transcriptions, so you should adjust your workflow’s timeout settings to compensate.
On your workflow’s main page, hit the Settings tab.

Under Execution Controls, set a longer Timeout value (in seconds), then click Save.
I’ve set mine to 180 seconds (3 minutes), which I’ve found to be sufficient even for transcribing 1-hour podcast episodes.
Note that 1 credit will be used for every 30-second block of compute time; however, setting a high Timeout value won’t always charge for that number of seconds.
In this case, 180 seconds is the max value – but if a particular run only takes 20 seconds, then it’ll only use one credit.

New: The Pipedream team has provided me with a link that will automatically add this entire workflow to your workspace. Once you have a Pipedream account, you can click this link to automatically create the entire workflow. You’ll still need to authenticate the apps, set Include Link to True in the trigger step, and set an environment variable for your database ID. If you run into problems, try following this guide step-by-step instead.
Welcome to the “code-heavy” version of this workflow. This version is much more robust, as it’s able to flexibly deal with some of the constraints involved in using the ChatGPT and Notion APIs. Namely:
- It can split up a long transcript and make multiple calls to ChatGPT, which gets around the 4,097-token limit that gpt-3.5-turbo has
- It can add additional block types to the Notion page – including a Table of Contents block
You should be able to simply copy and paste my code into your Pipedream steps to get this working, which means that you don’t necessarily need to know JavaScript to use it.
You’ll find all of these code steps in each of the instructional steps below, but I’ve also included them here in this convenient toggle.
You can come back here to reference code without needing to jump around the tutorial (which is quite lengthy, I know).
Note that the step names are important as they’re used for the export values that are referenced in subsequent steps. For example, the Download_to_tmp returns this object: steps.Download_to_tmp.$return_value.tmpPath – which is referenced in a future step.
All of this code is JavaScript, so make sure you use the Node app in Pipedream for each step.
Step 1: Trigger
The trigger step uses the Dropbox → New File action, and doesn’t use any code. Include Link must be set to True.
Step 2: Download_to_tmp
Node → Run Node Code
import stream from "stream";
import { promisify } from "util";
import fs from "fs";
import got from "got";

export default defineComponent({
  async run({ steps, $ }) {


    if (steps.trigger.event.size > 100000000) {
      throw new Error("File is too large. Files must be mp3 or m4a filels under 100mb")
    }

    try {

        const mime = steps.trigger.event.path_lower.match(/.w+$/)[0]


        if (mime !== '.mp3' && mime !== '.m4a') {
            throw new Error("Unsupported file type. Only mp3 and m4a files are supported.");
        }


        const tmpPath = `/tmp/recording${mime}`


        const pipeline = promisify(stream.pipeline);
        await pipeline(
        got.stream(steps.trigger.event.link),
        fs.createWriteStream(tmpPath)
        );


        const results = {
        "tmpPath": tmpPath,
        "mimetype": mime
        }

        return results
    } catch (error) {

        console.error(error);
        throw error;
    }
  }
})
Step 3: get_duration
Node → Run Node Code
import { parseFile } from 'music-metadata';
import { inspect } from 'util';

export default defineComponent({
  async run({ steps, $ }) {

    try {

      const filePath = steps.Download_to_tmp.$return_value.tmpPath

      if (!filePath) {
        throw new Error("File path is missing or invalid.");
      }


      let dataPack;
      try {
        dataPack = await parseFile(filePath);
      } catch (error) {
        throw new Error("Failed to read audio file metadata. The file format might be unsupported or corrupted, or the file might no longer exist at the specified file path (which is in temp storage).");
      }


      const duration = Math.round(await inspect(dataPack.format.duration, { showHidden: false, depth: null }));
      return duration;
    } catch (error) {

      console.error(error);
      throw new Error(`An error occurred while processing the audio file: ${error.message}`);
    }


  },
})
Step 4: create_transcription
This step uses the OpenAI (ChatGPT) → Create Transcription action, and doesn’t use any code.
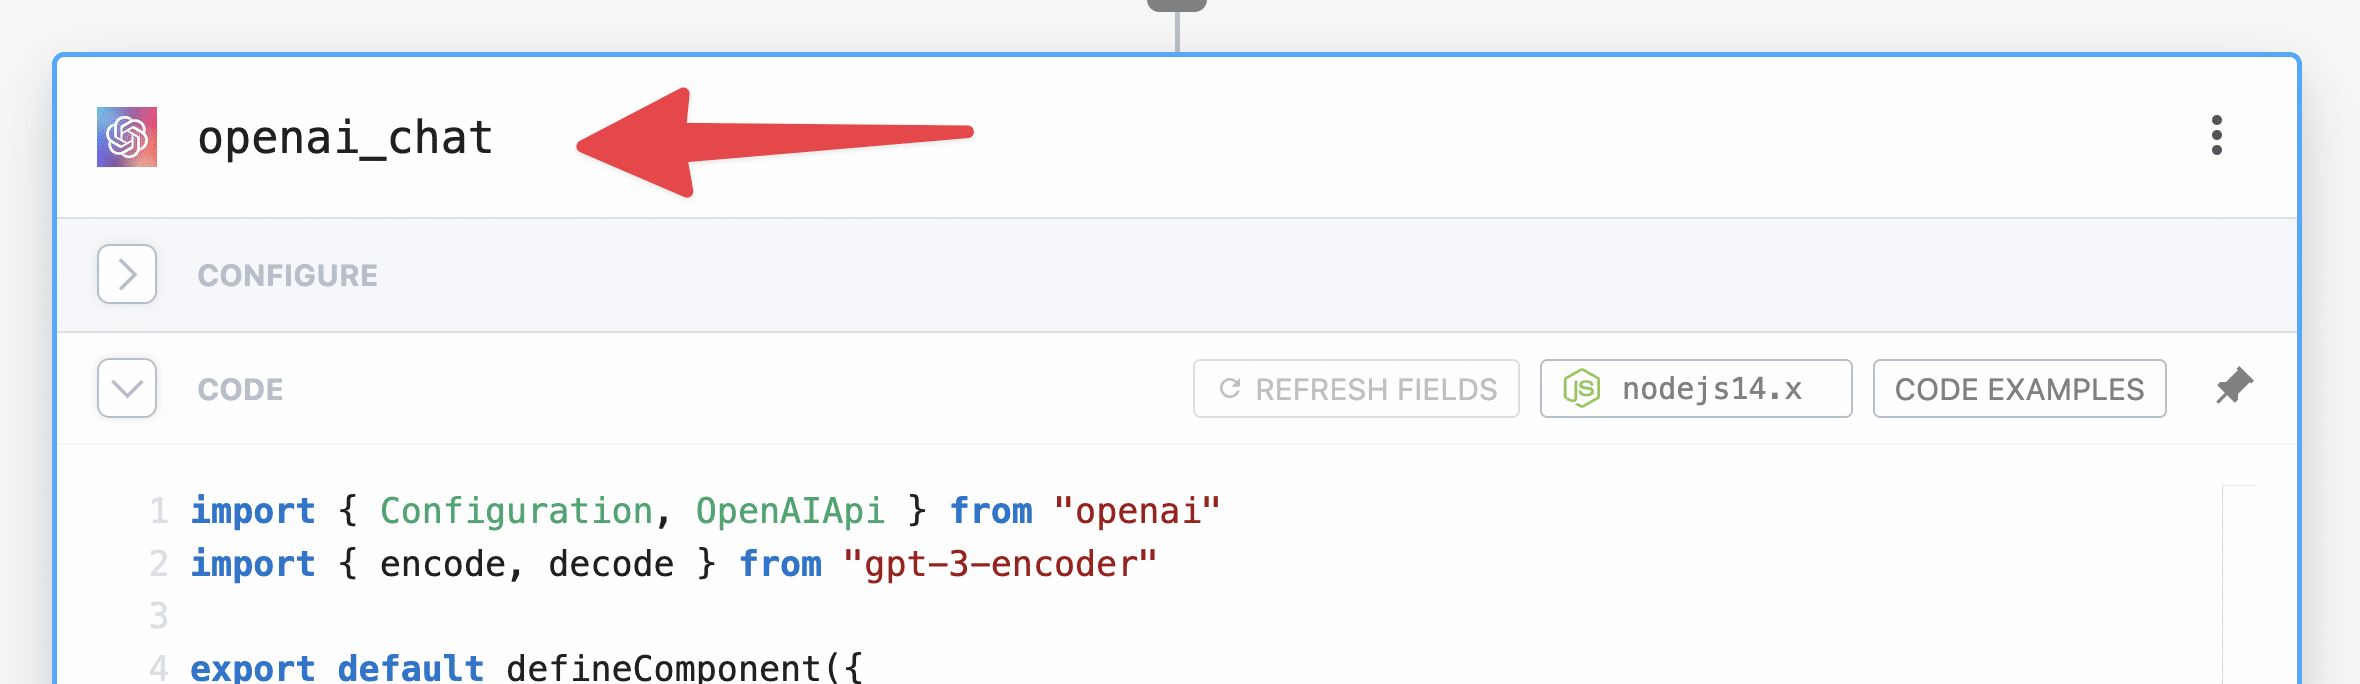
Step 5: openai_chat
OpenAI (ChatGPT) → Use any OpenAI (ChatGPT) API in Node.js
import { Configuration, OpenAIApi } from "openai"
import { encode, decode } from "gpt-3-encoder"

export default defineComponent({
  props: {
    openai: {
      type: "app",
      app: "openai",
    }
  },
  async run({steps, $}) {


    const transcript = steps.create_transcription.$return_value.transcription


    const maxTokens = 2000


    const openAIkey = this.openai.$auth.api_key
    const configuration = new Configuration({
      apiKey: openAIkey,
    });
    const openai = new OpenAIApi(configuration);


    function splitTranscript(encodedTranscript, maxTokens) {
      const stringsArray = []
      let currentIndex = 0

      while (currentIndex < encodedTranscript.length) {
        let endIndex = Math.min(currentIndex + maxTokens, encodedTranscript.length)


        while (endIndex < encodedTranscript.length && decode([encodedTranscript[endIndex]]) !== ".") {
          endIndex++
        }


        if (endIndex < encodedTranscript.length) {
          endIndex++
        }


        const chunk = encodedTranscript.slice(currentIndex, endIndex)
        stringsArray.push(decode(chunk))

        currentIndex = endIndex
      }

      return stringsArray
    }

    const encoded = encode(transcript)

    const stringsArray = splitTranscript(encoded, maxTokens)
    const result = await sendToChat(stringsArray)
    return result


    async function sendToChat (stringsArray) {

      const resultsArray = []

      for (let arr of stringsArray) {


        const prompt = `Analyze the transcript provided below, then provide the following:
Key "title:" - add a title.
Key "summary" - create a summary.
Key "main_points" - add an array of the main points. Limit each item to 100 words, and limit the list to 10 items.
Key "action_items:" - add an array of action items. Limit each item to 100 words, and limit the list to 5 items.
Key "follow_up:" - add an array of follow-up questions. Limit each item to 100 words, and limit the list to 5 items.
Key "stories:" - add an array of an stories, examples, or cited works found in the transcript. Limit each item to 200 words, and limit the list to 5 items.
Key "arguments:" - add an array of potential arguments against the transcript. Limit each item to 100 words, and limit the list to 5 items.
Key "related_topics:" - add an array of topics related to the transcript. Limit each item to 100 words, and limit the list to 5 items.
Key "sentiment" - add a sentiment analysis

Example formatting:

{
    "title": "Notion Buttons",
    "summary": "A collection of buttons for Notion",
    "action_items": [
        "item 1",
        "item 2",
        "item 3"
    ],
    "follow_up": [
        "item 1",
        "item 2",
        "item 3"
    ],
    "arguments": [
        "item 1",
        "item 2",
        "item 3"
    ],
    "related_topics": [
        "item 1",
        "item 2",
        "item 3"
    ]
    "sentiment": "positive"
}

Ensure that the final element of any array within the JSON object is not followed by a comma.

Transcript:

        ${arr}`

        let retries = 3
        while (retries > 0) {
          try {
            const completion = await openai.createChatCompletion({
              model: "gpt-3.5-turbo",
              messages: [{role: "user", content: prompt}, {role: "system", content: "You are an assistant that only speaks JSON. Do not write normal text."}],
              temperature: 0.2
            });

            resultsArray.push(completion)
            break
          } catch (error) {
            if(error.response && error.response.status === 500) {
              retries--
              if (retries == 0) {
                throw new Error("Failed to get a response from OpenAI Chat API after 3 attempts.")
              }
              console.log("OpenAI Chat API returned a 500 error. Retrying...")
            } else {
              throw error
            }
          }
        }

      }

      return resultsArray
    }

  },
})
Step 6: format_chat
Node → Run Node Code
export default defineComponent({
  async run({ steps, $ }) {

    const resultsArray = []
    for (let result of steps.openai_chat.$return_value) {


      function removeTrailingCommas(jsonString) {
        const regex = /,s*(?=])/g;
        return jsonString.replace(regex, '');
      }


      const jsonString = result.data.choices[0].message.content
        .replace(/^[^{]*?{/, '{')
        .replace(/}[^}]*?$/,'}')

      const cleanedJsonString = removeTrailingCommas(jsonString)

      let jsonObj
      try {
        jsonObj = JSON.parse(cleanedJsonString)
      } catch (error) {
        console.error("Error while parsing cleaned JSON string:")
        console.error(error)
        console.log("Original JSON string:", jsonString)
        console.log(cleanedJsonString)
        console.log("Cleaned JSON string:", cleanedJsonString)
        jsonObj = {}
      }

      const response = {
        choice: jsonObj,
        usage: !result.data.usage.total_tokens ? 0 : result.data.usage.total_tokens
      }

      resultsArray.push(response)
    }

    const chatResponse = {
      title: resultsArray[0].choice.title,
      sentiment: resultsArray[0].choice.sentiment,
      summary: [],
      main_points: [],
      action_items: [],
      stories: [],
      arguments: [],
      follow_up: [],
      related_topics: [],
      usageArray: []
    }

    for (let arr of resultsArray) {
      chatResponse.summary.push(arr.choice.summary)
      chatResponse.main_points.push(arr.choice.main_points)
      chatResponse.action_items.push(arr.choice.action_items)
      chatResponse.stories.push(arr.choice.stories)
      chatResponse.arguments.push(arr.choice.arguments)
      chatResponse.follow_up.push(arr.choice.follow_up)
      chatResponse.related_topics.push(arr.choice.related_topics)
      chatResponse.usageArray.push(arr.usage)
    }

    console.log(chatResponse.related_topics)

    function arraySum (arr) {
      const init = 0
      const sum = arr.reduce((accumulator, currentValue) => accumulator + currentValue, init)
      return sum
    }

    const finalChatResponse = {
      title: chatResponse.title,
      summary: chatResponse.summary.join(' '),
      sentiment: chatResponse.sentiment,
      main_points: chatResponse.main_points.flat(),
      action_items: chatResponse.action_items.flat(),
      stories: chatResponse.stories.flat(),
      arguments: chatResponse.arguments.flat(),
      follow_up: chatResponse.follow_up.flat(),
      related_topics: Array.from(new Set(chatResponse.related_topics.flat().map(item => item.toLowerCase()))).sort(),
      tokens: arraySum(chatResponse.usageArray)
    }

    return finalChatResponse

  },
})
Step 7: make_paragraphs
Node → Run Node Code
import natural from 'natural'

export default defineComponent({
  async run({ steps, $ }) {

    const tokenizer = new natural.SentenceTokenizer()
    const transcriptSentences = tokenizer.tokenize(steps.create_transcription.$return_value.transcription)
    const summarySentences = tokenizer.tokenize(steps.format_chat.$return_value.summary)

    const sentencesPerParagraph = 3

    function sentenceGrouper(arr) {
      const newArray = []

      for (let i = 0; i < arr.length; i+= sentencesPerParagraph) {
        const group = []
        for (let j = i; j < i + sentencesPerParagraph; j++) {
          if (arr[j]) {
            group.push(arr[j])
          }
        }

        newArray.push(group.join(' '))
      }

      return newArray
    }

    function charMaxChecker(arr) {
      const sentenceArray = arr.map((element) => {
          if (element.length > 800) {
            const pieces = element.match(/.{800}[^s]*s*/g);
            if (element.length > pieces.join('').length) {
                pieces.push(element.slice(pieces.join('').length));
            }
            return pieces;
        } else {
            return element;
        }
      }).flat()

      return sentenceArray
    }

    const paragraphs = sentenceGrouper(transcriptSentences)
    const lengthCheckedParagraphs = charMaxChecker(paragraphs)

    const summaryParagraphs = sentenceGrouper(summarySentences)
    const lengthCheckedSummaryParagraphcs = charMaxChecker(summaryParagraphs)

    const allParagraphs = {
      transcript: lengthCheckedParagraphs,
      summary: lengthCheckedSummaryParagraphcs
    }

    return allParagraphs

  },
})
Step 8: notion
Notion → Use any Notion API in Node.js
import { Client } from "@notionhq/client"
export default defineComponent({
  props: {
    notion: {
      type: "app",
      app: "notion",
    }
  },
  async run({steps, $}) {


    const notion = new Client({auth: this.notion.$auth.oauth_access_token});


    const dbID = process.env.CIG_ALL_NOTES_DB_ID


    const whisperRate = 0.006
    const gptTurboRate = 0.002


    const mp3Link = encodeURI("https://www.dropbox.com/home" + steps.trigger.event.path_lower);


    const duration = steps.get_duration.$return_value


    const today = new Date();
    const year = today.getFullYear();
    const month = String(today.getMonth() + 1).padStart(2, '0');
    const day = String(today.getDate()).padStart(2, '0');
    const date = `${year}-${month}-${day}`;


    const meta = steps.format_chat.$return_value


    meta.transcript = steps.make_paragraphs.$return_value.transcript


    meta.long_summary = steps.make_paragraphs.$return_value.summary


    const transcriptionCost = Number(((steps.get_duration.$return_value / 60) * whisperRate))
    meta['transcription-cost'] = `Transcription Cost: $${transcriptionCost.toFixed(3).toString()}`
    const chatCost = Number(((steps.format_chat.$return_value.tokens / 1000) * gptTurboRate))
    meta['chat-cost'] = `Chat API Cost: $${chatCost.toFixed(3).toString()}`
    const totalCost = Number((transcriptionCost + chatCost))
    meta['total-cost'] = `Total Cost: $${totalCost.toFixed(3).toString()}`


    const labeledSentiment = `Sentiment: ${meta.sentiment}`


    const data = {
      "parent": {
        "type": "database_id",
        "database_id": dbID
      },
      "icon": {
        "type": "emoji",
        "emoji": "🤖"
      },
      "properties": {
        "Title": {
          "title": [
            {
              "text": {
                "content": meta.title
              }
            }
          ]
        },
        "Type": {
          "select": {
            "name": "AI Transcription"
          }
        },
        "AI Cost": {
          "number": Math.round(totalCost * 1000) / 1000
        },
        "Duration (Seconds)": {
          "number": duration
        }
      },
      "children": [
        {
          "callout": {
            "rich_text": [
              {
                "text": {
                  "content": "This AI transcription and summary was created on "
                }
              },
              {
                mention: {
                  "type": "date",
                  "date": {
                    "start": date
                  }
                }
              },
              {
                "text": {
                  "content": ". "
                }
              },
              {
                "text": {
                  "content": "Listen to the original recording here.",
                  "link": {
                    "url": mp3Link
                  }
                }
              }
            ],
            "icon": {
              "emoji": "🤖"
            },
            "color": "blue_background"
          }
        },
        {
          "table_of_contents": {
            "color": "default"
          }
        },
        {
          "heading_1": {
            "rich_text": [
              {
                "text": {
                  "content": "Summary"
                }
              }
            ]
          }
        }
      ]
    }


    for (let paragraph of meta.long_summary) {
      const summaryParagraph = {
        "paragraph": {
          "rich_text": [
            {
              "text": {
                "content": paragraph
              }
            }
          ]
        }
      }

      data.children.push(summaryParagraph)
    }


    const transcriptHeader = {
      "heading_1": {
        "rich_text": [
          {
            "text": {
              "content": "Transcript"
            }
          }
        ]
      }
    }

    data.children.push(transcriptHeader)


    const transcriptHolder = []
    const transcriptBlockMaxLength = 80

    for (let i = 0; i < meta.transcript.length; i += transcriptBlockMaxLength ) {
      const chunk = meta.transcript.slice(i, i + transcriptBlockMaxLength)
      transcriptHolder.push(chunk)
    }


    const firstTranscriptBlock = transcriptHolder[0]
    console.log(firstTranscriptBlock)
    for (let sentence of firstTranscriptBlock) {
      const paragraphBlock = {
        "paragraph": {
          "rich_text": [
            {
              "text": {
                "content": sentence
              }
            }
          ]
        }
      };
      console.log(sentence)
      data.children.push(paragraphBlock)
    }


    const additionalInfoArray = []

    const additionalInfoHeader = {
      "heading_1": {
        "rich_text": [
          {
            "text": {
              "content": "Additional Info"
            }
          }
        ]
      }
    }

    additionalInfoArray.push(additionalInfoHeader)


    function additionalInfoHandler (arr, header, itemType) {
      const infoHeader = {
        "heading_2": {
          "rich_text": [
            {
              "text": {
                "content": header
              }
            }
          ]
        }
      }

      additionalInfoArray.push(infoHeader)

      if (header === "Arguments and Areas for Improvement") {
        const argWarning = {
          "callout": {
            "rich_text": [
              {
                "text": {
                  "content": "These are potential arguments and rebuttals that other people may bring up in response to the transcript. Like every other part of this summary document, factual accuracy is not guaranteed."
                }
              }
            ],
            "icon": {
              "emoji": "⚠️"
            },
            "color": "orange_background"
          }
        }
      }

      for (let item of arr) {
        const infoItem = {
          [itemType]: {
            "rich_text": [
              {
                "text": {
                  "content": item
                }
              }
            ]
          }
        }

        additionalInfoArray.push(infoItem)
      }
    }

    additionalInfoHandler(meta.main_points, "Main Points", "bulleted_list_item")
    additionalInfoHandler(meta.stories, "Stories, Examples, and Citations", "bulleted_list_item")
    additionalInfoHandler(meta.action_items, "Potential Action Items", "to_do")
    additionalInfoHandler(meta.follow_up, "Follow-Up Questions", "bulleted_list_item")
    additionalInfoHandler(meta.arguments, "Arguments and Areas for Improvement", "bulleted_list_item")
    additionalInfoHandler(meta.related_topics, "Related Topics", "bulleted_list_item")


    const metaArray = [labeledSentiment, meta['transcription-cost'], meta['chat-cost'], meta['total-cost']]
    additionalInfoHandler(metaArray, "Meta", "bulleted_list_item")


    const response = await notion.pages.create( data )


    const responseHolder = {
      response: response,
      transcript: transcriptHolder,
      additional_info: additionalInfoArray
    }

    return responseHolder


  },
})
Step 9: update_page
Notion → Use any Notion API in Node.js
import { Client } from "@notionhq/client"
export default defineComponent({
  props: {
    notion: {
      type: "app",
      app: "notion",
    }
  },
  async run({steps, $}) {

    const notion = new Client({auth: this.notion.$auth.oauth_access_token});


    const pageID = steps.notion.$return_value.response.id.replace(/-/g,'')


    async function sendTranscripttoNotion (transcript) {

      const data = {
        block_id: pageID,
        children: []
      }

      for (let sentence of transcript) {
        const paragraphBlock = {
          "paragraph": {
            "rich_text": [
              {
                "text": {
                  "content": sentence
                }
              }
            ]
          }
        };

        data.children.push(paragraphBlock)
      }

      const response = await notion.blocks.children.append(data)
      return response
    }

    const transcriptArray = steps.notion.$return_value.transcript
    transcriptArray.shift()
    const transcriptAdditionResponses = []
    for (let transcript of transcriptArray) {
      const response = await sendTranscripttoNotion(transcript)
      transcriptAdditionResponses.push(response)
    }


    const additionalInfo = steps.notion.$return_value.additional_info
    const infoHolder = []
    const infoBlockMaxLength = 95

    for (let i = 0; i < additionalInfo.length; i += infoBlockMaxLength ) {
      const chunk = additionalInfo.slice(i, i + infoBlockMaxLength)
      infoHolder.push(chunk)
    }


    async function sendAdditionalInfotoNotion (info) {

      const data = {
        block_id: pageID,
        children: []
      }

      for (let block of info) {
        data.children.push(block)
      }

      const response = await notion.blocks.children.append(data)
      return response

    }

    const additionalInfoAdditionResponses = []
    for (let addition of infoHolder) {
      const response = await sendAdditionalInfotoNotion(addition)
      additionalInfoAdditionResponses.push(response)
    }

    const allAPIResponses = {
      transcript_responses: transcriptAdditionResponses,
      additional_info_responses: additionalInfoAdditionResponses
    }

    return allAPIResponses

  },
})
However, knowing a bit of JavaScript (or knowing at least how to paste code into ChatGPT and ask for debugging help) will help you in the event that you run into bugs or want to make your own customizations.
If you do want to get more familiar with the Notion API and learn some code, you can work through my beginner Notion API tutorial:
The Complete Notion API Crash Course for Beginners
Learn how to work with the Notion API using JavaScript in this beginner-friendly and extremely detailed tutorial.
I also recommend checking out that guide if you want to see deep explanations of the code.
Here, I’ll briefly explain what the code in each step is doing – but I’m not going to spend a lot of time explaining the specific syntax and methods.
Remember: You can paste any of these code steps into ChatGPT to get a great explanation of what the code is doing. You can also adjust your prompt to make things simpler or more verbose – i.e. “Assume I’m a complete JavaScript beginner”.
Since we’ll be working directly with the Notion API in this version of the tutorial, you’ll need to do a couple things in Notion before we get started:
- Select a Notion database you want to work with
- Obtain your Notion database ID
- Take note of any database properties you want to set
Personally, I’ll be using the Notes database in my copy of my Ultimate Brain template.
Ultimate Brain is my all-in-one productivity template for Notion, and it combines tasks, notes, projects, goal-tracking, daily planning, journaling, and more to form a complete second brain in Notion.
You can get it here:
Recommended
![]()
Alternatively, I’ve created a simple Notes template that you can use along with this tutorial. Grab it here.
That simple template has a couple of useful properties baked in:

The Duration property is a formula, which takes in a number of seconds from the Duration (Seconds) property and formats it as a timestamp – e.g. 00:00:00.
If you’d like to add these properties to your own Notes database, check out the toggle below.
If you want to store and display the duration of your recording, as well as the combined cost for transcription and summarization, add the following properties to your notes database:
| Property Name | Property Type |
|---|---|
| AI Cost | Number |
| Duration (Seconds) | Number |
| Duration | Formula |
Then add the following formula in the Duration property’s formula editor:
if(floor(prop("Duration (Seconds)") / 3600) < 10, "0", "") + format(floor(prop("Duration (Seconds)") / 3600)) + ":" + if(floor(prop("Duration (Seconds)") % 3600 / 60) < 10, "0", "") + format(floor(prop("Duration (Seconds)") % 3600 / 60)) + ":" + if(floor(prop("Duration (Seconds)") % 3600 % 60) < 10, "0", "") + format(floor(prop("Duration (Seconds)") % 3600 % 60))
This will take the number of seconds in the audio file and show it in hours:minutes:seconds format (e.g. 00:00:00).
With these properties set, we’ll be able to calculate the full cost and duration in our Pipedream automation, and then send the final numbers to these database properties within our new Notion page.
If you’re unable to add or edit properties in your database, make sure the database isn’t locked:

How to Unlock Notion Databases
Learn how to unlock Notion databases so you can make changes to properties.
And if you want to learn more about Notion formulas, check out my comprehensive formula guide:
Formula Reference Introduction – Thomas Frank
And if you need a refresher on Notion databases, you can check out this guide:
Notion Databases: The Ultimate Beginner’s Guide
Databases are Notion’s most powerful feature. This guide will teach you everything about them – including views, filters, sorts, grouping, and more!
As for finding your database ID, you can use the instructions in this toggle block if you need:
From your Notion database’s home page (not a page containing a linked database view), click the ••• menu and click Copy Link.
This will copy the entire URL of your database to the clipboard. It will look something like this:
https:
Your database ID is the bolded portion of the snippet above – it is the string of characters after the final / character and before the ?v= characters.
This means that my database’s ID is:
8a37b5ad471a4153921eae0aaadb2c20
If you’re still having trouble finding your Database ID, watch this video:
Create a Pipedream Account and Workflow
To get started, create a Pipedream account if you don’t already have one. You’ll be asked to create a workspace, which you can name whatever you want.
If you haven’t heard of Pipedream, here’s a quick rundown:
Pipedream is an automation-builder, much like Make.com and Zapier. The big differences between it and its competitors:
- Pipedream has a much heavier focus on code. While it has no-code actions, it specializes in giving you a code window where you can write JavaScript, Python, Go, or Bash code.
- Pipedream is vastly cheaper than other platforms while being more performant.
I included more detail on Pipedream (and why I chose it) in the no-code section of this tutorial, so you can click that link to jump up to that section if you’re curious.
In this version of the tutorial, we’ll upload our files to Dropbox and use it as the trigger. I’m using Dropbox because I record my voice memos with an awesome app called RecUp, which only works with Dropbox.
If you’d like to use Google Drive instead of Dropbox, you’ll need to make a couple of small modifications to the setup described below.
First, set your first two steps exactly as described in the Google Drive section of the no-code version of this tutorial.
Then add the Download_to_tmp step beneath your Google Drive → Download File action.
Instead of using the code in the actual Download_to_tmp step below, use this code instead:
export default defineComponent({
  async run({ steps, $ }) {
    const results = {
      "tmpPath": `/tmp/recording.${steps.trigger.event.fullFileExtension}`,
      "mimetype": `${steps.trigger.event.fullFileExtension}`
    }
    return results
  },
})
The Google Drive → Download File action already takes care of the heavy lifting of getting your audio file into /tmp storage.
However, many of the code blocks you’ll see in this tutorial expect to pull a value from a variable called steps.Download_to_tmp.$return_value.
By adding this step to your workflow, you’ll export that exact object property, which will allow the rest of the code to work.
Even though I use Google Drive for most of my cloud storage purposes, I’m using Dropbox for this automation. The reason is that there is only one iPhone app in existence that will automatically upload voice memos after you stop recording.
That app is called RecUp – it’s a $1.99, one-time purchase (no subscription).
RecUp has been around for years, and it only works with Dropbox. But it’ll auto-upload voice memos the moment you finish recording, which is awesome.
I’ve looked high and low for another app that does the same thing, and I can’t find one – neither on iOS nor Android. I may end up hiring a mobile developer to build one in the future – but for now, I’m using RecUp, which means I’m using Dropbox.
If you’re fine using your phone’s Share feature to manually send voice memos to cloud storage, then you can easily use Google Drive instead of Dropbox.
To get started , create a new Workflow in your Pipedream account.
- Give your workflow a name.
- In the trigger module, select the Dropbox app, then select the New File action.

Set the following properties in this trigger module:
- Connect and authenticate your Dropbox account
- Choose the folder you want to watch (I recommend setting a specific folder, not using your entire account)
- Set Include Link to True.
When setting the Path, it can be helpful to type part of it out – e.g. I typed /apps to find my /apps/RecUp App directory.
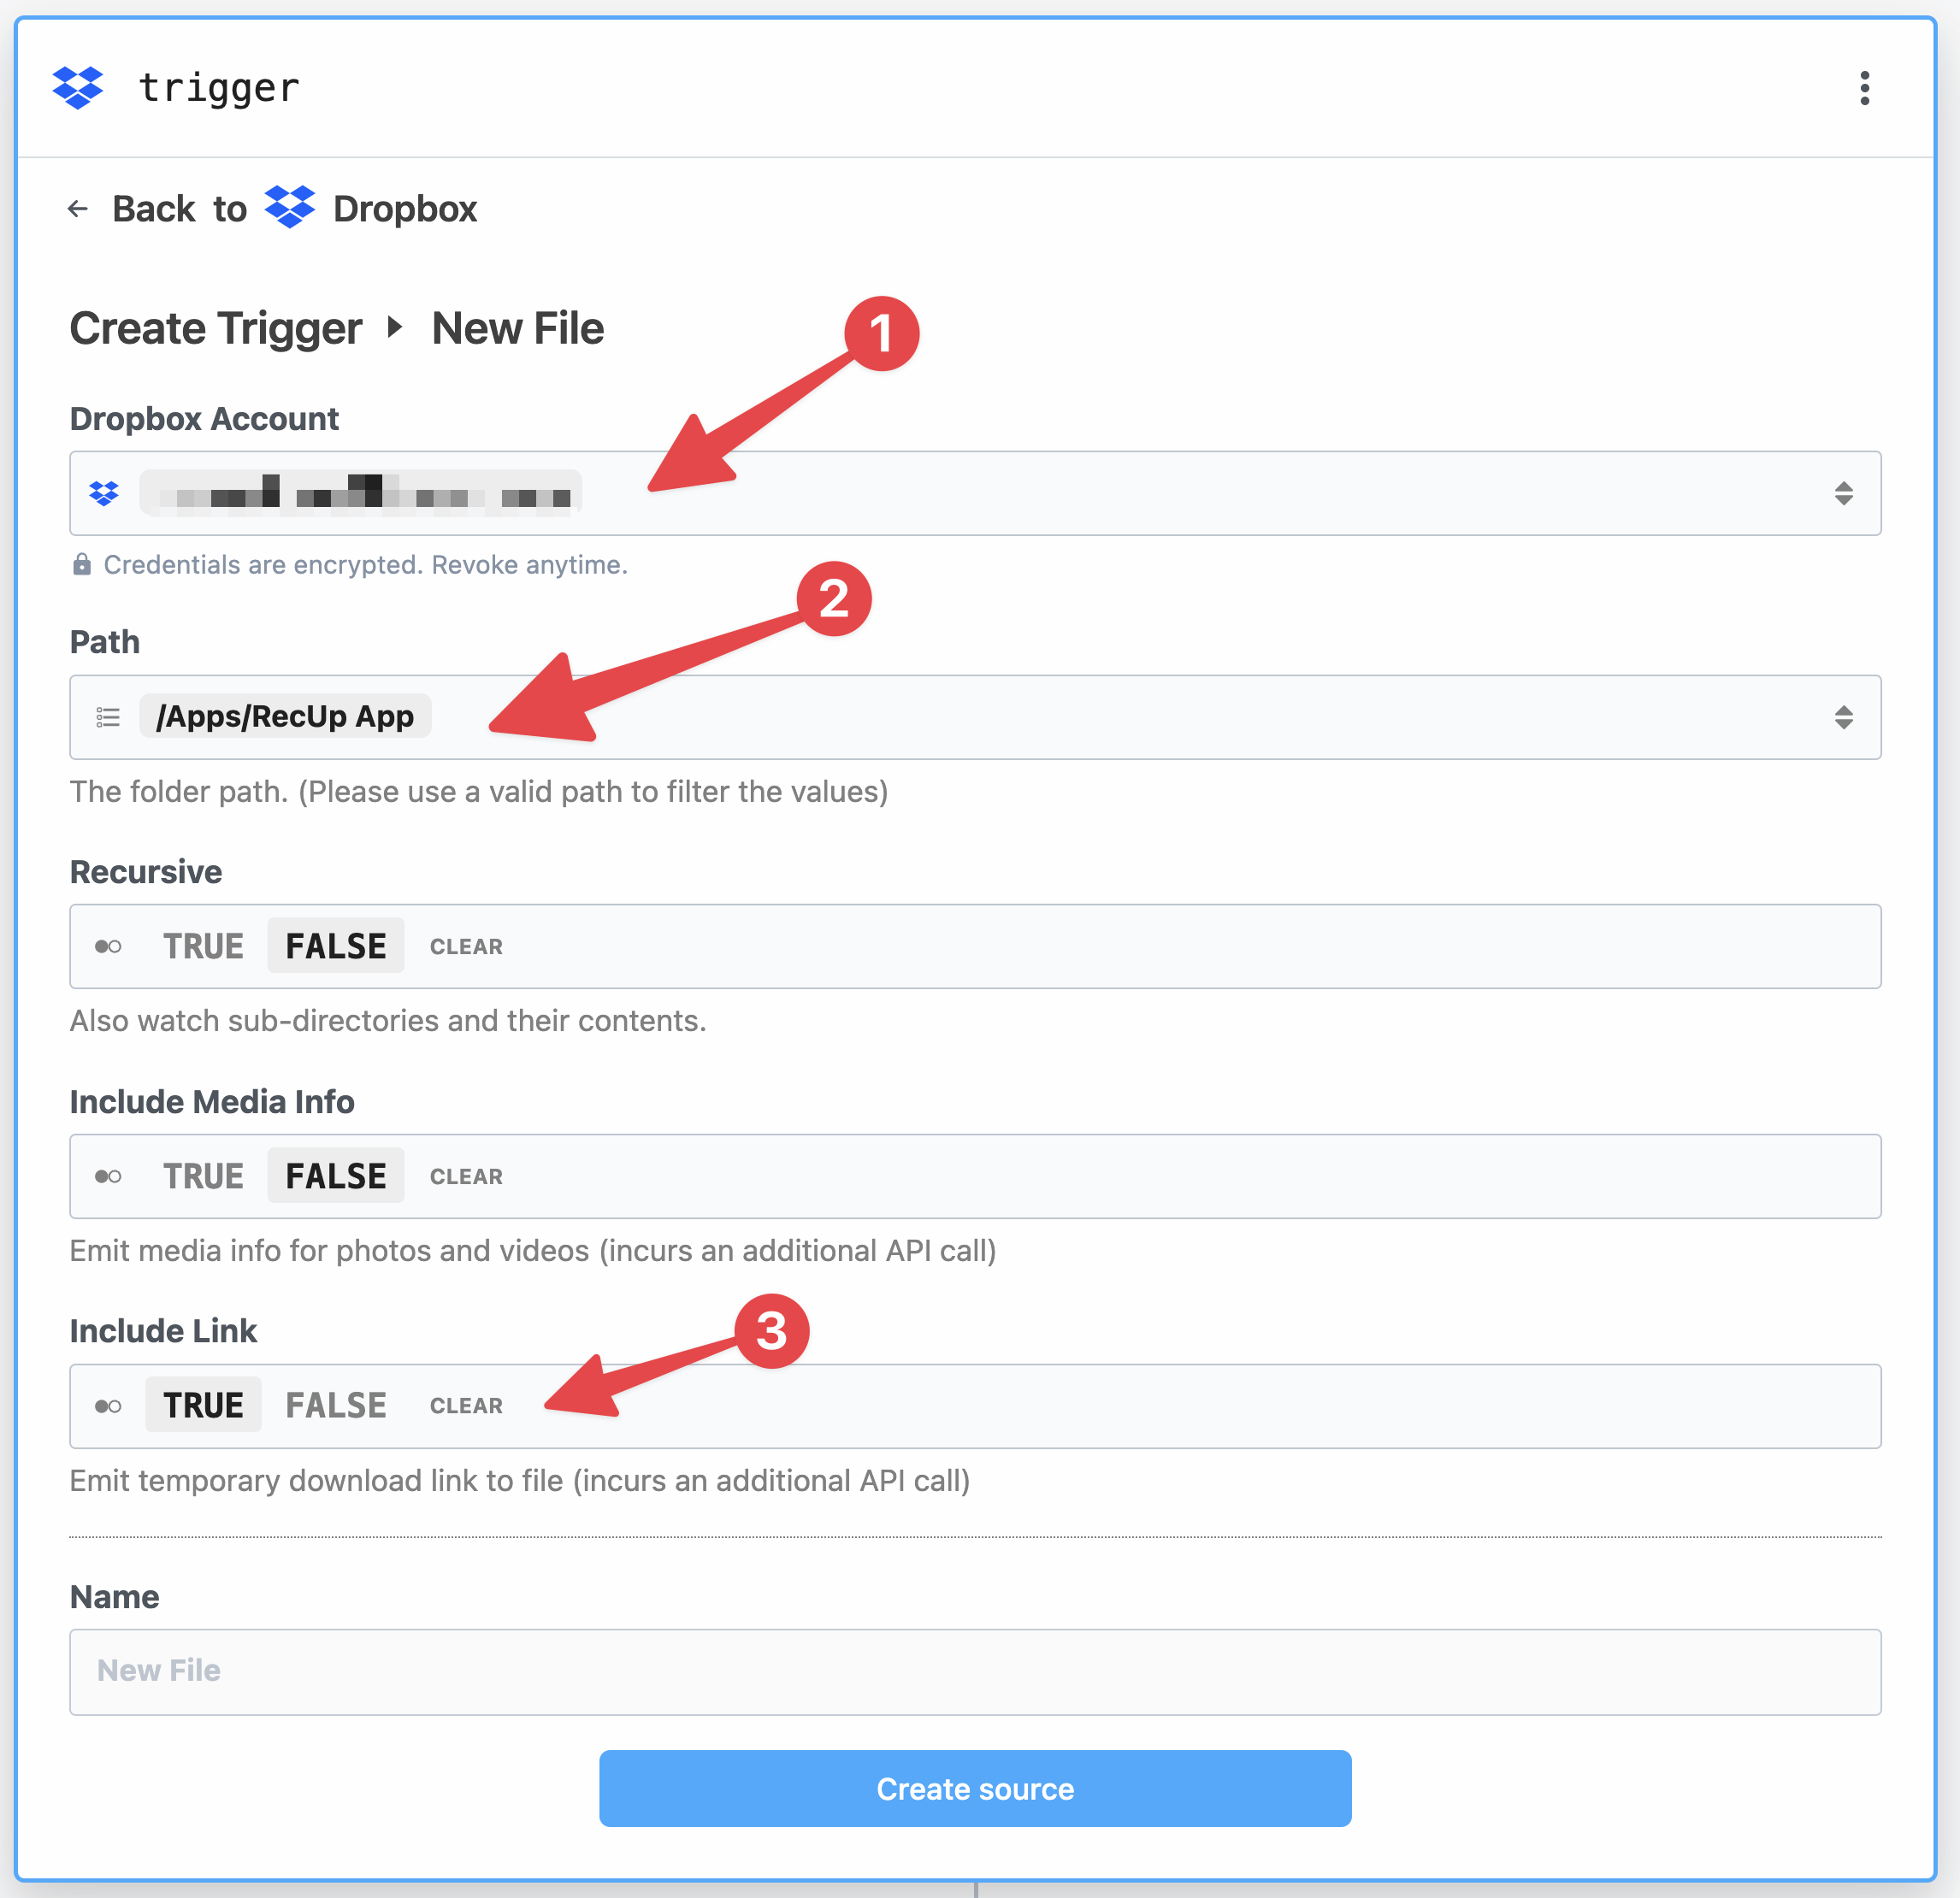
Hit Create Source.
Before you can continue, you’ll need to generate a Test Event for the trigger. This will also be used to enable testing on all the other steps we’ll add.
Do this by uploading an audio file to the Dropbox folder you set in the Path field. I’d recommend uploading an mp3 or m4a file, though technically you can use any file type supported by Whisper.
If you need a test file to use, feel free to download this one that I made. (It’s a quick narration of my article on the 1% Rule)
Select your event, then hit Test.

After the test run, you should see a success message similar to this one:

Hit Continue.
Pipedream currently doesn’t have a no-code action for downloading a file from Dropbox (even though there is an API method for it).
I’ve submitted a request for this action to be added, so by the time you’re reading this, it might be an option. I’d recommend checking the Dropbox actions to see if it’s there.
For the time being, we can manually download the file from Dropbox to your Pipedream account’s /tmp storage, which will allow Whisper to access it (Pipedream has access to your Dropbox account, but Whisper doesn’t).
To do that, choose the Node app, then choose the Run Node Code action. Rename the action as Download_to_tmp.
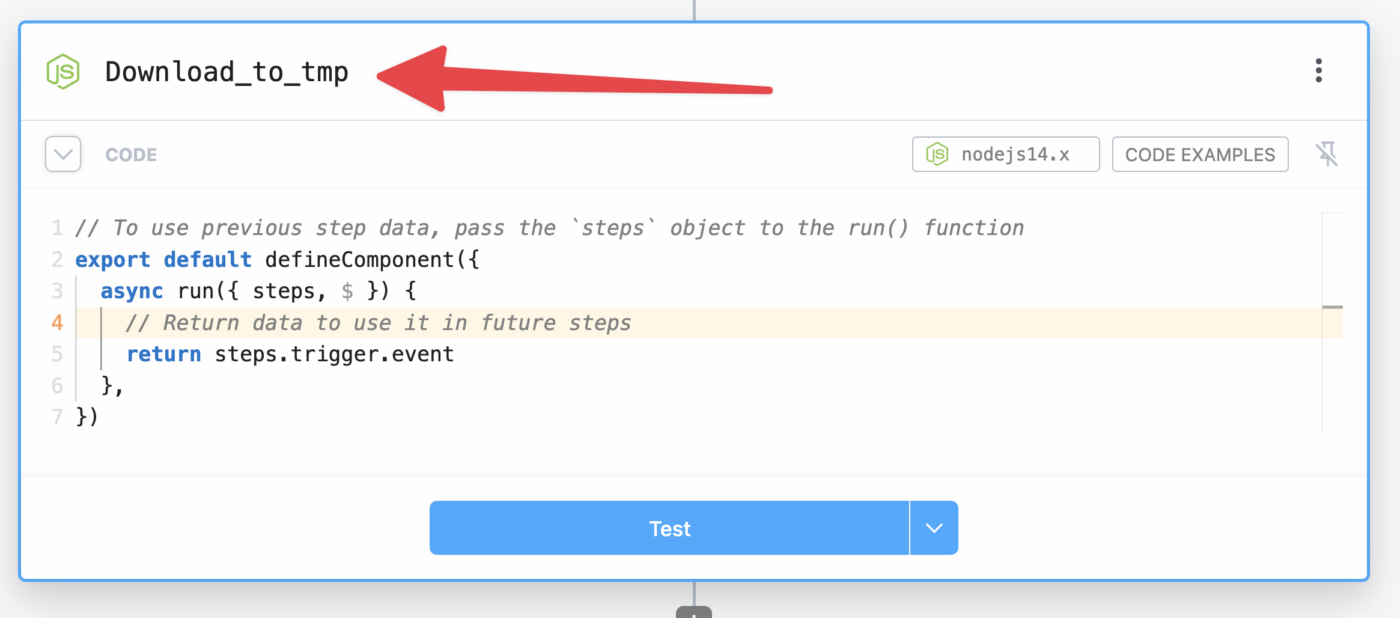
Next, replace all the code in the editor with this code:
import stream from "stream";
import { promisify } from "util";
import fs from "fs";
import got from "got";

export default defineComponent({
  async run({ steps, $ }) {


    if (steps.trigger.event.size > 100000000) {
      throw new Error("File is too large. Files must be mp3 or m4a filels under 100mb")
    }

    try {

        const mime = steps.trigger.event.path_lower.match(/.w+$/)[0]


        if (mime !== '.mp3' && mime !== '.m4a') {
            throw new Error("Unsupported file type. Only mp3 and m4a files are supported.");
        }


        const tmpPath = `/tmp/recording${mime}`


        const pipeline = promisify(stream.pipeline);
        await pipeline(
        got.stream(steps.trigger.event.link),
        fs.createWriteStream(tmpPath)
        );


        const results = {
        "tmpPath": tmpPath,
        "mimetype": mime
        }

        return results
    } catch (error) {

        console.error(error);
        throw error;
    }
  }
})
Here’s what this code does:
- Checks that the file is <100mb (Even though Pipedream’s Whisper action will split audio files into chunks, we’ve found that very large files can still cause issues).
- Checks that the audio file is either an MP3 or M4A file
- Downloads the file to your Pipedream account’s
/tmpdirectory
Hit Test. You should see the following Success message:

Note how the Exports tab returns an object, which is named after the name of the step.
In this case, the object is steps.Download_to_tmp.
You can reference specific properties of this object by clicking the Copy Path button next to each one.
For example, you could reference the tmpPath property’s value in a later step by typing steps.Download_to_tmp.$return_value.tmpPath in your code.
In no-code steps, you can wrap this reference in doubled curly braces:
{{steps.Download_to_tmp.$return_value.tmpPath}}
Since the name of the step is included in these object references, it’s important to name your steps exactly as I’ve named mine! Otherwise, you’ll have to modify the code I’m sharing with you here – it contains many such object references.
Now that you’re armed with that knowledge, let’s move on to the next step.
I like to calculate the duration of the audio file for two reasons:
- I can use it to calculate the cost of transcription (the Whisper API currently charges $0.006/minute)
- I can display the duration of the file as a database property in Ultimate Brain.
If you want to add these properties to your database, check out the toggle in the Prepare Your Notion Database section above. I’ll assume your database has them for the rest of this tutorial, though you can always modify the code if you don’t want to use them.
I recommend following this step, even if you don’t care about sending duration information to Notion. If you skip it, you’ll need to edit a lot of code in future steps.
Add a new step, once again choosing Node → Run Node Code.
Name this step get_duration, then replace all the code in the editor with this code:
import { parseFile } from 'music-metadata';
import { inspect } from 'util';

export default defineComponent({
  async run({ steps, $ }) {

    try {

      const filePath = steps.Download_to_tmp.$return_value.tmpPath

      if (!filePath) {
        throw new Error("File path is missing or invalid.");
      }


      let dataPack;
      try {
        dataPack = await parseFile(filePath);
      } catch (error) {
        throw new Error("Failed to read audio file metadata. The file format might be unsupported or corrupted, or the file might no longer exist at the specified file path (which is in temp storage).");
      }


      const duration = Math.round(await inspect(dataPack.format.duration, { showHidden: false, depth: null }));
      return duration;
    } catch (error) {

      console.error(error);
      throw new Error(`An error occurred while processing the audio file: ${error.message}`);
    }


  },
})
This code uses the music-metadata npm package to analyze the audio file from /tmp and get the duration, which is returned as a number of seconds.
Hit Test; if your test is successful, you should see a numeric return value:

Next, we’ll send the audio file from /tmp to the Whisper API in order to transcribe it.
This section requires no code; instead, hit the + button to add a new step, then choose OpenAI (ChatGPT) → Create Transcription.
Before you can use Whisper to transcribe your audio file, you’ll need to do two things:
- Create an OpenAI API key
- Upgrade to a paid OpenAI account
You can create an API key from your API Keys page in your OpenAI user settings.
Note that you won’t be able to see it again after generating it, so be sure to copy it and paste it into Pipedream immediately.
You can add your billing details and upgrade to a paid account from your Billing Overview page.
As of this writing, OpenAI currently gives you an “approved usage limit”, which is a monthly cap on spending. Mine is currently $120/mo.
You can also choose to set your own Hard Limit if you want to ensure you don’t go over a certain amount of spend each month.
Once you have your API key, you’ll be able to authenticate with OpenAI in the Whisper step by pasting in your key.
Next, set the following:
- Audio Upload Type: File
-
File Path:
{{steps.Download_to_tmp.$return_value.tmpPath}} - Response Format: JSON
Note that you can locate the property for File Path in the Download_to_tmp step’s Success message and use Copy Path to copy it.

For Whisper, you don’t need to set a prompt. Even without one, you’ll get a near-perfect transcription (provided the audio you submit is high-quality – e.g. single-speaker or minimal overlap between multiple speakers, minimal background noise).
Note: Whisper has a 25mb file size limit. While prepping this tutorial, I worked with the Pipedream team to get the Create Transcription action updated so that it will split large audio files into chunks. This means you can upload files larger than 25mb – however, in our testing, we’ve still found that files over 100mb can cause errors. As a result, I’d recommend keeping your files under 100mb.
Hit Test, and you should see your transcription in the Exports tab:

If you get “Error: /tmp/recording.m4a does not exist” when you do this, you’ll need to re-test your Download_to_tmp step to get the audio file back into tmp storage. This error can happen when you’re building your workflow, as files don’t stay in the /tmp directory for long.
Next, we’ll use the ChatGPT API to generate the following from your transcript:
- Title
- Summary
- Lists
- Main points
- Action items
- Follow-up questions
- Potential arguments against your transcript
- Stories, examples, and citations
- Related topics
- Sentiment analysis
Add a new step with the + button, then choose OpenAI (ChatGPT) → Use Any OpenAI (ChatGPT) API in Node.js.
Name the step openai_chat.
In the no-code version of this tutorial above, we used Pipedream’s no-code “Chat” module – so why aren’t we using it here?
The reason is GPT-3’s token limit. The current default ChatGPT model, gpt-3.5-turbo, has a limit of 4,097 tokens. This limit is shared between:
- Prompt
- Context (the transcript in this case)
- Response
A token is a fragment of a word, and good rule of thumb is that 1,000 tokens = 750 words (you can get a more accurate count for a piece of text using OpenAI’s Tokenizer, or with the GPT-3-Encoder npm package – the latter of which we’ll use in the code block below).
Since you want to leave some tokens available for your prompt and for the response, your transcript can only realistically be around 2,000-2,500 words when using the no-code action.
But what if you want to summarize a longer transcript? Code to the rescue!
The code in this step splits your transcript into 2,000-token chunks, then sends each chunk (along with your prompt) to ChatGPT one at a time.
The result is that you can summarize text that is much, much longer than 2,500 words.
Note: The largest test I’ve conducted myself is on a 95-minute podcast episode, which ended up being around 18,000 words. You may run into unforeseen issues if you try even longer files. As I explained in this Twitter thread, all systems have capacities – and sometimes you can’t see them until you do sufficient testing.
Replace all the code in this step with the following code block:
import { Configuration, OpenAIApi } from "openai"
import { encode, decode } from "gpt-3-encoder"

export default defineComponent({
  props: {
    openai: {
      type: "app",
      app: "openai",
    }
  },
  async run({steps, $}) {


    const transcript = steps.create_transcription.$return_value.transcription


    const maxTokens = 2000


    const openAIkey = this.openai.$auth.api_key
    const configuration = new Configuration({
      apiKey: openAIkey,
    });
    const openai = new OpenAIApi(configuration);


    function splitTranscript(encodedTranscript, maxTokens) {
      const stringsArray = []
      let currentIndex = 0

      while (currentIndex < encodedTranscript.length) {
        let endIndex = Math.min(currentIndex + maxTokens, encodedTranscript.length)


        while (endIndex < encodedTranscript.length && decode([encodedTranscript[endIndex]]) !== ".") {
          endIndex++
        }


        if (endIndex < encodedTranscript.length) {
          endIndex++
        }


        const chunk = encodedTranscript.slice(currentIndex, endIndex)
        stringsArray.push(decode(chunk))

        currentIndex = endIndex
      }

      return stringsArray
    }

    const encoded = encode(transcript)

    const stringsArray = splitTranscript(encoded, maxTokens)
    const result = await sendToChat(stringsArray)
    return result


    async function sendToChat (stringsArray) {

      const resultsArray = []

      for (let arr of stringsArray) {


        const prompt = `Analyze the transcript provided below, then provide the following:
Key "title:" - add a title.
Key "summary" - create a summary.
Key "main_points" - add an array of the main points. Limit each item to 100 words, and limit the list to 10 items.
Key "action_items:" - add an array of action items. Limit each item to 100 words, and limit the list to 5 items.
Key "follow_up:" - add an array of follow-up questions. Limit each item to 100 words, and limit the list to 5 items.
Key "stories:" - add an array of an stories, examples, or cited works found in the transcript. Limit each item to 200 words, and limit the list to 5 items.
Key "arguments:" - add an array of potential arguments against the transcript. Limit each item to 100 words, and limit the list to 5 items.
Key "related_topics:" - add an array of topics related to the transcript. Limit each item to 100 words, and limit the list to 5 items.
Key "sentiment" - add a sentiment analysis

Ensure that the final element of any array within the JSON object is not followed by a comma.

Transcript:

        ${arr}`

        let retries = 3
        while (retries > 0) {
          try {
            const completion = await openai.createChatCompletion({
              model: "gpt-3.5-turbo",
              messages: [{role: "user", content: prompt}, {role: "system", content: `You are an assistant that only speaks JSON. Do not write normal text.

Example formatting:

{
    "title": "Notion Buttons",
    "summary": "A collection of buttons for Notion",
    "action_items": [
        "item 1",
        "item 2",
        "item 3"
    ],
    "follow_up": [
        "item 1",
        "item 2",
        "item 3"
    ],
    "arguments": [
        "item 1",
        "item 2",
        "item 3"
    ],
    "related_topics": [
        "item 1",
        "item 2",
        "item 3"
    ]
    "sentiment": "positive"
}
              `}],
              temperature: 0.2
            });

            resultsArray.push(completion)
            break
          } catch (error) {
            if(error.response && error.response.status === 500) {
              retries--
              if (retries == 0) {
                throw new Error("Failed to get a response from OpenAI Chat API after 3 attempts.")
              }
              console.log("OpenAI Chat API returned a 500 error. Retrying...")
            } else {
              throw error
            }
          }
        }

      }

      return resultsArray
    }

  },
})
Here’s what this code does:
- Imports the transcript
- Sets the max number of tokens to 2,000
- Splits the transcript into an array of strings, each containing no more than 2,000 tokens
- Sends each array element to ChatGPT, along with the prompt
- Retries each array element’s ChatGPT call up to 3 times (to mitigate 500 errors, which can happen when ChatGPT is under heavy load)
- Gets the response from ChatGPT, which is in the form of a JSON string
- Adds each response from ChatGPT to an array, then returns that array
I’m working on entire guide on this subject, but I’d like to take a couple seconds to go over the prompt I’ve written in the code above.
First, I’ll note that a prompt actually has three parts:
- Query (aka User Message)
- Context (the transcript, in this case)
- Instructions (aka the System Message)
As I noted in this Twitter thread, your results will get better when you’re more explicit about what you want in your prompt.
Here’s the prompt I wrote:
Analyze the transcript provided below, then provide the following:
Key "title:" - add a title.
Key "summary" - create a summary.
Key "main_points" - add an array of the main points. Limit each item to 100 words, and limit the list to 10 items.
Key "action_items:" - add an array of action items. Limit each item to 100 words, and limit the list to 5 items.
Key "follow_up:" - add an array of follow-up questions. Limit each item to 100 words, and limit the list to 5 items.
Key "stories:" - add an array of an stories, examples, or cited works found in the transcript. Limit each item to 200 words, and limit the list to 5 items.
Key "arguments:" - add an array of potential arguments against the transcript. Limit each item to 100 words, and limit the list to 5 items.
Key "related_topics:" - add an array of topics related to the transcript. Limit each item to 100 words, and limit the list to 5 items.
Key "sentiment" - add a sentiment analysis

Ensure that the final element of any array within the JSON object is not followed by a comma.

Transcript:

${arr}
Note how I specifically tell it to add keys and give them specific names. I also specify how many items I want in each list, and I set limits on how many items should be in each list.
Additionally, setting a good System Message can really improve your results. And when you work with the ChatGPT API, the system message is actually a separate parameter.
I set the System Message like so:
const completion = await openai.createChatCompletion({
  model: "gpt-3.5-turbo",
  messages: [
    {role: "user", content: prompt
    },
    {role: "system", content: `You are an assistant that only speaks JSON. Do not write normal text.

Example formatting: {
        "title": "Notion Buttons",
        "summary": "A collection of buttons for Notion",
        "action_items": [
          "item 1",
          "item 2",
          "item 3"
        ],
        "follow_up": [
          "item 1",
          "item 2",
          "item 3"
        ],
        "arguments": [
          "item 1",
          "item 2",
          "item 3"
        ],
        "related_topics": [
          "item 1",
          "item 2",
          "item 3"
        ]
"sentiment": "positive"
      }
  `
    }
  ],
  temperature: 0.2
});
In my testing, I’ve found that setting these formatting instructions in the System Message is much more effective than setting them in the User Message.
It’s also very helpful to provide one or more examples of the formatting you want.
Finally, note that I’ve set temperature to 0.2. Temperature is a setting between 0 and 1 that influences the variability/creativity of the response. The closer to 0 you set it, the more predictable and deterministic your response will be.
For creative writing tasks, a higher temperature is better. But since I need the response to be valid JSON, I set the temperature low in order to reduce variability.
Of course, you can test out different values to see what works best for your needs.
If you have API access to GPT-4, you can modify your code to use it instead of gpt-3.5-turbo.
Note that you must have access to the GPT-4 API in order for this to work. Subscribing to ChatGPT Plus does not currently grant this access; it only lets you use the GPT-4 model directly on the ChatGPT website.
Currently, there is a waitlist for GPT-4 API access.
If you do have access, you can use the same API key you’re already using for gpt-3.5-turbo. In the code above, simply set the model parameter to gpt-4, like so:
const completion = await openai.createChatCompletion({
  model: "gpt-4",
  messages: [
    {role: "user", content: prompt
    },
    {role: "system", content: `You are an assistant that only speaks JSON. Do not write normal text.

Example formatting: {
        "title": "Notion Buttons",
        "summary": "A collection of buttons for Notion",
        "action_items": [
          "item 1",
          "item 2",
          "item 3"
        ],
        "follow_up": [
          "item 1",
          "item 2",
          "item 3"
        ],
        "arguments": [
          "item 1",
          "item 2",
          "item 3"
        ],
        "related_topics": [
          "item 1",
          "item 2",
          "item 3"
        ]
"sentiment": "positive"
      }
  `
    }
  ],
  temperature: 0.2
});
When you hit Test, you might run into a Timeout Error. This can happen because ChatGPT is often under heavy load, and Pipedream workflows default to timing out if they don’t finish all their steps in 30 seconds.
To fix this, hit the 3-dot menu icon in the top-right corner of the page, then click Settings.

Under Execution Controls, set the Timeout to a higher value. I often transcribe and summarize long files, so I have mine set to 180 seconds (3 minutes).
For every 30 seconds that your workflow runs, it’ll use one credit. However, this setting is just a max value – so if a particular run only takes 30 seconds, it’ll still only use up one credit.
Note: You likely won’t need to change the memory limit, but if your workflow runs into an Out of Memory error, try increasing it.
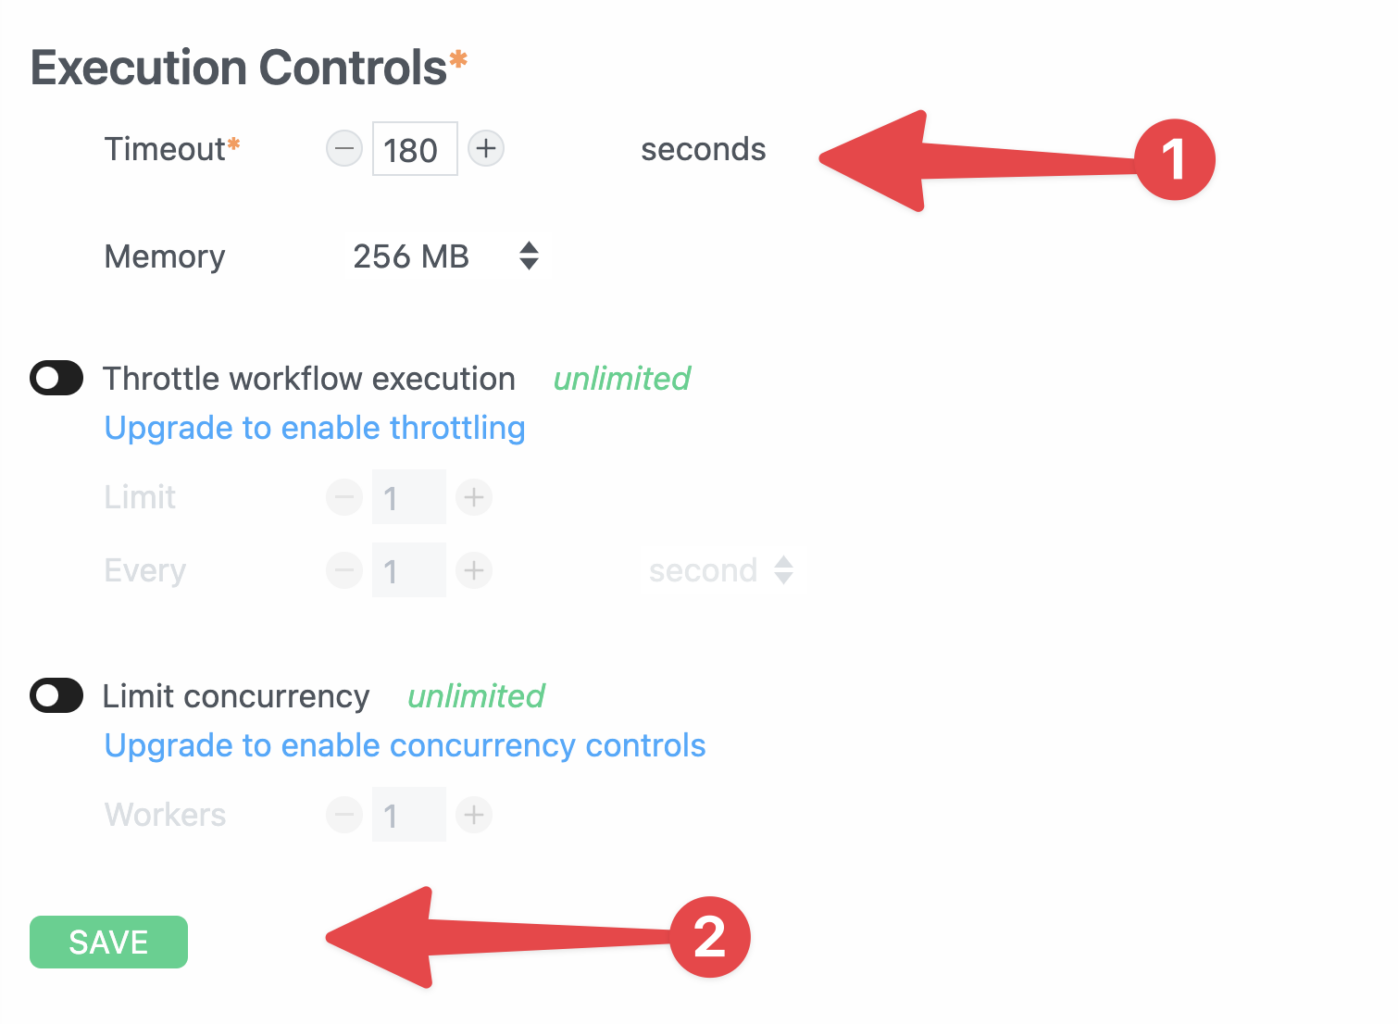
After setting this value, hit the Edit button in the top-right corner to go back to the editor.
Head back to your openai_chat step and hit Test again. If all goes well, you’ll see a return value in the Exports tab.
If your transcript was longer than 2,000 tokens, you’ll have multiple array elements. To find the response in each one, drill down until you reach the steps.openai_chat.$return_value[0].data.choices[0].message.content property.

Note: I usually see the CIRCULAR_RETURN_VALUE warning when testing, but it doesn’t negatively affect anything.
Format the Title, Summary, and Lists
Our code above is designed to make multiple calls to the ChatGPT API in order to get around GPT-3’s token limit.
This means that we need to add a step that combined the multiple potential responses from ChatGPT into a single object that we can use to construct our Notion page later.
Hit the + button to add a new step, this time choosing Node → Run Node Code. Name this step format_chat.
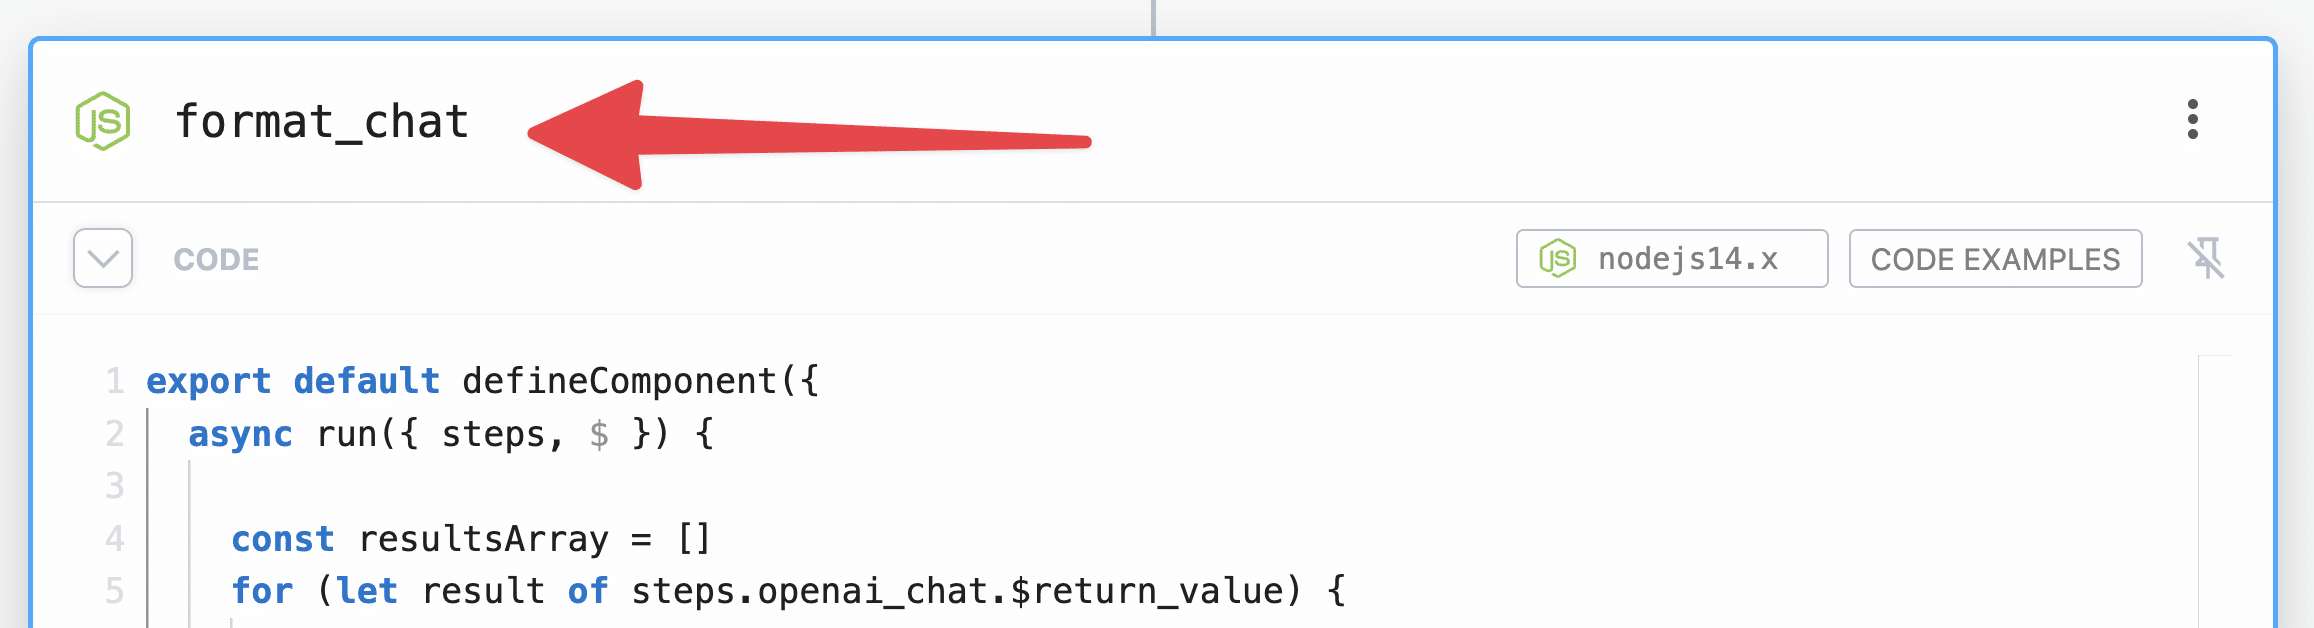
Replace everything in the editor with the following code:
export default defineComponent({
  async run({ steps, $ }) {

    const resultsArray = []
    for (let result of steps.openai_chat.$return_value) {


      function removeTrailingCommas(jsonString) {
        const regex = /,s*(?=])/g;
        return jsonString.replace(regex, '');
      }


      const jsonString = result.data.choices[0].message.content
        .replace(/^[^{]*?{/, '{')
        .replace(/}[^}]*?$/,'}')

      const cleanedJsonString = removeTrailingCommas(jsonString)

      let jsonObj
      try {
        jsonObj = JSON.parse(cleanedJsonString)
      } catch (error) {
        console.error("Error while parsing cleaned JSON string:")
        console.error(error)
        console.log("Original JSON string:", jsonString)
        console.log(cleanedJsonString)
        console.log("Cleaned JSON string:", cleanedJsonString)
        jsonObj = {}
      }

      const response = {
        choice: jsonObj,
        usage: !result.data.usage.total_tokens ? 0 : result.data.usage.total_tokens
      }

      resultsArray.push(response)
    }

    const chatResponse = {
      title: resultsArray[0].choice.title,
      sentiment: resultsArray[0].choice.sentiment,
      summary: [],
      main_points: [],
      action_items: [],
      stories: [],
      arguments: [],
      follow_up: [],
      related_topics: [],
      usageArray: []
    }

    for (let arr of resultsArray) {
      chatResponse.summary.push(arr.choice.summary)
      chatResponse.main_points.push(arr.choice.main_points)
      chatResponse.action_items.push(arr.choice.action_items)
      chatResponse.stories.push(arr.choice.stories)
      chatResponse.arguments.push(arr.choice.arguments)
      chatResponse.follow_up.push(arr.choice.follow_up)
      chatResponse.related_topics.push(arr.choice.related_topics)
      chatResponse.usageArray.push(arr.usage)
    }

    console.log(chatResponse.related_topics)

    function arraySum (arr) {
      const init = 0
      const sum = arr.reduce((accumulator, currentValue) => accumulator + currentValue, init)
      return sum
    }

    const finalChatResponse = {
      title: chatResponse.title,
      summary: chatResponse.summary.join(' '),
      sentiment: chatResponse.sentiment,
      main_points: chatResponse.main_points.flat(),
      action_items: chatResponse.action_items.flat(),
      stories: chatResponse.stories.flat(),
      arguments: chatResponse.arguments.flat(),
      follow_up: chatResponse.follow_up.flat(),
      related_topics: Array.from(new Set(chatResponse.related_topics.flat().map(item => item.toLowerCase()))).sort(),
      tokens: arraySum(chatResponse.usageArray)
    }

    return finalChatResponse

  },
})
Here’s what this code does:
- Cleans up any potential errors in the JSON strings returned by ChatGPT. I’ve found that setting the System Message correctly basically removes all errors, but I’ve left in this code just as an insuranc policy.
- Checks that each JSON string is correctly formatted.
- Parses each JSON string, converting it into a proper JSON object we can work with.
- Constructs a final return object
- Adds each piece from the JSON objects into our final object
As an example, the finalChatResponse.main_points property’s value will be an array that contains all the “main_points” array elements from all the JSON strings returned by ChatGPT.
Hit Test, and you should see a Success message like this:
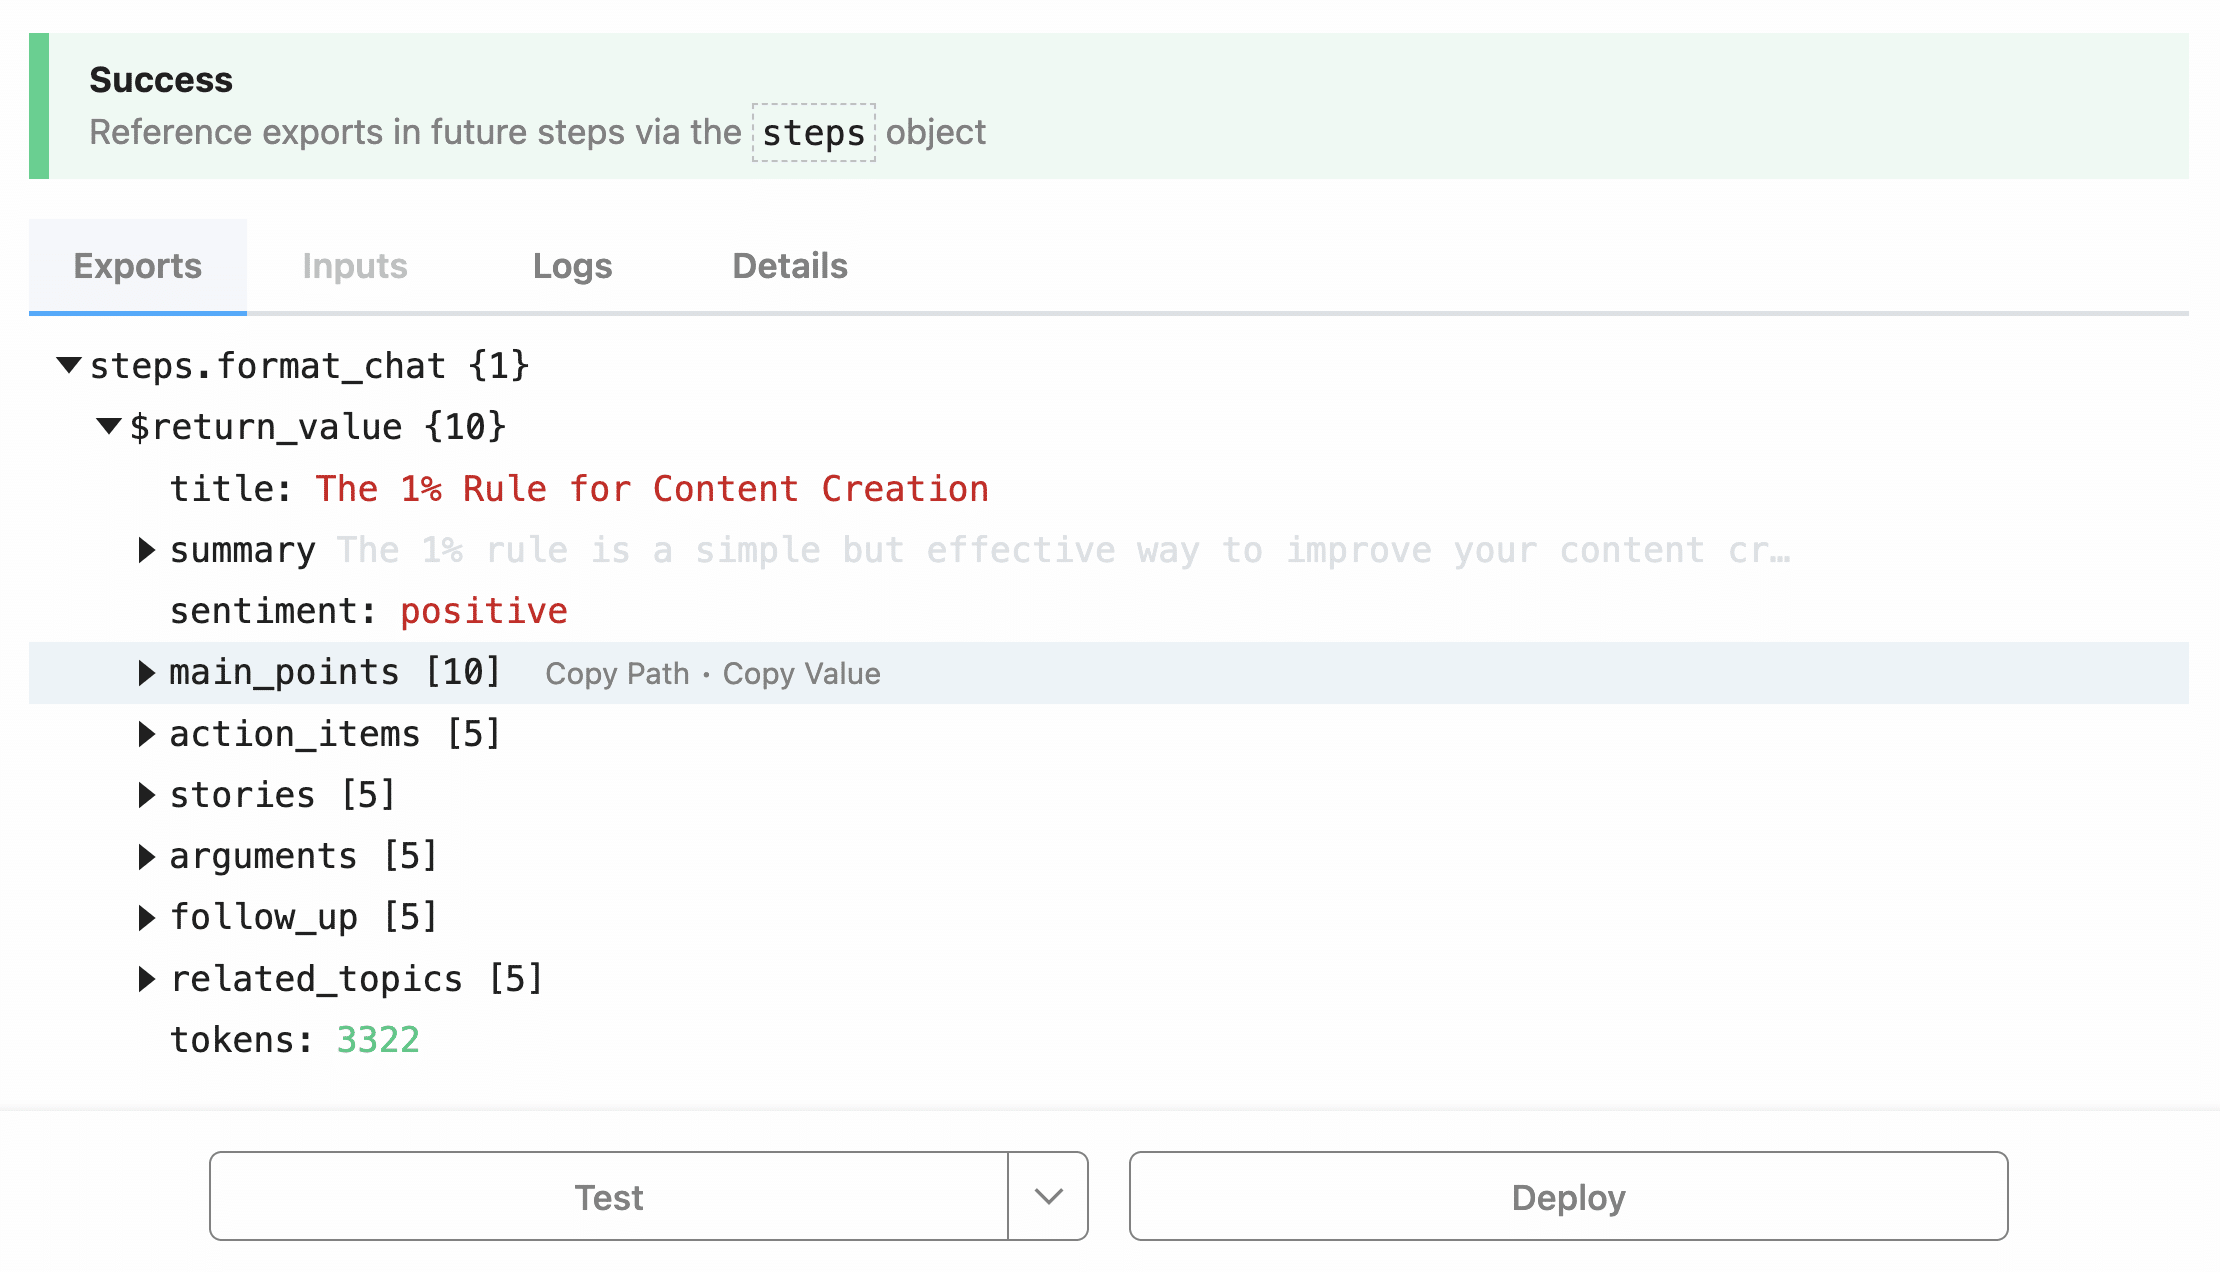
Next, we need to split the transcript itself into an array of paragraphs. This will help readability, but it’s also necessarily due to the Notion API’s limits.
In short, the limits we’re dealing with in this automation are:
- Rich text objects can have no more than 2,000 characters each
- A single API request payload can contain no more than 1,000 blocks (or 500kb of data, whichever is smaller).
Your transcript likely contains more than 2,000 characters, so we need to split it up into an array.
Hit the + button to add a new step, once again choosing Node → Run Node Code.
Name this step make_paragraphs.
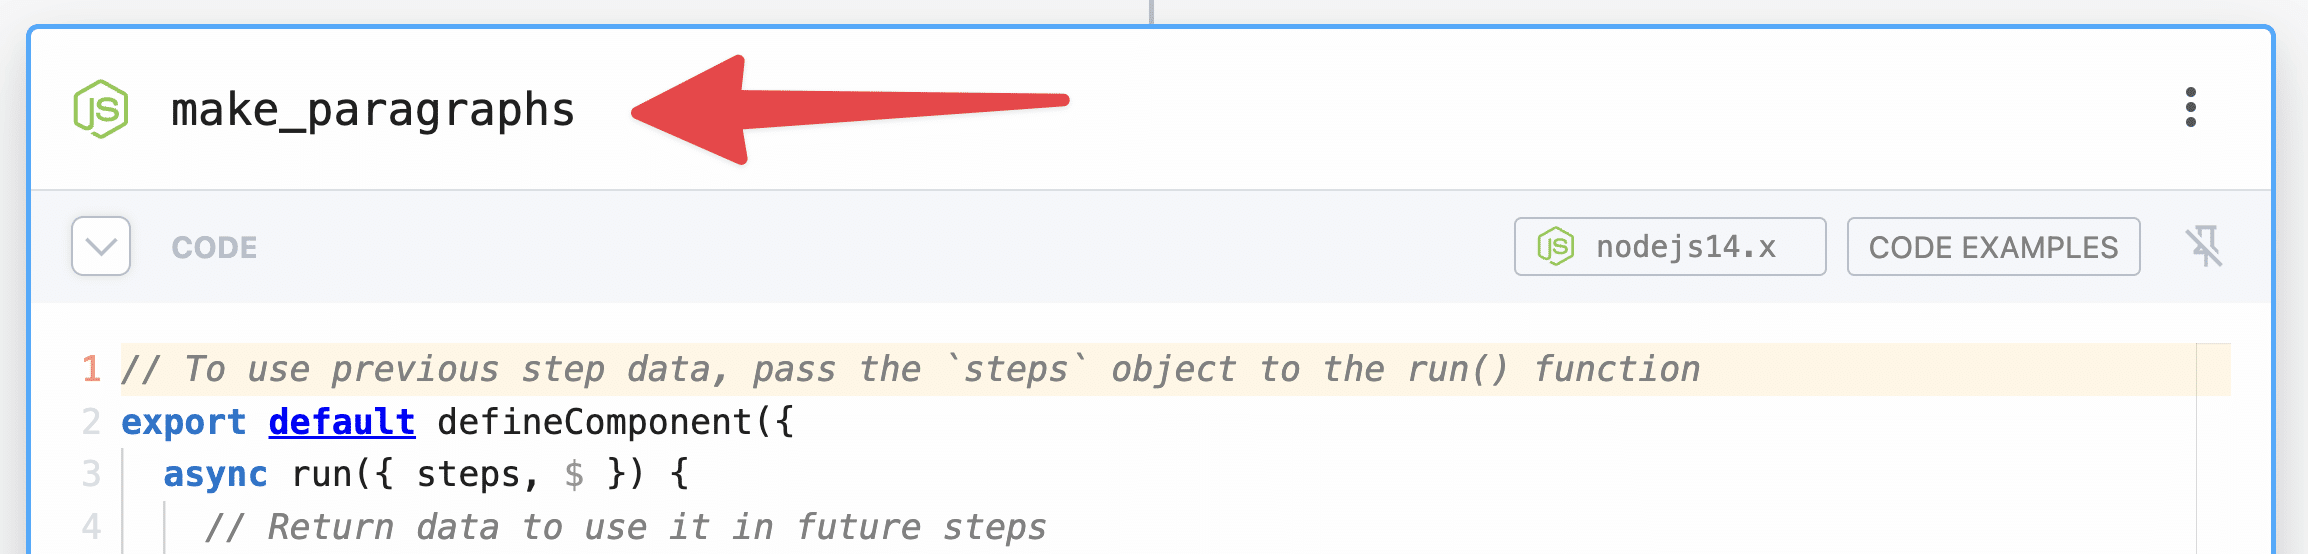
Replace everything in the editor with the following code:
import natural from 'natural'

export default defineComponent({
  async run({ steps, $ }) {

    const tokenizer = new natural.SentenceTokenizer()
    const transcriptSentences = tokenizer.tokenize(steps.create_transcription.$return_value.transcription)
    const summarySentences = tokenizer.tokenize(steps.format_chat.$return_value.summary)

    const sentencesPerParagraph = 3

    function sentenceGrouper(arr) {
      const newArray = []

      for (let i = 0; i < arr.length; i+= sentencesPerParagraph) {
        const group = []
        for (let j = i; j < i + sentencesPerParagraph; j++) {
          if (arr[j]) {
            group.push(arr[j])
          }
        }

        newArray.push(group.join(' '))
      }

      return newArray
    }

    function charMaxChecker(arr) {
      const sentenceArray = arr.map((element) => {
          if (element.length > 800) {
            const pieces = element.match(/.{800}[^s]*s*/g);
            if (element.length > pieces.join('').length) {
                pieces.push(element.slice(pieces.join('').length));
            }
            return pieces;
        } else {
            return element;
        }
      }).flat()

      return sentenceArray
    }

    const paragraphs = sentenceGrouper(transcriptSentences)
    const lengthCheckedParagraphs = charMaxChecker(paragraphs)

    const summaryParagraphs = sentenceGrouper(summarySentences)
    const lengthCheckedSummaryParagraphcs = charMaxChecker(summaryParagraphs)

    const allParagraphs = {
      transcript: lengthCheckedParagraphs,
      summary: lengthCheckedSummaryParagraphcs
    }

    return allParagraphs

  },
})
Here’s what this code does:
- Uses the natural npm package to count the number of sentences in both the transcript and the summary (which can also exceed 2,000 characters).
- Splits both the transcript and summary into groups of 3 sentences, adding each group to an array.
- Checks each 3-sentence string to ensure it doesn’t exceed 800 characters (for readability). If one does, it is split into two elements.
- Returns an object containing the arrays for both the transcript and summary
Hit Test, and you should see this Success message and returned object:
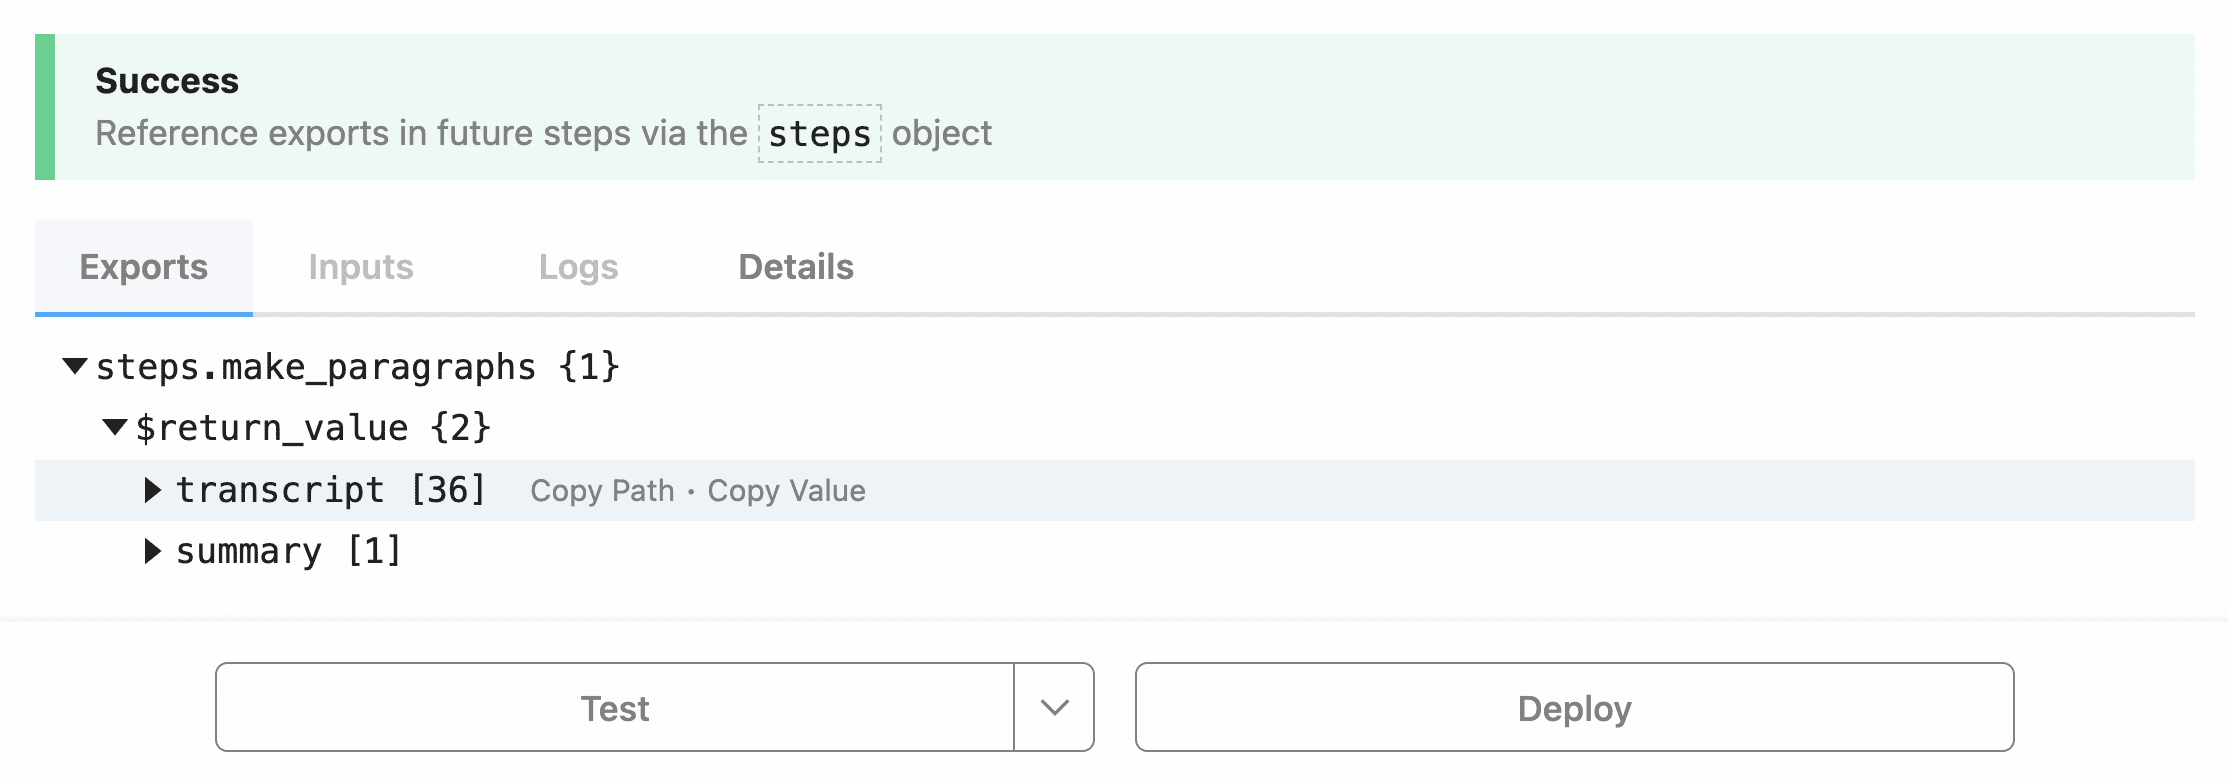
We’re finally ready to create a new page in Notion and populate it with our summary, transcript, and lists.
Hit the + button once again, this time choosing Notion → Use Any Notion API in Node.js.
The step should be named notion by default; if so, keep that name.
If you haven’t done so already, authenticate your Notion account. Be sure to add your Notes database (or a page that contains it) during this process so Pipedream can access it.
Next, you’ll need to obtain your database ID (click here to jump up to the instructions on how to find it) and add to your Pipedream account as an environment variable.
Note: Technically, you can modify my code below, replacing the process.env variable with a string containing your database ID. But if you’re playing with code, it’s a good ID to use environment variables. They’re great for keeping sensitive data out of your code. Learn more about them here:
Environment Variables
Pipedream Documentation – Connect APIs, remarkably fast
To create an environment variable, click the Pipedream logo in the top-left corner of the page to navigate to your account’s hub, then:
- Click Settings
- Click the Environment Variables tab
- Click New Environment Variable
- Name the variable
NOTES_DB_ID - Set the value to be your database ID
- Click Create
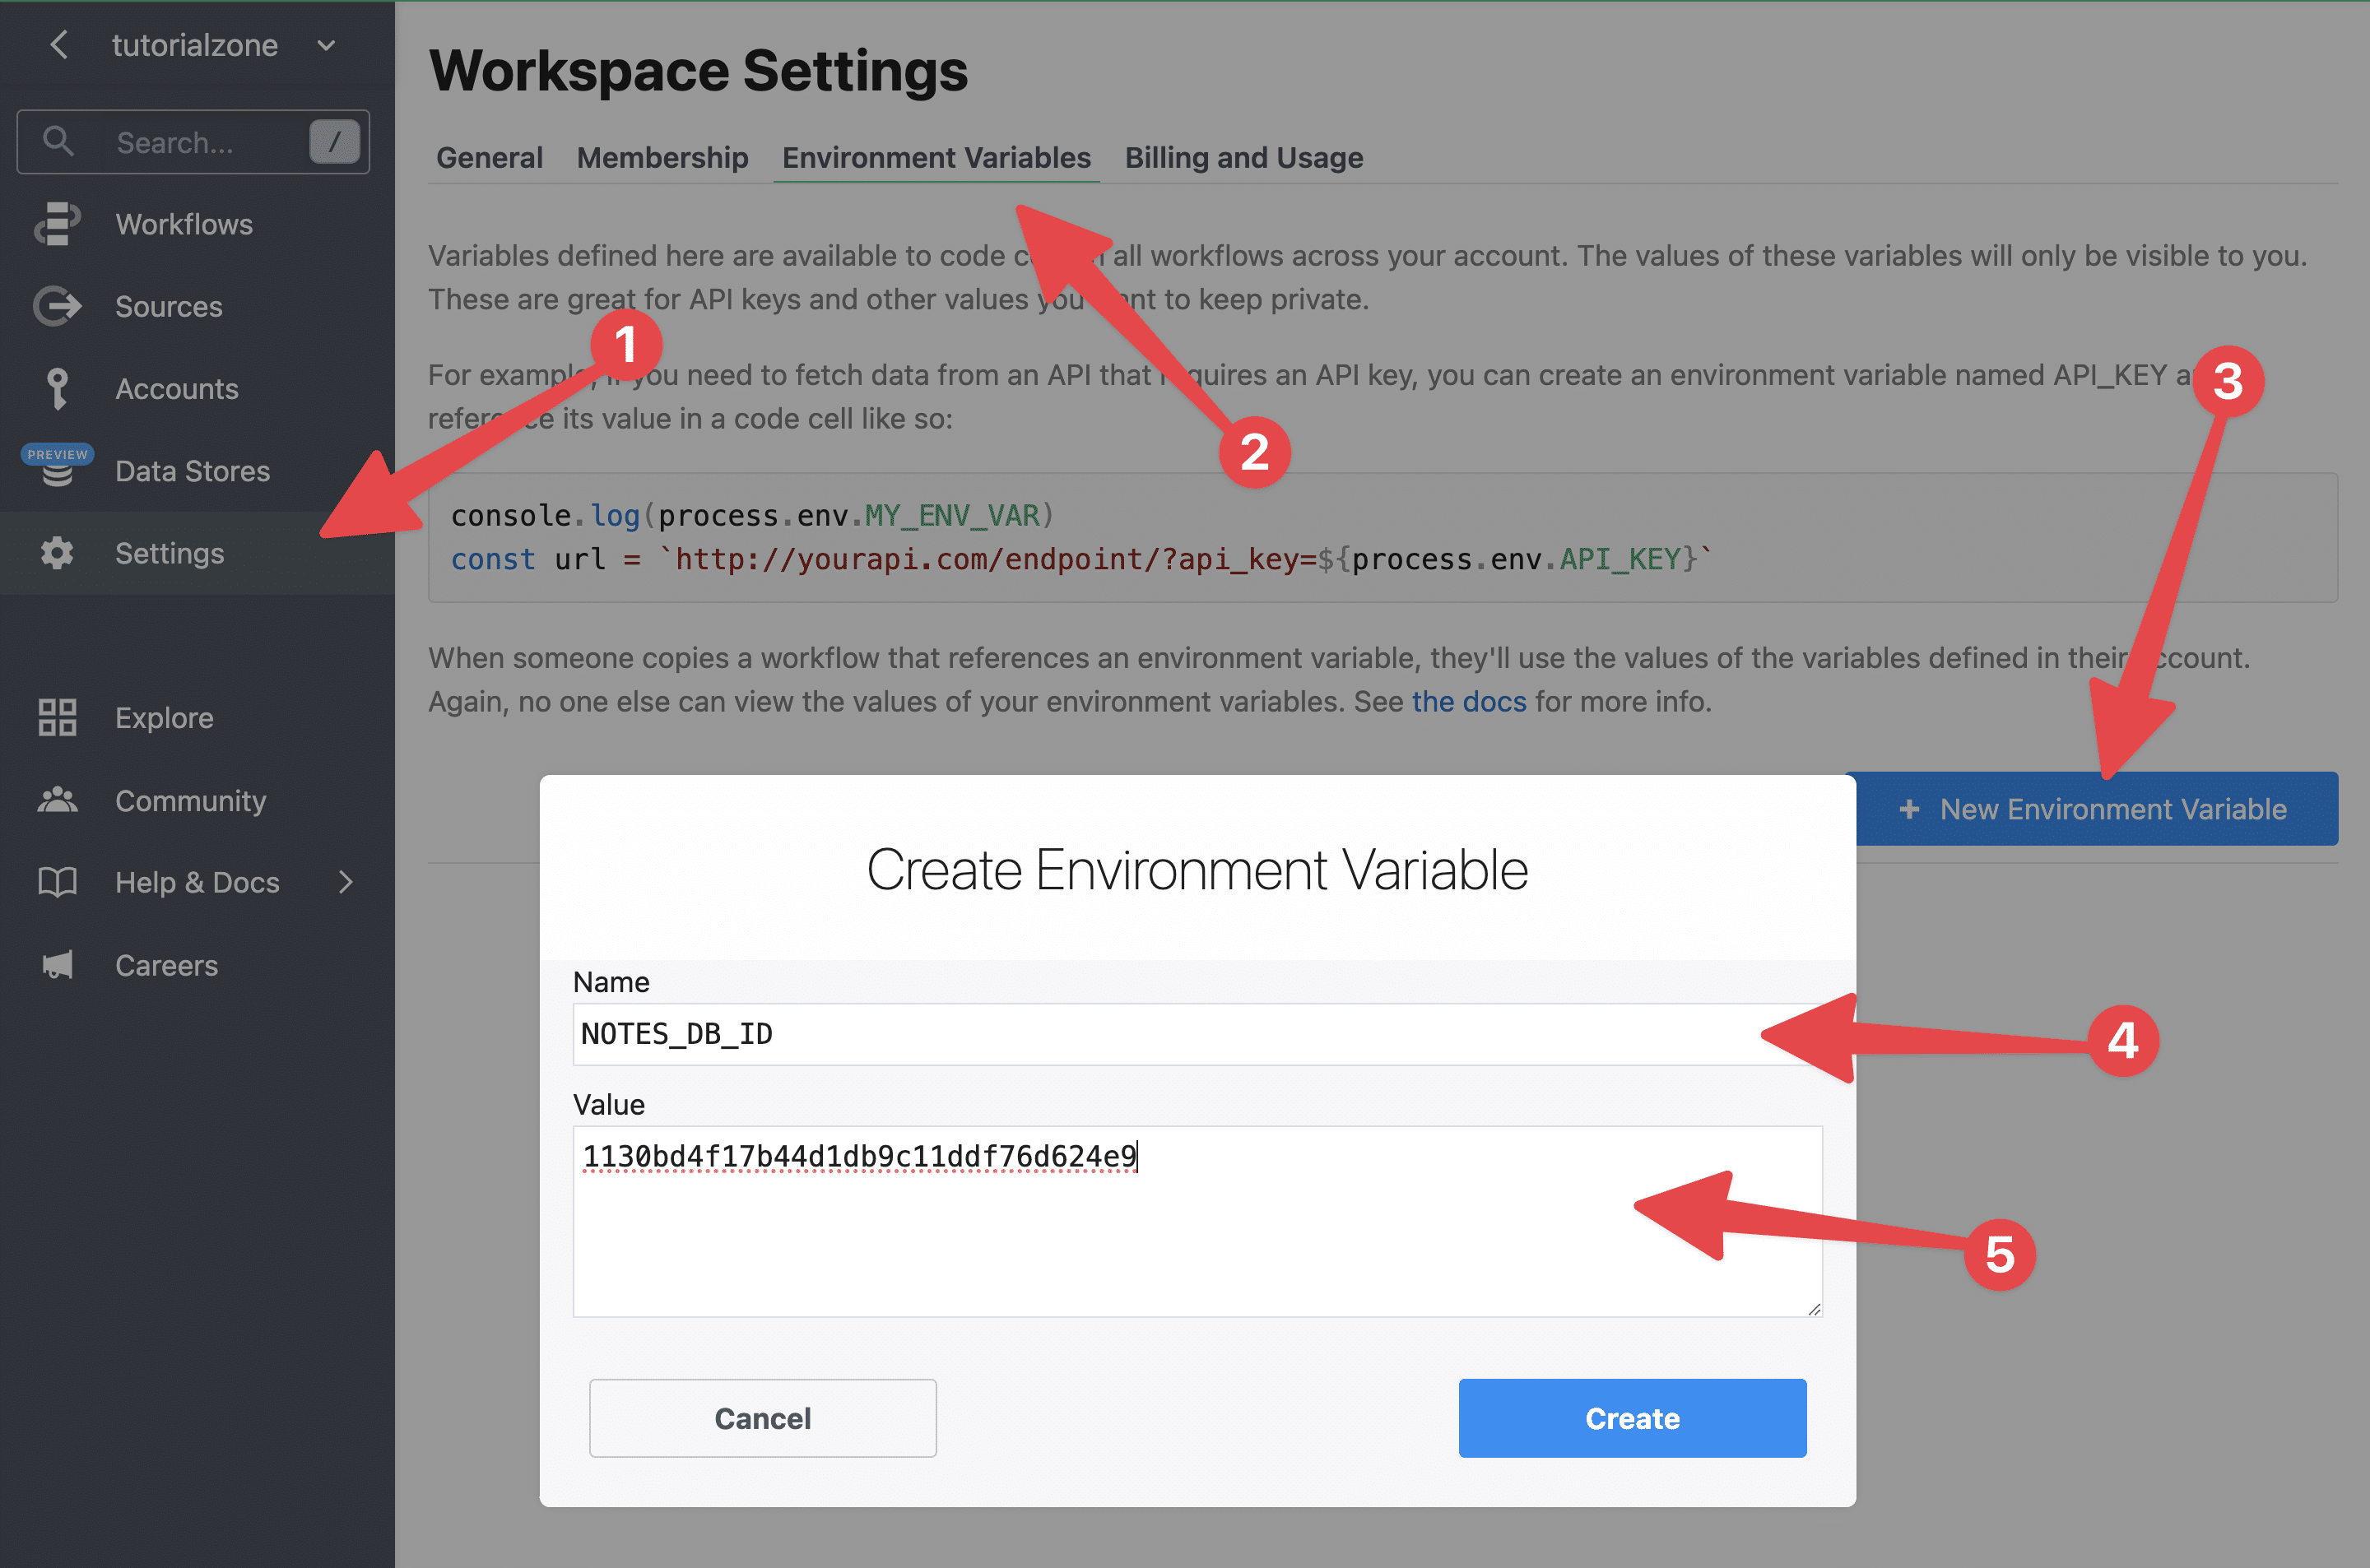
Now you can click Workflows in the sidebar menu and navigate back to the editor for your workflow.
Replace everything in the notion step’s editor with this code:
import { Client } from "@notionhq/client"
export default defineComponent({
  props: {
    notion: {
      type: "app",
      app: "notion",
    }
  },
  async run({steps, $}) {


    const notion = new Client({auth: this.notion.$auth.oauth_access_token});


    const dbID = process.env.NOTES_DB_ID


    const whisperRate = 0.006
    const gptTurboRate = 0.002


    const mp3Link = encodeURI("https://www.dropbox.com/home" + steps.trigger.event.path_lower);


    const duration = steps.get_duration.$return_value


    const today = new Date();
    const year = today.getFullYear();
    const month = String(today.getMonth() + 1).padStart(2, '0');
    const day = String(today.getDate()).padStart(2, '0');
    const date = `${year}-${month}-${day}`;


    const meta = steps.format_chat.$return_value


    meta.transcript = steps.make_paragraphs.$return_value.transcript


    meta.long_summary = steps.make_paragraphs.$return_value.summary


    const transcriptionCost = Number(((steps.get_duration.$return_value / 60) * whisperRate))
    meta['transcription-cost'] = `Transcription Cost: $${transcriptionCost.toFixed(3).toString()}`
    const chatCost = Number(((steps.format_chat.$return_value.tokens / 1000) * gptTurboRate))
    meta['chat-cost'] = `Chat API Cost: $${chatCost.toFixed(3).toString()}`
    const totalCost = Number((transcriptionCost + chatCost))
    meta['total-cost'] = `Total Cost: $${totalCost.toFixed(3).toString()}`


    const labeledSentiment = `Sentiment: ${meta.sentiment}`


    const data = {
      "parent": {
        "type": "database_id",
        "database_id": dbID
      },
      "icon": {
        "type": "emoji",
        "emoji": "🤖"
      },
      "properties": {
        "Title": {
          "title": [
            {
              "text": {
                "content": meta.title
              }
            }
          ]
        },
        "Type": {
          "select": {
            "name": "AI Transcription"
          }
        },
        "AI Cost": {
          "number": Math.round(totalCost * 1000) / 1000
        },
        "Duration (Seconds)": {
          "number": duration
        }
      },
      "children": [
        {
          "callout": {
            "rich_text": [
              {
                "text": {
                  "content": "This AI transcription and summary was created on "
                }
              },
              {
                mention: {
                  "type": "date",
                  "date": {
                    "start": date
                  }
                }
              },
              {
                "text": {
                  "content": ". "
                }
              },
              {
                "text": {
                  "content": "Listen to the original recording here.",
                  "link": {
                    "url": mp3Link
                  }
                }
              }
            ],
            "icon": {
              "emoji": "🤖"
            },
            "color": "blue_background"
          }
        },
        {
          "table_of_contents": {
            "color": "default"
          }
        },
        {
          "heading_1": {
            "rich_text": [
              {
                "text": {
                  "content": "Summary"
                }
              }
            ]
          }
        }
      ]
    }


    for (let paragraph of meta.long_summary) {
      const summaryParagraph = {
        "paragraph": {
          "rich_text": [
            {
              "text": {
                "content": paragraph
              }
            }
          ]
        }
      }

      data.children.push(summaryParagraph)
    }


    const transcriptHeader = {
      "heading_1": {
        "rich_text": [
          {
            "text": {
              "content": "Transcript"
            }
          }
        ]
      }
    }

    data.children.push(transcriptHeader)


    const transcriptHolder = []
    const transcriptBlockMaxLength = 80

    for (let i = 0; i < meta.transcript.length; i += transcriptBlockMaxLength ) {
      const chunk = meta.transcript.slice(i, i + transcriptBlockMaxLength)
      transcriptHolder.push(chunk)
    }


    const firstTranscriptBlock = transcriptHolder[0]
    console.log(firstTranscriptBlock)
    for (let sentence of firstTranscriptBlock) {
      const paragraphBlock = {
        "paragraph": {
          "rich_text": [
            {
              "text": {
                "content": sentence
              }
            }
          ]
        }
      };
      console.log(sentence)
      data.children.push(paragraphBlock)
    }


    const additionalInfoArray = []

    const additionalInfoHeader = {
      "heading_1": {
        "rich_text": [
          {
            "text": {
              "content": "Additional Info"
            }
          }
        ]
      }
    }

    additionalInfoArray.push(additionalInfoHeader)


    function additionalInfoHandler (arr, header, itemType) {
      const infoHeader = {
        "heading_2": {
          "rich_text": [
            {
              "text": {
                "content": header
              }
            }
          ]
        }
      }

      additionalInfoArray.push(infoHeader)

      if (header === "Arguments and Areas for Improvement") {
        const argWarning = {
          "callout": {
            "rich_text": [
              {
                "text": {
                  "content": "These are potential arguments and rebuttals that other people may bring up in response to the transcript. Like every other part of this summary document, factual accuracy is not guaranteed."
                }
              }
            ],
            "icon": {
              "emoji": "⚠️"
            },
            "color": "orange_background"
          }
        }
      }

      for (let item of arr) {
        const infoItem = {
          [itemType]: {
            "rich_text": [
              {
                "text": {
                  "content": item
                }
              }
            ]
          }
        }

        additionalInfoArray.push(infoItem)
      }
    }

    additionalInfoHandler(meta.main_points, "Main Points", "bulleted_list_item")
    additionalInfoHandler(meta.stories, "Stories, Examples, and Citations", "bulleted_list_item")
    additionalInfoHandler(meta.action_items, "Potential Action Items", "to_do")
    additionalInfoHandler(meta.follow_up, "Follow-Up Questions", "bulleted_list_item")
    additionalInfoHandler(meta.arguments, "Arguments and Areas for Improvement", "bulleted_list_item")
    additionalInfoHandler(meta.related_topics, "Related Topics", "bulleted_list_item")


    const metaArray = [labeledSentiment, meta['transcription-cost'], meta['chat-cost'], meta['total-cost']]
    additionalInfoHandler(metaArray, "Meta", "bulleted_list_item")


    const response = await notion.pages.create( data )


    const responseHolder = {
      response: response,
      transcript: transcriptHolder,
      additional_info: additionalInfoArray
    }

    return responseHolder


  },
})
Here’s what this code does:
- Authenticates with Notion
- Imports the formatted summary/lists object and transcript object from the previous two steps
- Adds all of their values to a new
metaobject - Adds properties for the current date, transcription cost, chat cost, total cost, and duration
- Constructs a
dataobject, which is formatted so the Notion API’s Create a Page endpoint will accept it - Adds the summary to the
dataobject, along with headers for Summary and Transcript - Adds up to the first 80 paragraphs of the transcript to the
dataobject - Adds everything else (e.g. the lists) to an array called
additionalInfoArray, which will be sent to Notion in the next step - Creates a new Notion page in your database, passing all the data in the
dataobject.
Before we test, I’d like to point out the properties portion of the data object:
const data = {
  "parent": {
    "type": "database_id",
    "database_id": dbID
  },
  "icon": {
    "type": "emoji",
    "emoji": "🤖"
  },
  "properties": {
    "Title": {
      "title": [
        {
          "text": {
            "content": meta.title
          }
        }
      ]
    },
    "Type": {
      "select": {
        "name": "AI Transcription"
      }
    },
    "AI Cost": {
      "number": Math.round(totalCost * 1000) / 1000
    },
    "Duration (Seconds)": {
      "number": duration
    }
  },
Note how I’m setting values for three specific properties:
- Type – a Select
- AI Cost – a Number
- Duration (Seconds) – a Number
If your database doesn’t have these exact properties (with the same names and property types), your API call will return an error.
Therefore, you’ll want to make sure you either:
- Add these properties to your database
- Remove/modify the property settings in the
dataobject
Additionally, I’ll note that I’ve renamed the Name property (the default property, which has a type of “title”) in my Notes database to Title.
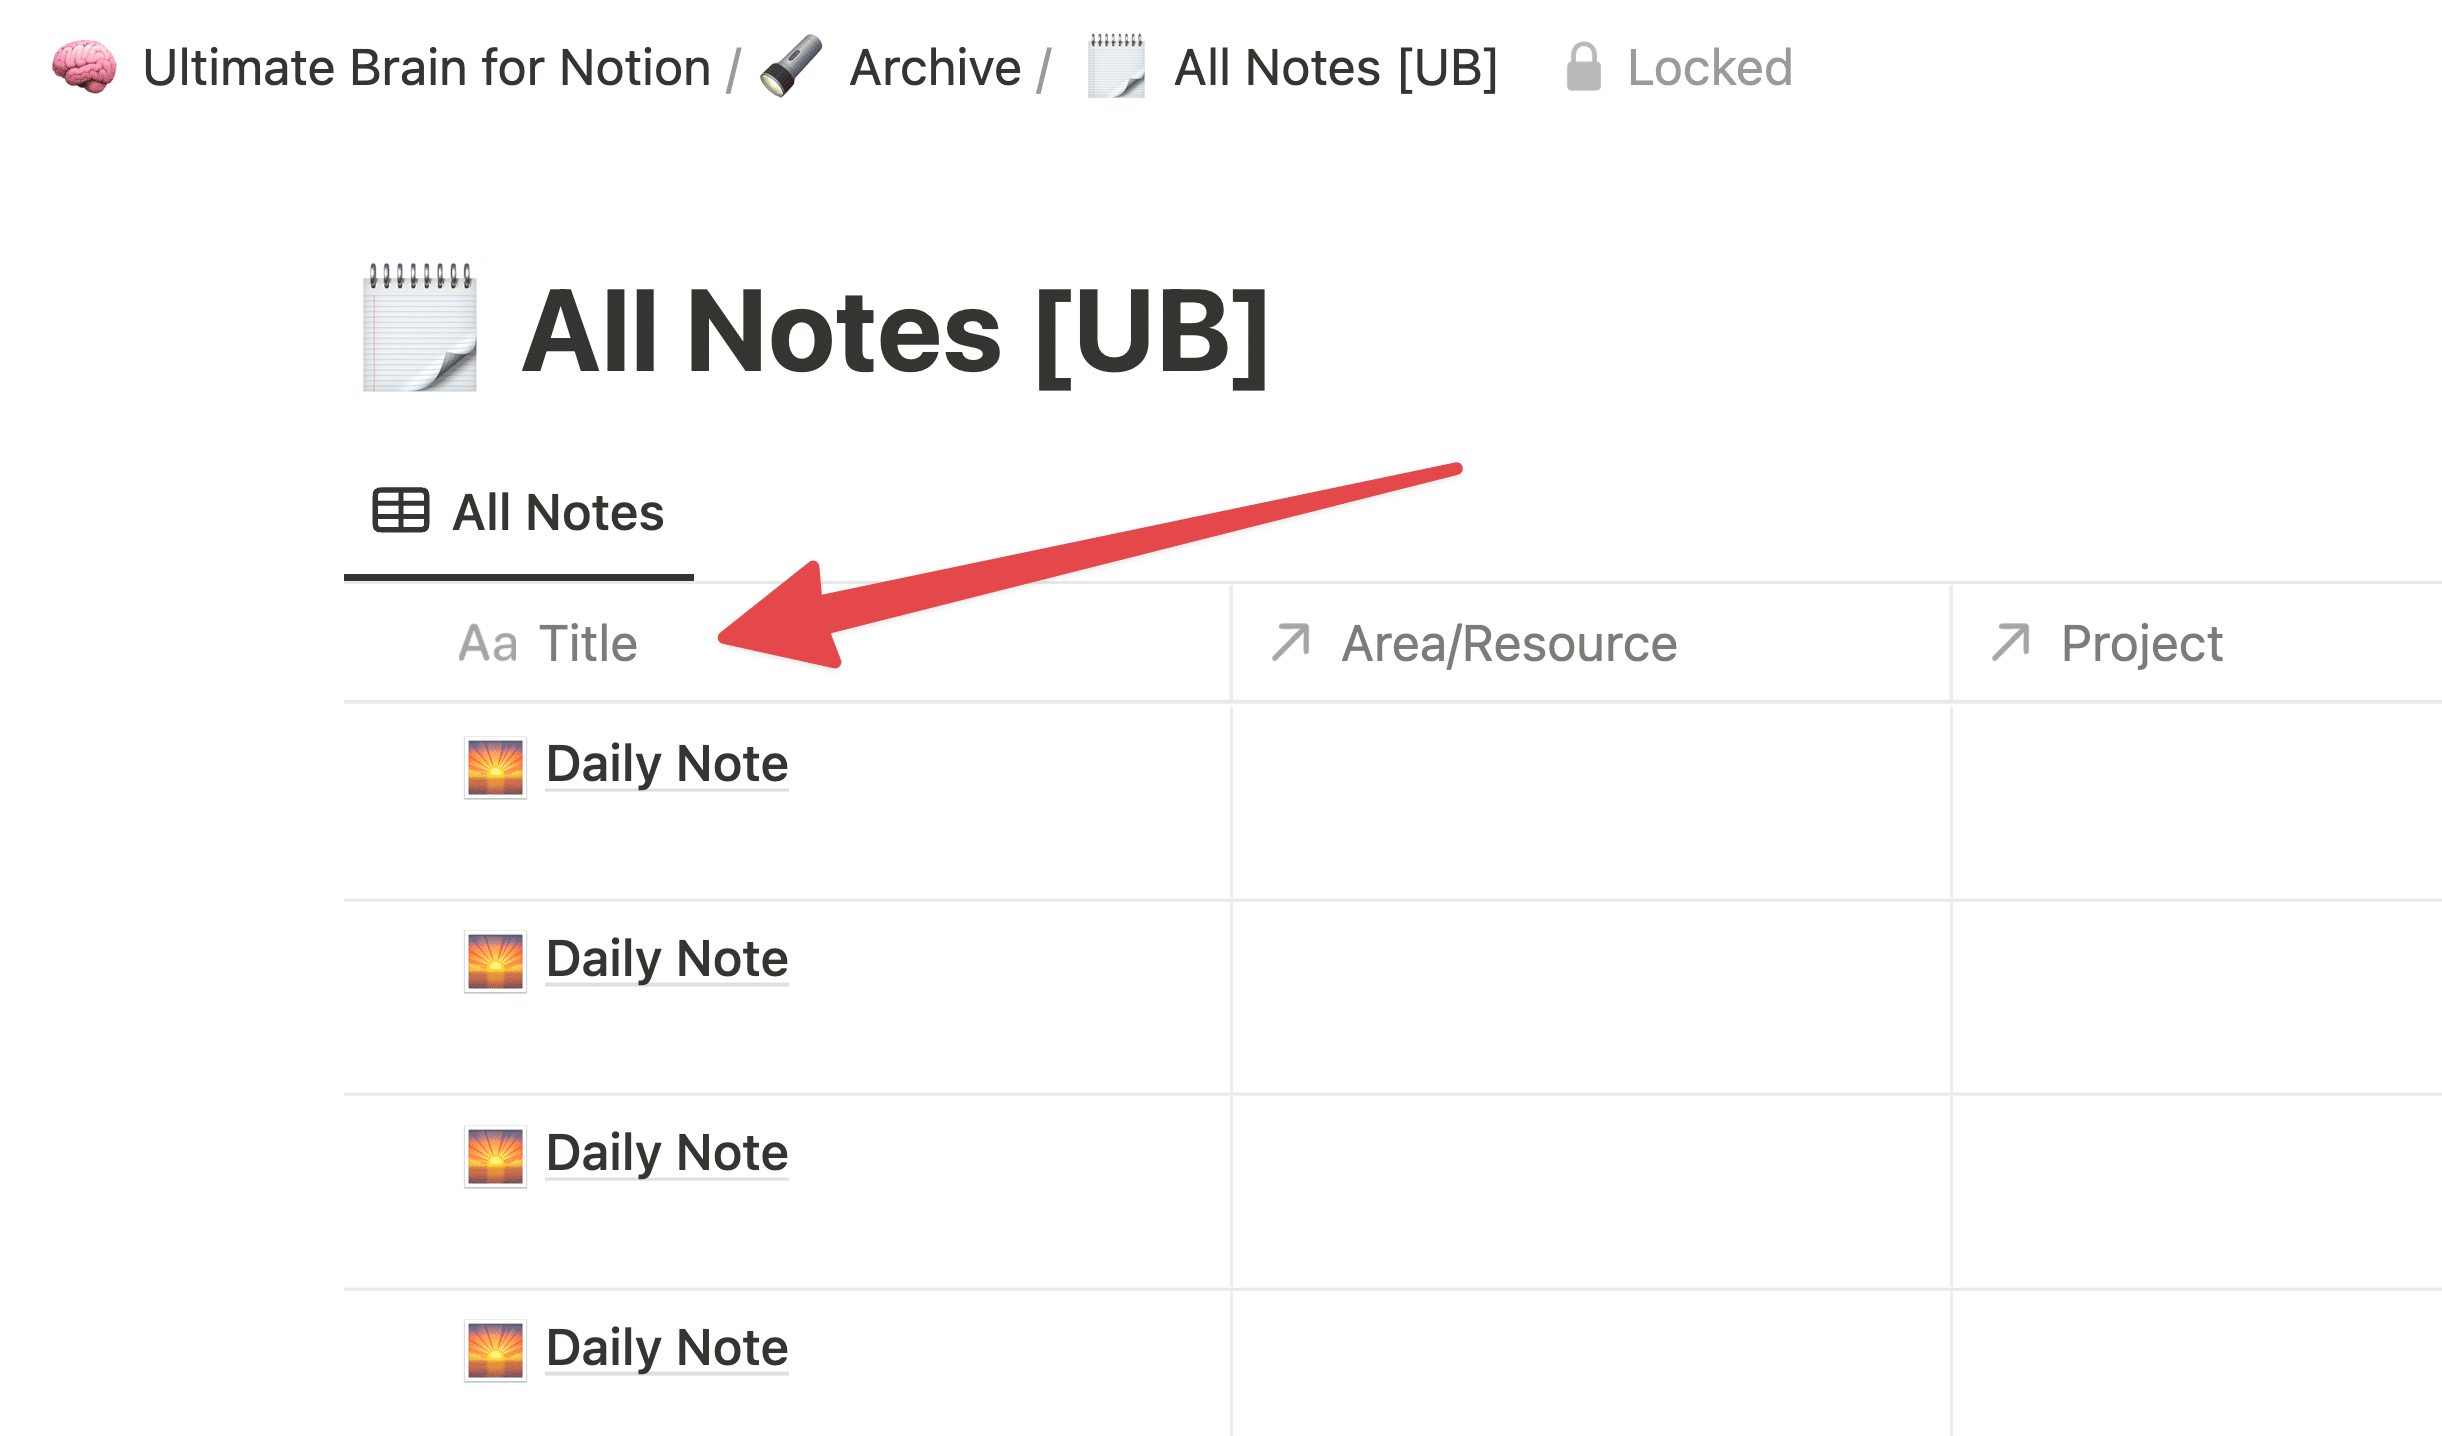
For that reason, my data object references that exact name:
    const data = {
      "parent": {
        "type": "database_id",
        "database_id": dbID
      },
      "icon": {
        "type": "emoji",
        "emoji": "🤖"
      },
      "properties": {
        "Title": {
          "title": [
            {
              "text": {
                "content": meta.title
              }
            }
          ]
        },
To make the code work for you, do one of the following:
- Change the Name property’s name in your target database to Title
- Modify the code, replacing “Title” with the name of your database’s title property (by default, it is Name)
Do not change the lowercase title property, as that references the property’s type. If you’re curious, here’s the API reference section on this property type:

Page properties
A page object is made up of page properties that contain data about the page. When you send a request to Create a page, you set the page properties in the properties object body param. Retrieve a page gets the identifier, type, and value of a page’s properties. Retrieve a page property item returns …
With that being said, hit Test when you’re ready.
If all goes well, you should see a Success message and an exported object:

You should also see the new page in your Notion database!
Currently, it should contain a callout, table of contents, the summary, and at least some of the transcript.
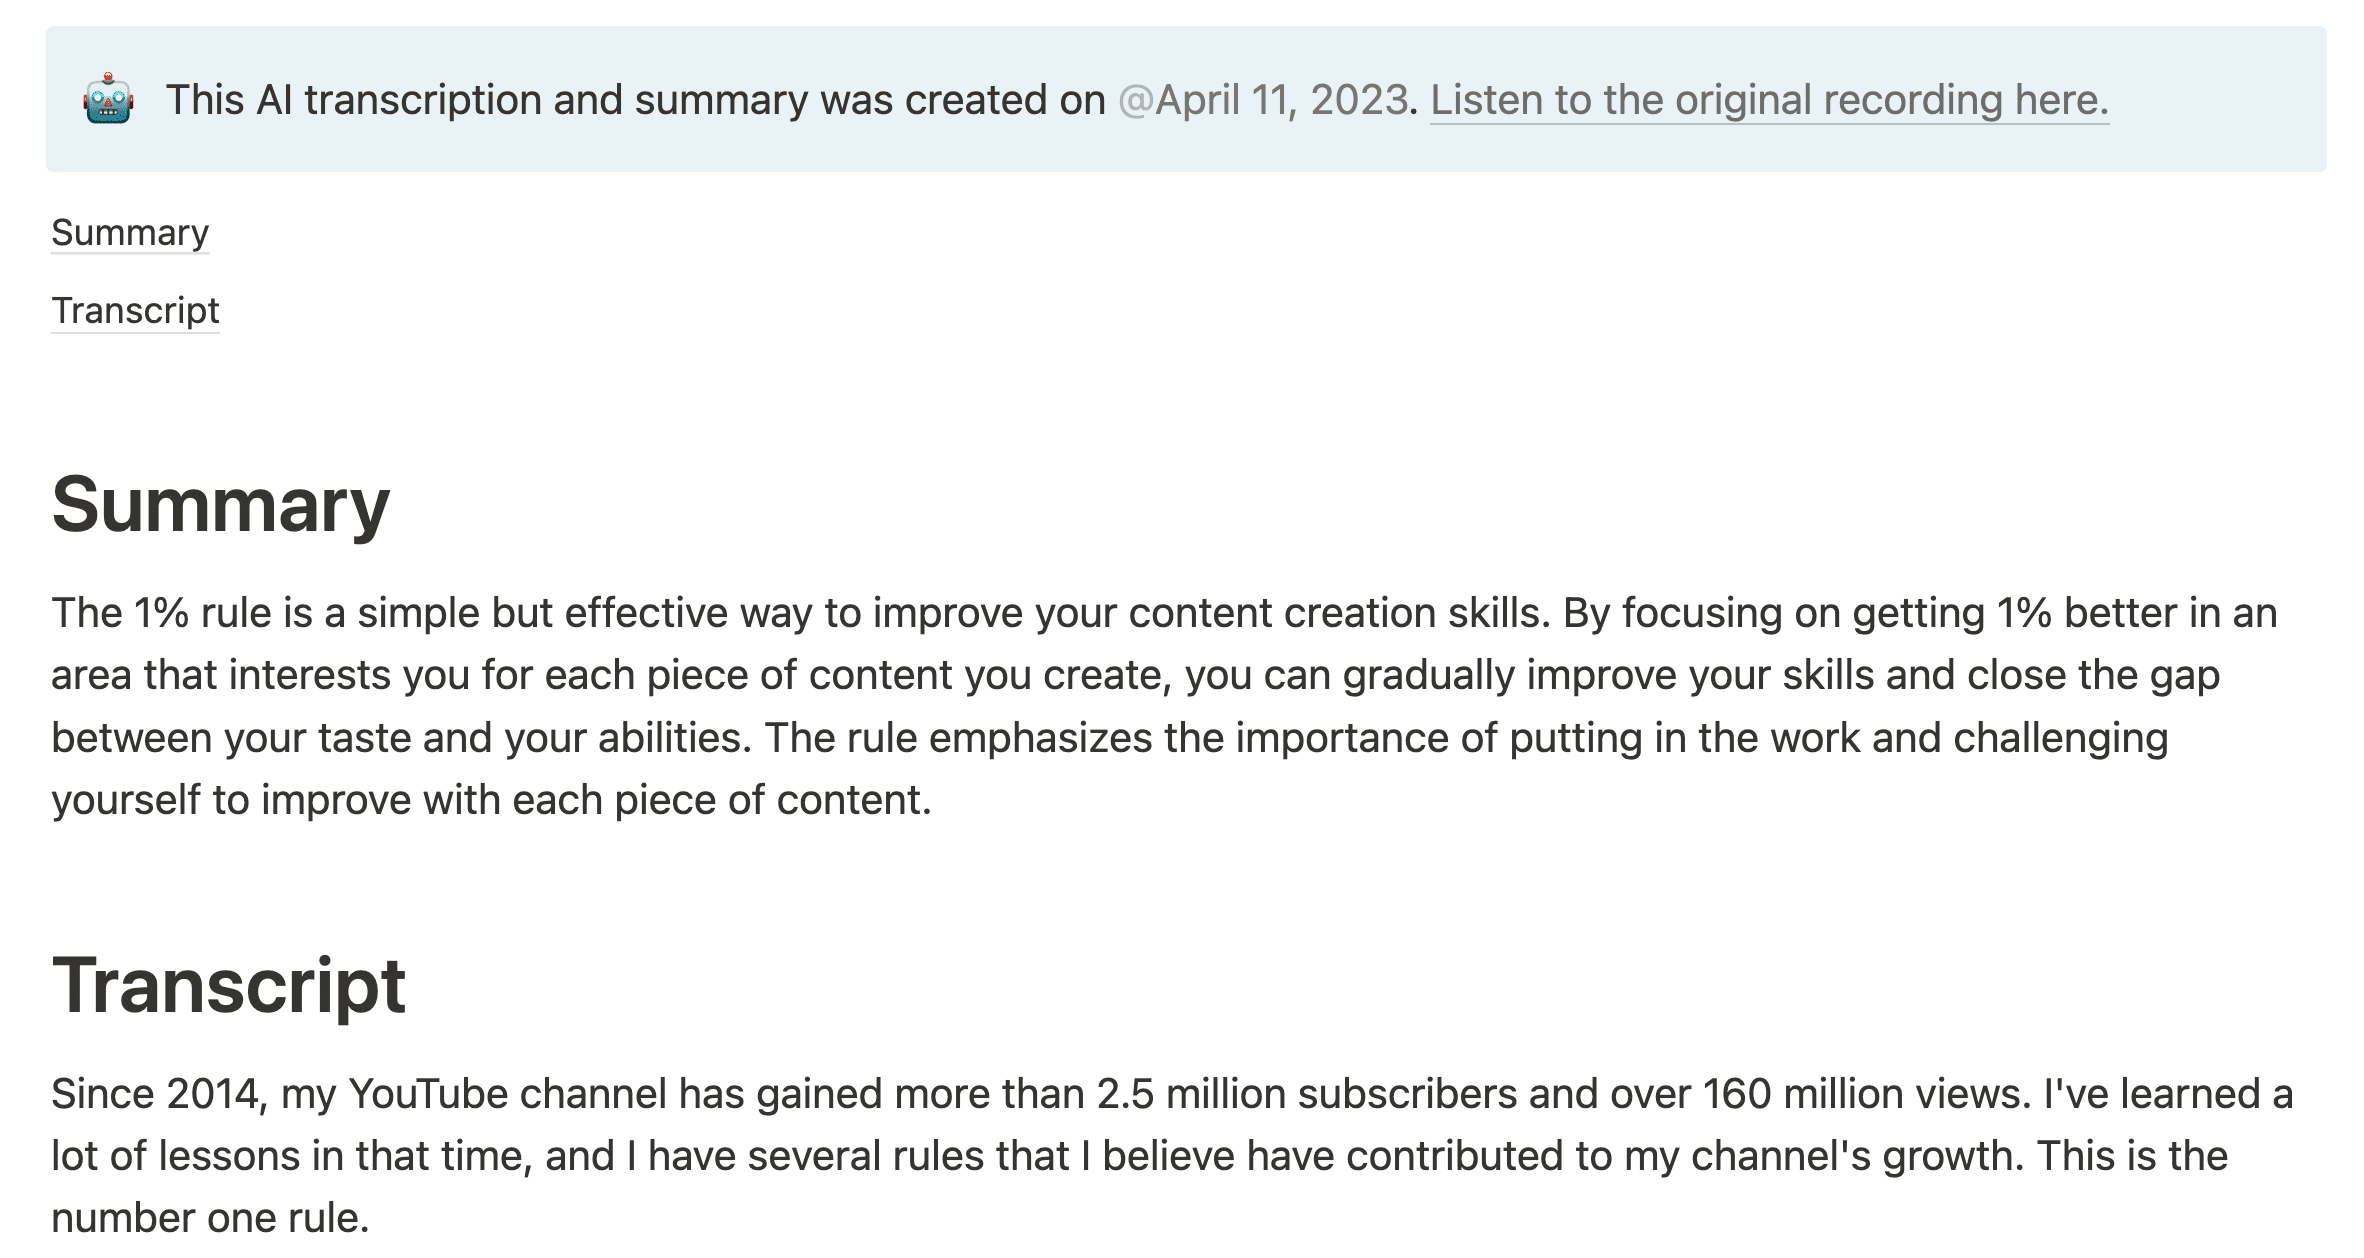
In the next (and final) step, we’ll append everything else to the bottom of this Notion page.
Hit the + button to add another step. Once again, choose Notion → Use Any Notion API in Node.js.
Name this step update_page.

Replace everything in the code editor with the following code:
import { Client } from "@notionhq/client"
export default defineComponent({
  props: {
    notion: {
      type: "app",
      app: "notion",
    }
  },
  async run({steps, $}) {

    const notion = new Client({auth: this.notion.$auth.oauth_access_token});


    const pageID = steps.notion.$return_value.response.id.replace(/-/g,'')


    async function sendTranscripttoNotion (transcript) {

      const data = {
        block_id: pageID,
        children: []
      }

      for (let sentence of transcript) {
        const paragraphBlock = {
          "paragraph": {
            "rich_text": [
              {
                "text": {
                  "content": sentence
                }
              }
            ]
          }
        };

        data.children.push(paragraphBlock)
      }

      const response = await notion.blocks.children.append(data)
      return response
    }

    const transcriptArray = steps.notion.$return_value.transcript
    transcriptArray.shift()
    const transcriptAdditionResponses = []
    for (let transcript of transcriptArray) {
      const response = await sendTranscripttoNotion(transcript)
      transcriptAdditionResponses.push(response)
    }


    const additionalInfo = steps.notion.$return_value.additional_info
    const infoHolder = []
    const infoBlockMaxLength = 95

    for (let i = 0; i < additionalInfo.length; i += infoBlockMaxLength ) {
      const chunk = additionalInfo.slice(i, i + infoBlockMaxLength)
      infoHolder.push(chunk)
    }


    async function sendAdditionalInfotoNotion (info) {

      const data = {
        block_id: pageID,
        children: []
      }

      for (let block of info) {
        data.children.push(block)
      }

      const response = await notion.blocks.children.append(data)
      return response

    }

    const additionalInfoAdditionResponses = []
    for (let addition of infoHolder) {
      const response = await sendAdditionalInfotoNotion(addition)
      additionalInfoAdditionResponses.push(response)
    }

    const allAPIResponses = {
      transcript_responses: transcriptAdditionResponses,
      additional_info_responses: additionalInfoAdditionResponses
    }

    return allAPIResponses

  },
})
Here’s what this code is doing:
- Gets the page ID of the newly-created Notion page in the last step
- Constructs a
dataobject, which has achildrenproperty initialized with an empty array - Adds the rest of the transcript to the Notion page. Makes a call for each group of 80 paragraphs
- Adds all of the additional information (lists, cost/duration info, etc.) to the bottom of the Notion page
- Returns an
allAPIResponsesobject (usually not needed, but useful for debugging)
Hit Test, and you should see a success message. You should also see all of the additional information added at the bottom of your Notion page.
If everything went well, you can now hit Deploy to put your workflow into production!

Your workflow is now live, so it’ll trigger and run any time a new audio file is uploaded to your specified Dropbox folder.
Common Errors and Issues
As with any multi-step workflow (especially those involving code), these workflows can sometimes run into unexpected errors.
In this section, I’ve collected some of the most common errors, along with their likely fixes.
Before digging into the actual errors, I want to give you a few tips for debugging an errors you run into.
First, open up the toggle in your error message. If you’re working with a code step, the first line inside the toggle will usually tell you what line the error is occurring on.

Second, try pasting your code and error message into ChatGPT, along with a prompt that can help with debugging.
Here’s an example prompt that I gave to ChatGPT in order to debug the issue shown in the image above. (I used the default GPT-3.5 model for this):
I'm building a workflow in Pipedream, and I'm hitting an error in the step that contain the following code. Point out what the likely error is, and suggest a fix.

Error message:

TypeError
Cannot read property 'match' of null

DETAILS
    at null.splitStringIntoSentences (file:///tmp/__pdg__/dist/code/28ba5195658182acae92c1a1c228b1634456efa2c6cd94e13967ea86b3ae1e0c/component.mjs:22:29)
    at Object.run (file:///tmp/__pdg__/dist/code/28ba5195658182acae92c1a1c228b1634456efa2c6cd94e13967ea86b3ae1e0c/component.mjs:44:29)
    at global.executeComponent (/var/task/launch_worker.js:139:53)
    at MessagePort.messageHandler (/var/task/launch_worker.js:598:28)

Code:

export default defineComponent({
  async run({ steps, $ }) {

    const results = {
      title: "",
      transcript: "",
      summary: "",
      additional_info: ""
    }

    // Add line breaks to the transcript
    const originalTranscript = steps.create_transcription.$return_value.transcription

    function splitStringIntoSentences(str) {

      // If the provide string is null, return an array with an error message.
      /*if (!str) {
        const noTranscript = ["No transcript was found."]
        return noTranscript
      } */

      const sentences = str.match(/(?:^|[^.!?]+)[.!?]+s?/g) || [] // split into sentences

      // If the sentences array's length is less than one, return an array with an error message.
      if (sentences.length < 1) {
        const noTranscript = ["No transcript was found."]
        return noTranscript
      }
      const result = []

      for (let i = 0; i < sentences.length; i += 3) {
        result.push(sentences.slice(i, i + 3).join(' ')) // join 3 sentences
      }

      return result
    }

    function joinArrayWithBlankLine(arr) {
      return arr.join('nn')
    }


    // const transcriptArray = splitStringIntoSentences(originalTranscript)
    const transcriptArray = splitStringIntoSentences(null)

    results.transcript = joinArrayWithBlankLine(transcriptArray)

    // Extract the summary
    const summary = steps.chat.$return_value.choices[0].message.content

    function splitSummary(str) {
      const titleDelimiter = /^.*nn/
      const summaryDelimiter = /ns*?--Summary--s*?ns*/
      const additionalInfoDelimiter = /ns*?--Additional Info--s*?ns*/;

      const titleMatch = str.match(titleDelimiter)
      const summaryMatch = str.match(summaryDelimiter)
      const additionalInfoMatch = str.match(additionalInfoDelimiter)

      if (!titleMatch || !summaryMatch || !additionalInfoMatch) {
        console.log("One or more delimiters not found")
        return str
      } else {
        const titleIndex = titleMatch.index
        const summaryIndex = summaryMatch.index
        const additionalInfoIndex = additionalInfoMatch.index

        results.title = str.slice(0, titleIndex + titleMatch[0].length).trim().replace(/^#s*/,"")
        results.summary = str.slice(summaryIndex + summaryMatch[0].length, additionalInfoIndex).trim()
        results.additional_info = str.slice(additionalInfoIndex + additionalInfoMatch[0].length).trim()
      }
    }

    splitSummary(summary)

    // Return the results object
    return results

  },
})
And here is ChatGPT’s response:
The likely error is that the splitStringIntoSentences function is being passed a null value, causing the error message Cannot read property 'match' of null. This is because the commented-out code block that would have returned an error message if the transcript string was null has been disabled.

To fix the error, uncomment the following code block in the splitStringIntoSentences function:

if (!str) {
  const noTranscript = ["No transcript was found."]
  return noTranscript
}

This will cause the function to return an error message array if the transcript string is null, preventing the error from occurring.
Note that I deliberately sabotaged my code from the formatter step in order to get this error for example purposes. The fix described here is already implemented in the actual code from the no-code version of the tutorial.
Third, ask for help in the Pipedream community. Pipedream staff are usually quite responsive there. If you’ve purchased one of my premium templates (Ultimate Brain or Creator’s Companion), you can also get support in my support community.
Several people have reported getting the following error when testing the formatter step from the no-code version of this tutorial:
Cannot read property 'length' of null.
This error can happen if the transcript provided by Whisper doesn’t contain any sentence-ending punctuation marks.
I have modified the code in the formatter step (click here to jump to it) so that it hopefully avoids this, so first try copying the code from that step and replacing your existing code with it.
Additionally, you can add the optional Prompt field to your create_transcription step. Try adding the prompt: “Transcribe the audio file. Add proper punctuation after each sentence.”
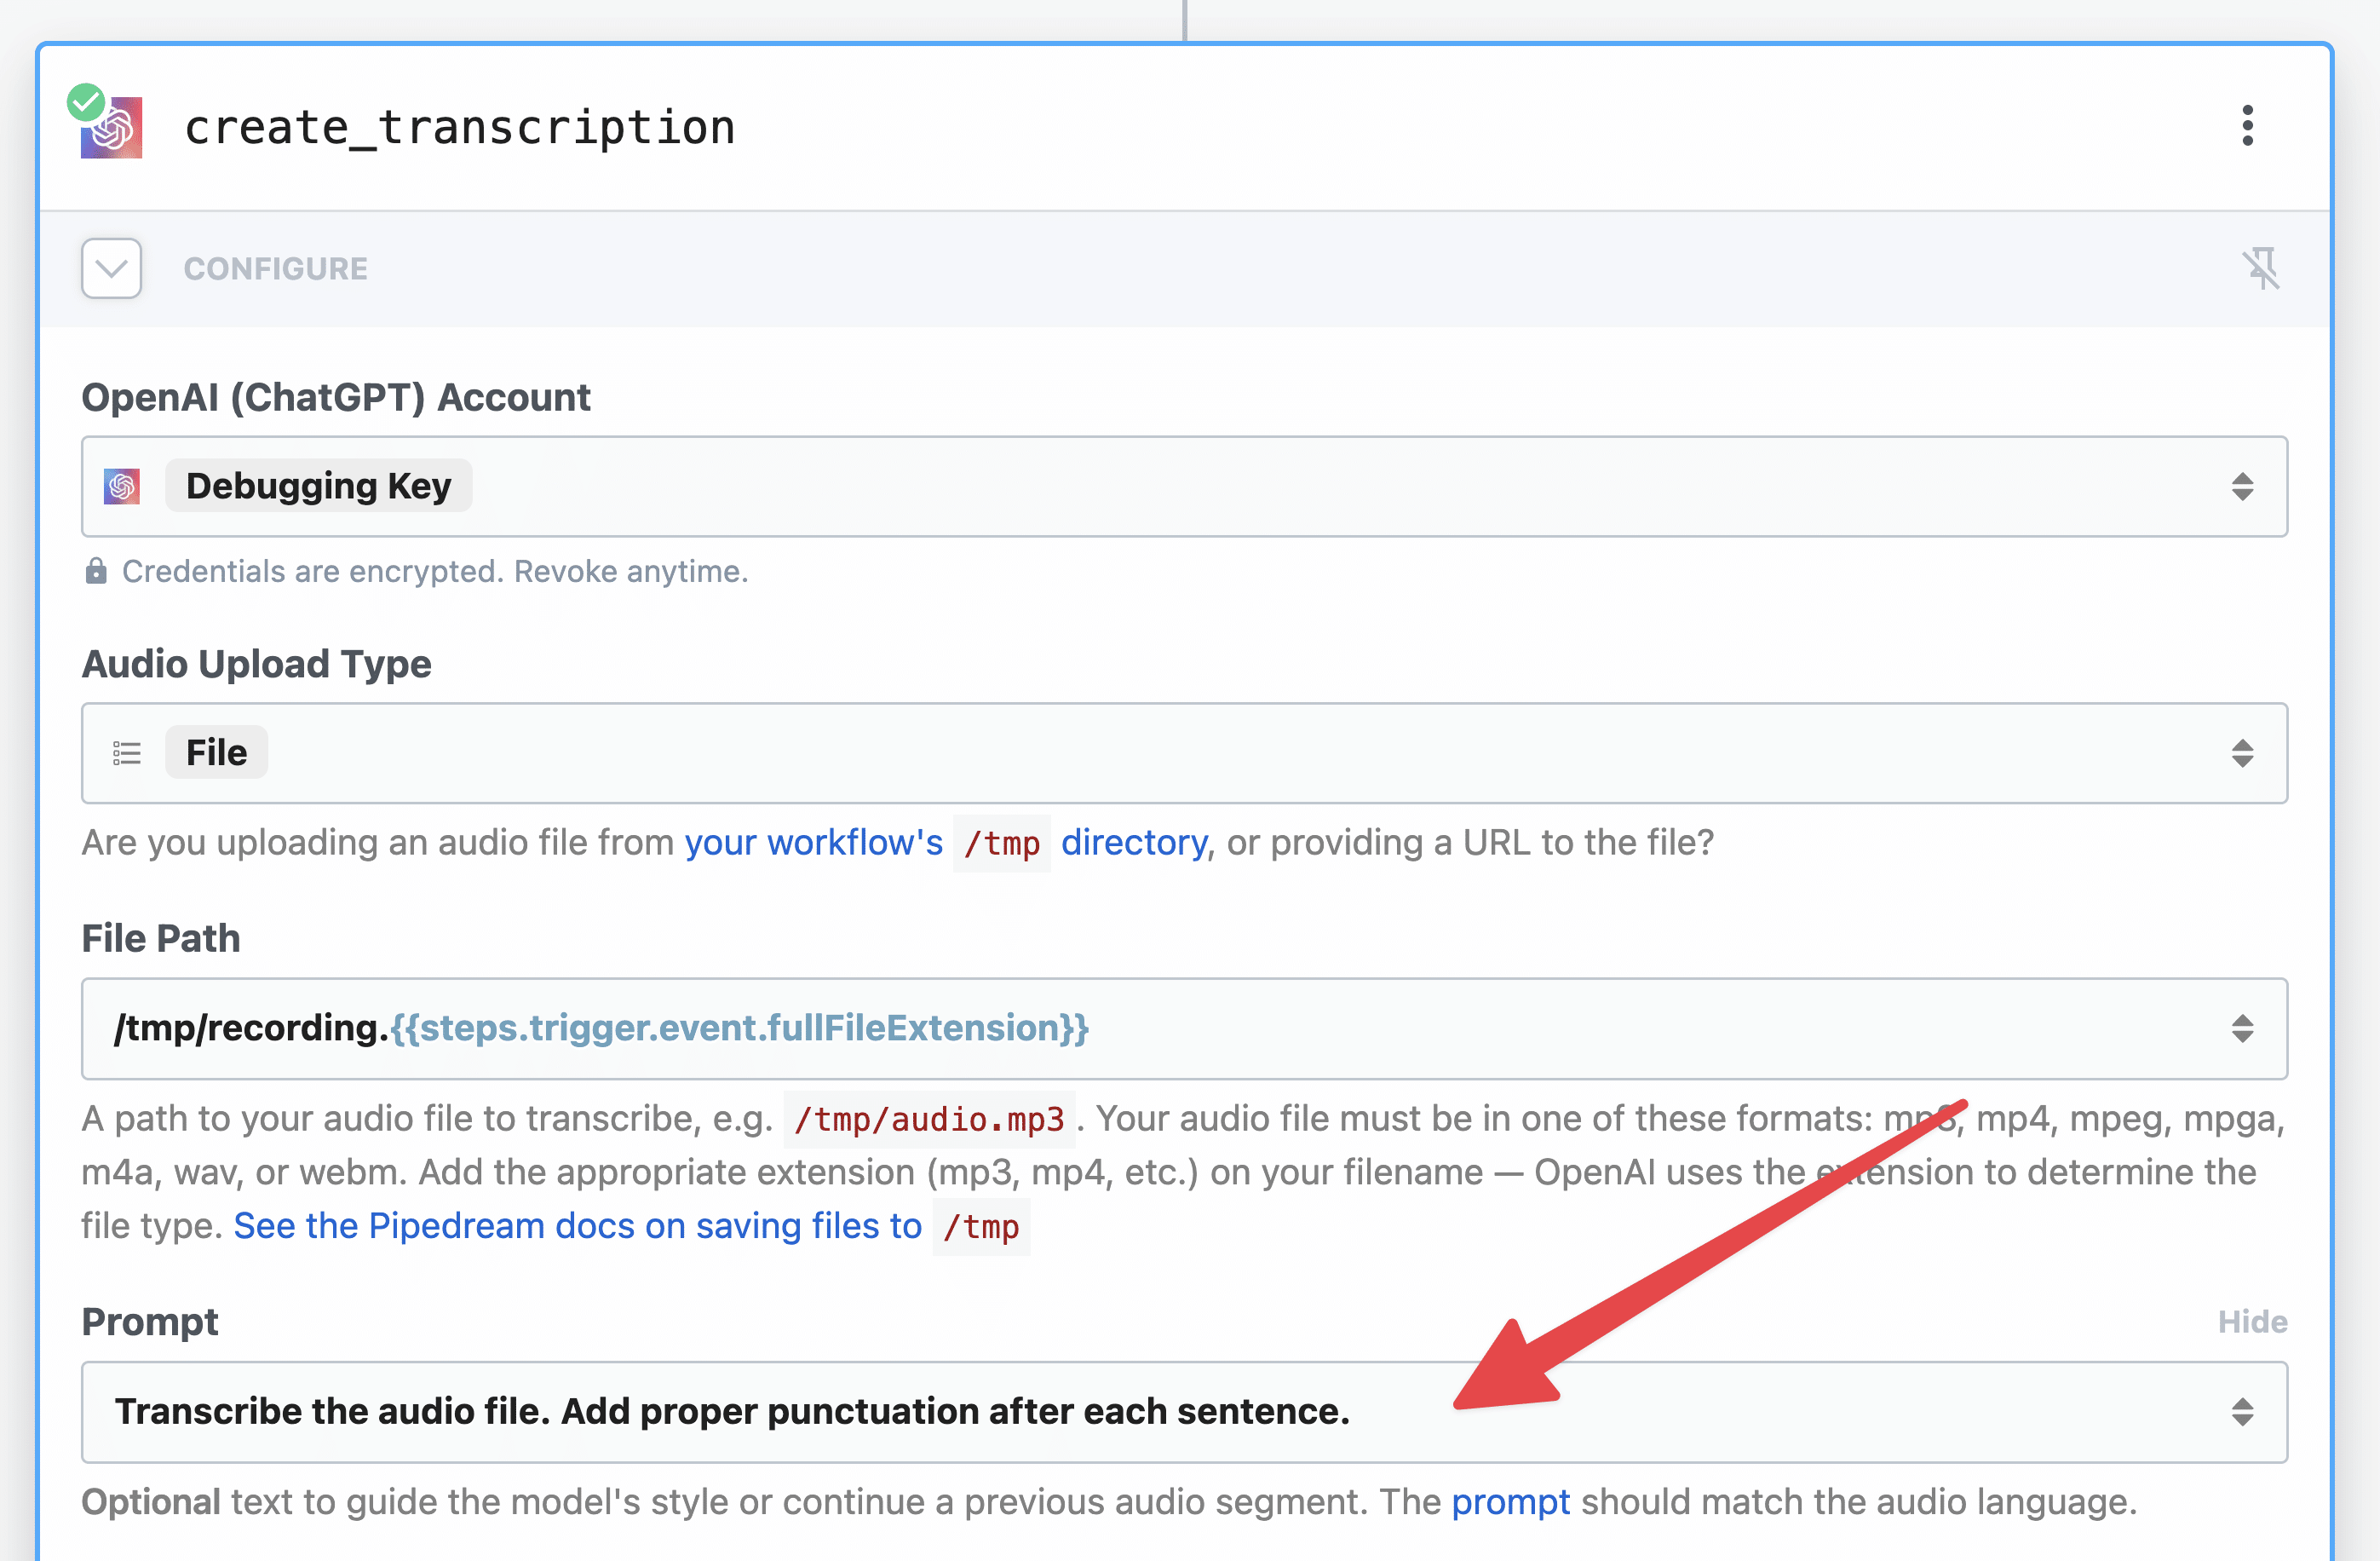
I have never needed to do this personally, but it may fix things.
This error can often happen when you’re building your workflow, but will likely never happen after the workflow has been deployed.
It happens because Pipedream automatically removes files from your personal /tmp directory quite quickly in order to keep it open for new files.
If you run into this error while building, do the following:
- Create another trigger event by uploading another file to Dropbox/Google Drive
- Test your download step again
This will get a new file into /tmp storage, and from there you should be able to keep building and testing the workflow successfully.
See this Pipedream doc page for more details:
Working with the filesystem in Node.js
Pipedream Documentation – Connect APIs, remarkably fast
Error: Body Failed Validation
A common error that can happen in the final step of the no-code version (sending the page to Notion) is:
body failed validation. Fix one: body.children.length should be ≤ `100`, instead was `106`.
This happens when your audio file – and hence the transcript – is long enough that it bumps up against the Notion API’s request limits.
If you’re working with longer audio files and you run into this issue, you’ll need to follow the code-heavy version of the tutorial. It includes code loops that split the transcript and summary into pieces, sending them to Notion in batches.
If your workflow is timing out, or the Whisper/ChatGPT steps return an Out of Memory error, the first thing you should do is increase your workflow’s memory limit in your workflow settings.
From the workflow editor, hit the ••• menu in the top-right corner and choose Settings.
Under Execution Controls, set a higher timeout and/or memory limit. Personally, I find that I don’t need to increase memory past 256mb – but I do set my timeout to 300 seconds so my workflow can deal with longer files.
If that doesn’t help, first try uploading this audio file to your workflow.
This is the audio recording from the beginning of this article, and I used it successfully while building and testing this workflow multiple times.
If your workflow works with that file, the next step is to convert your own audio file to a 128kbps MP3 file using a tool like Handbrake (easy to use GUI) or FFMPEG (command-line only).
Some people have experienced these issues, and we currently don’t know exactly what’s causing them. It’s possible that there is some facet of an audio file that has a supported file extension (perhaps metadata or bitrate) that is causing errors with the OpenAI APIs. More testing is needed before we find the exact issue.
In the code-heavy version of this tutorial (when using Dropbox), the Download_to_tmp step can sometimes run into the error: Missing 'url' property.
This happens when you have the Include Link setting in the trigger set to false. To fix it, set Include Link to True.
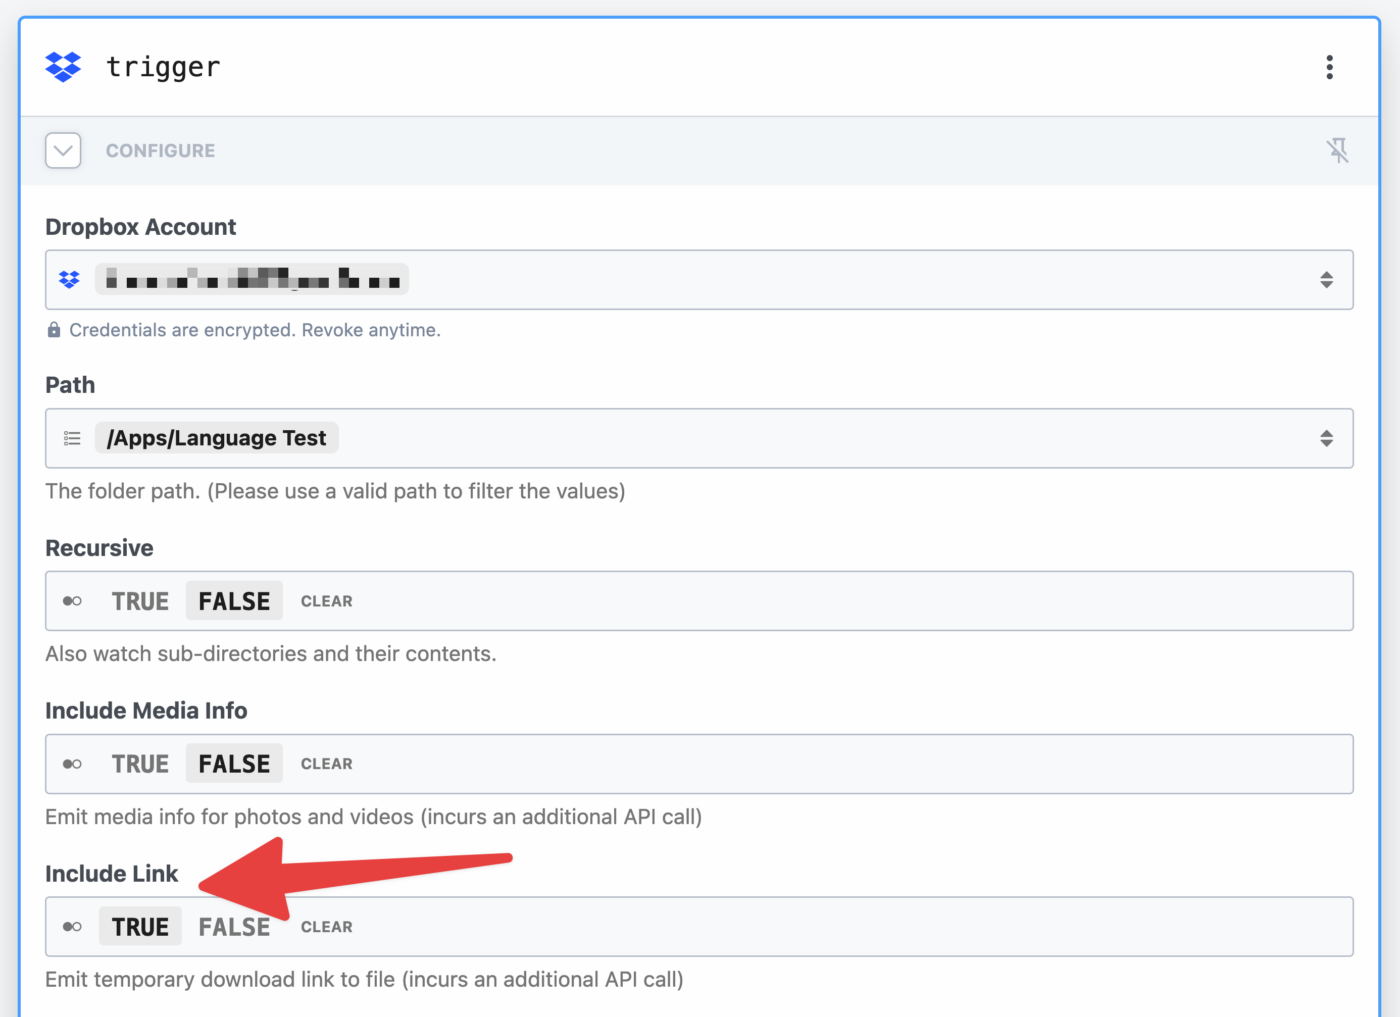
In your Notion steps, if you run into any kind of error regarding your Database ID, one of two things is likely:
- Pipedream doesn’t have access to your target database
- If you’re working with code, you’ve accidentally provided a Page ID rather than a Database ID
The video below will show you exactly how to find your actual Database ID, and how to ensure Pipedream has access to it:
If you want to use this workflow with a language besides English, you’re in luck! Both Whisper and ChatGPT can work in other languages – though ChatGPT in particular will have varying degrees of usefulness depending on what language you pick.
In this section, I’ll cover the languages you can work with, and show you how to tweak your workflow in order to use a specific language.
Here’s the short version of how to do it:
- Whisper: Set the Language parameter.
- ChatGPT: Add a line in your System Instructions like, “Do not respond in any language other than Spanish.”
The Whisper model can currently work with more than 50 languages. According to the Whisper API FAQ page, those languages include:
Afrikaans, Arabic, Armenian, Azerbaijani, Belarusian, Bosnian, Bulgarian, Catalan, Chinese, Croatian, Czech, Danish, Dutch, English, Estonian, Finnish, French, Galician, German, Greek, Hebrew, Hindi, Hungarian, Icelandic, Indonesian, Italian, Japanese, Kannada, Kazakh, Korean, Latvian, Lithuanian, Macedonian, Malay, Marathi, Maori, Nepali, Norwegian, Persian, Polish, Portuguese, Romanian, Russian, Serbian, Slovak, Slovenian, Spanish, Swahili, Swedish, Tagalog, Tamil, Thai, Turkish, Ukrainian, Urdu, Vietnamese, and Welsh.
If the language in your audio file is among these choices, then this entire workflow will work for it!
Additionally, Whisper is able to translate audio into other languages as well. OpenAI has stated that Whisper can translate from other languages into English, but I’ve found that it can translate to other languages as well.
However, when translating into a non-English language, your results can vary:
- When I tried translating this Spanish-language video into Japanese, half of the transcript seemed right… and the other half was just “今” (the kanji for “now”) repeated over and over.
- I tried translating the same video into German, and the results were much better (I’m not a native German speaker, so I can’t say “perfect”, but they seemed right.)
Unlike Whisper, OpenAI has not released an official list of supported languages for ChatGPT (or GPT-4, for that matter).
There are many articles on the internet that list the languages ChatGPT “supports”, but it’s important to understand what this really means.
ChatGPT’s underlying model (gpt-3.5-turbo) was trained on a massive corpus of text, including a large swath of the public internet.
This means that its capabilities will be stronger in languages that are well-represented in its training data, and strongest of all in English. OpenAI has stated:
OpenAI’s GPT models are trained on vast quantities of text on the internet. Accordingly, most of the model’s training set is in English and other major languages, which means that GPT doesn’t have the same abilities or breadth of understanding in smaller languages.
In summary, you can ask ChatGPT to work with non-English languages, but the quality of your results may vary depending how how capable the model is when working with your chosen language.
Note: As an alternative to the instructions in this section, you can also use Pipedream’s built-in OpenAI (ChatGPT) →Translate Text action. However, I’ve found the process below to work, and using it will avoid using making unnecessary ChatGPT calls.
As I mentioned above, you can send audio files to Whisper if they contain any of the model’s supported languages.
To set the language of the transcript, simply set the Language parameter.
In the create_transcription action, click the Language field in the Optional Fields section:
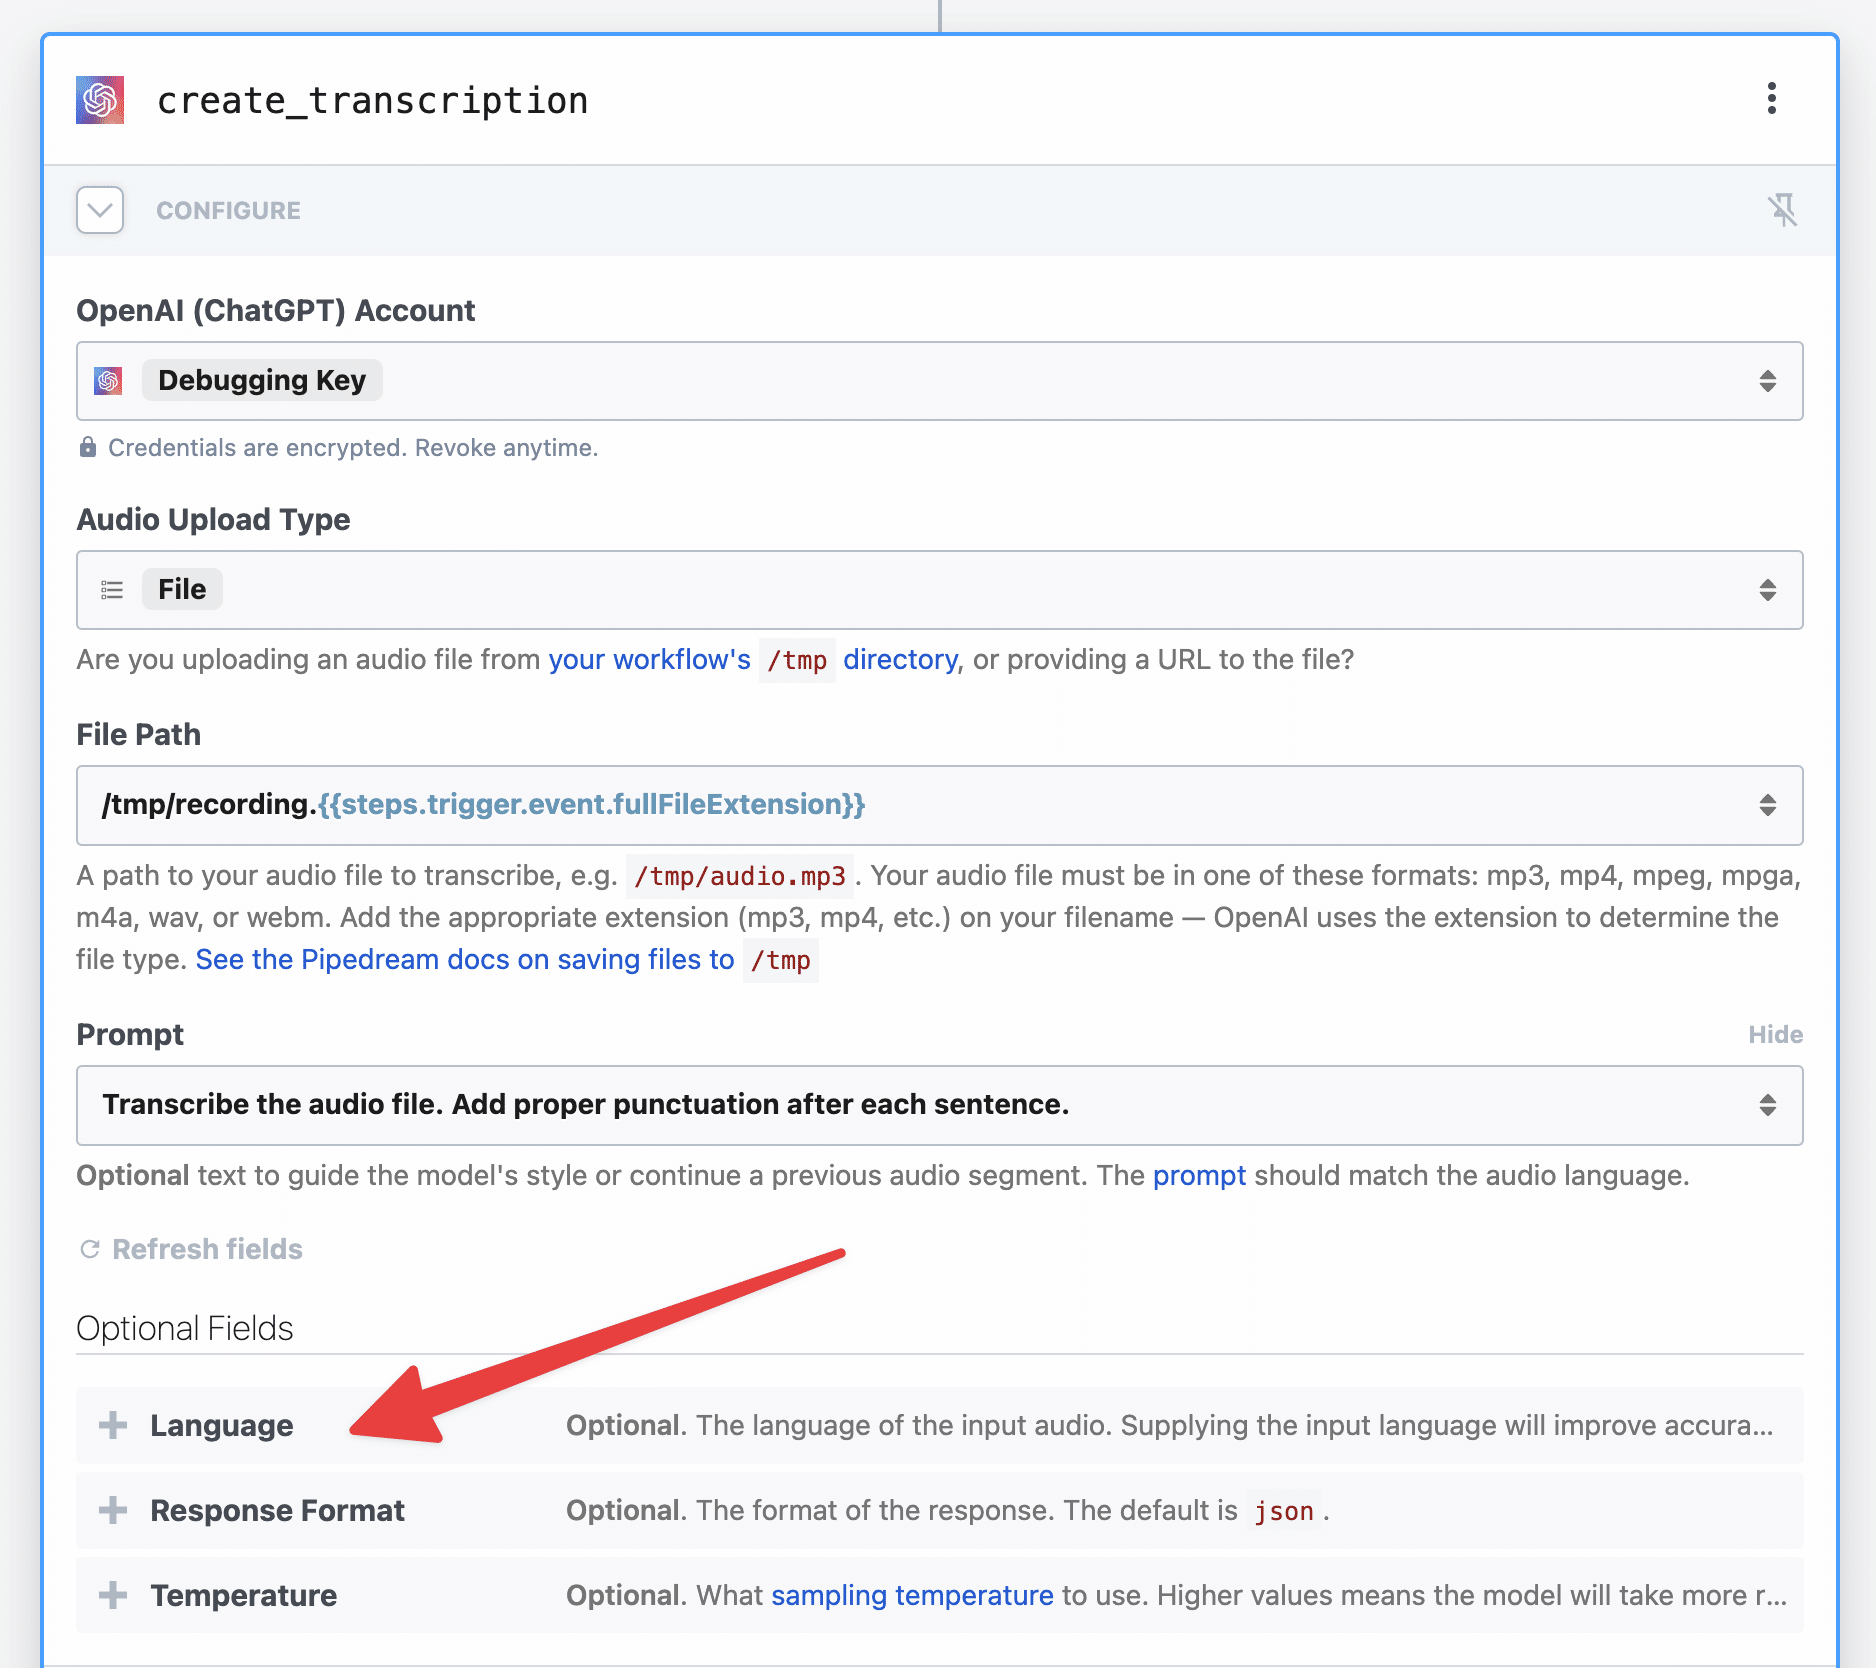
Next, select your target language.
You can either scroll to find it, or type to filter the results.
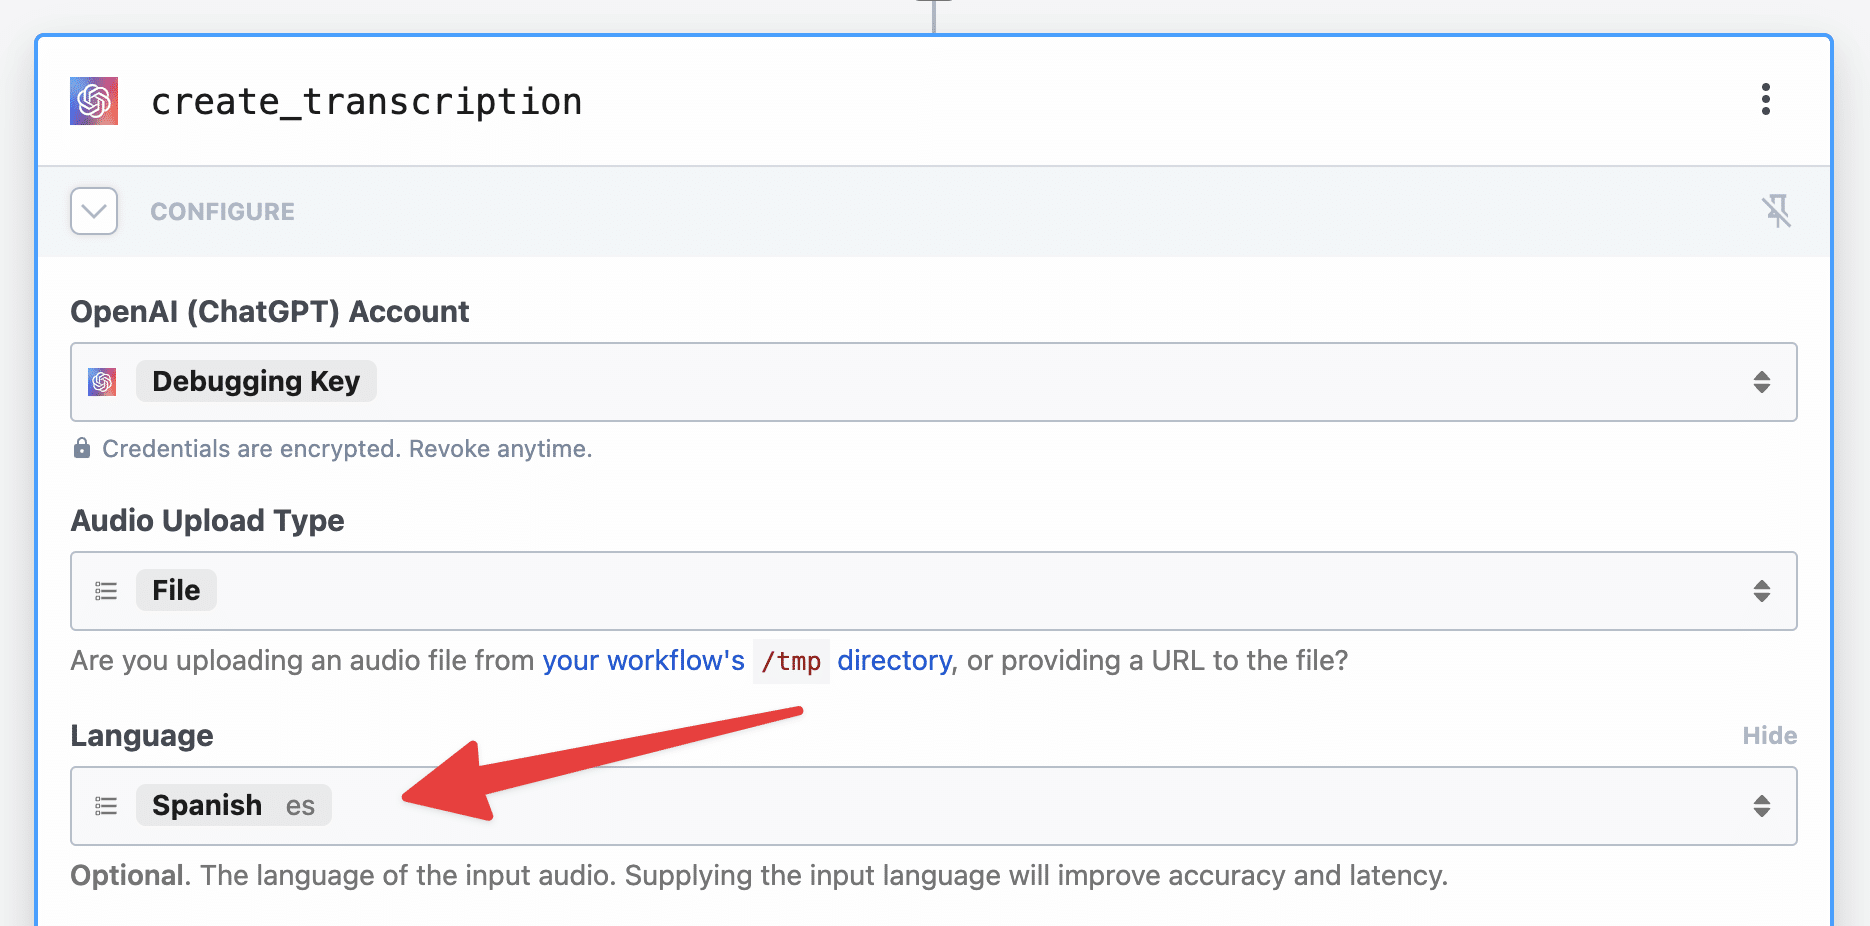
If you’re working with code, you can use the create translation endpoint to set the target language. This isn’t needed for this tutorial; I’m just linking this resource for thoroughness.
If you want ChatGPT to respond in a particular language, you simply have to tell it to do so in the prompt.
However, if you want ChatGPT to respond in a different language than the transcript, you will need to be quite explicit when prompting it to do so.
For example – when I wanted ChatGPT to summarize a German transcript in Spanish, I tried the following system instructions:
You are an assistant that only speaks Spanish, formatted in Markdown. Do not write text that isn’t formatted as markdown. Do not write in any language other than Spanish.
This actually wasn’t enough! My summary still came back in German.
When I added “Write all responses in Spanish.” to the user message as well, it successfully responded in Spanish.
This “forcefulness” is likely needed because the size of the transcript makes the majority of the prompt German-language.
With that being said, if you’re using the no-code version of this tutorial, simply adjust your User Message and System Instructions to request responses in your target language.
You likely won’t need to be as “forceful” if the transcript from Whisper is already in your target language.

If you’re using the code-heavy version of this tutorial, you’ll do the same thing – the only difference is that your changes will be made in the code.
        const prompt = `Analyze the transcript provided below, then provide the following:
          Key "title:" - add a title.
          Key "summary" - create a summary.
          Key "main_points" - add an array of the main points. Limit each item to 100 words, and limit the list to 10 items.
          Key "action_items:" - add an array of action items. Limit each item to 100 words, and limit the list to 5 items.
          Key "follow_up:" - add an array of follow-up questions. Limit each item to 100 words, and limit the list to 5 items.
          Key "stories:" - add an array of an stories, examples, or cited works found in the transcript. Limit each item to 200 words, and limit the list to 5 items.
          Key "arguments:" - add an array of potential arguments against the transcript. Limit each item to 100 words, and limit the list to 5 items.
          Key "related_topics:" - add an array of topics related to the transcript. Limit each item to 100 words, and limit the list to 5 items.
          Key "sentiment" - add a sentiment analysis

          Ensure that the final element of any array within the JSON object is not followed by a comma.

          Write all responses in Spanish.

          Transcript:

        ${arr}`

        let retries = 3
        while (retries > 0) {
          try {
            const completion = await openai.createChatCompletion({
              model: "gpt-3.5-turbo",
              messages: [{role: "user", content: prompt}, {role: "system", content: `You are an assistant that only speaks Spanish formatted as JSON. Do not write normal text. Do not write in any language other than Spanish.

              Example formatting:

              {
                  "title": "Notion Buttons",
                  "summary": "A collection of buttons for Notion",
                  "action_items": [
                      "item 1",
                      "item 2",
                      "item 3"
                  ],
                  "follow_up": [
                      "item 1",
                      "item 2",
                      "item 3"
                  ],
                  "arguments": [
                      "item 1",
                      "item 2",
                      "item 3"
                  ],
                  "related_topics": [
                      "item 1",
                      "item 2",
                      "item 3"
                  ]
                  "sentiment": "positive"
              }
              `}],
              temperature: 0.2
            });
Wrap-Up and More Resources
Whether you used the no-code or code-heavy method, you’ve now got a totally hands-off automation that will turn your voice notes into well-formatted Notion pages containing a summary, transcript, and useful lists.
This is, of course, just the tip of the iceberg. Here are a few of my own ideas for evolving this workflow:
- Tweak the prompt for other purposes
- Adapt the workflow for audio journal entries (keeping in mind the privacy notes outlined above)
- Adapt the workflow for summarizing podcast and YouTube videos
If you want to truly understand the Notion API and learn how to code so you can realize your ideas, start with my Notion API Beginner’s Guide:
The Complete Notion API Crash Course for Beginners
Learn how to work with the Notion API using JavaScript in this beginner-friendly and extremely detailed tutorial.
This is a truly comprehensive introduction to coding with the API, and even features a 2-hour video tutorial. And it’s 100% free.
You can also find other no-code tutorials at my Notion Automations hub:

The Ultimate Guide to Notion Automations and the Notion API
A free collection of tutorials for automating Notion using no-code tools (like Zapier and Make), along with Notion API coding tutorials.
You might find these guides helpful as well:
I’d also recommend checking out the Pipedream docs if you want to work more with the platform.
This tutorial took well over 50 hours to research, test, debug, and write.
If you’d like to support my work, the best way is to share it. So if you enjoyed this tutorial, please share it on Twitter, LinkedIn, or with a friend 🙂
I’ll also note that this automation works extremely well with Ultimate Brain, my all-in-one productivity template for Notion.
If you want a complete, done-for-you second brain in Notion, give it a shot:
Recommended
![]()
Finally, if you want to get notified when I release new tutorials (like this one) and templates, join my free Notion Tips newsletter:


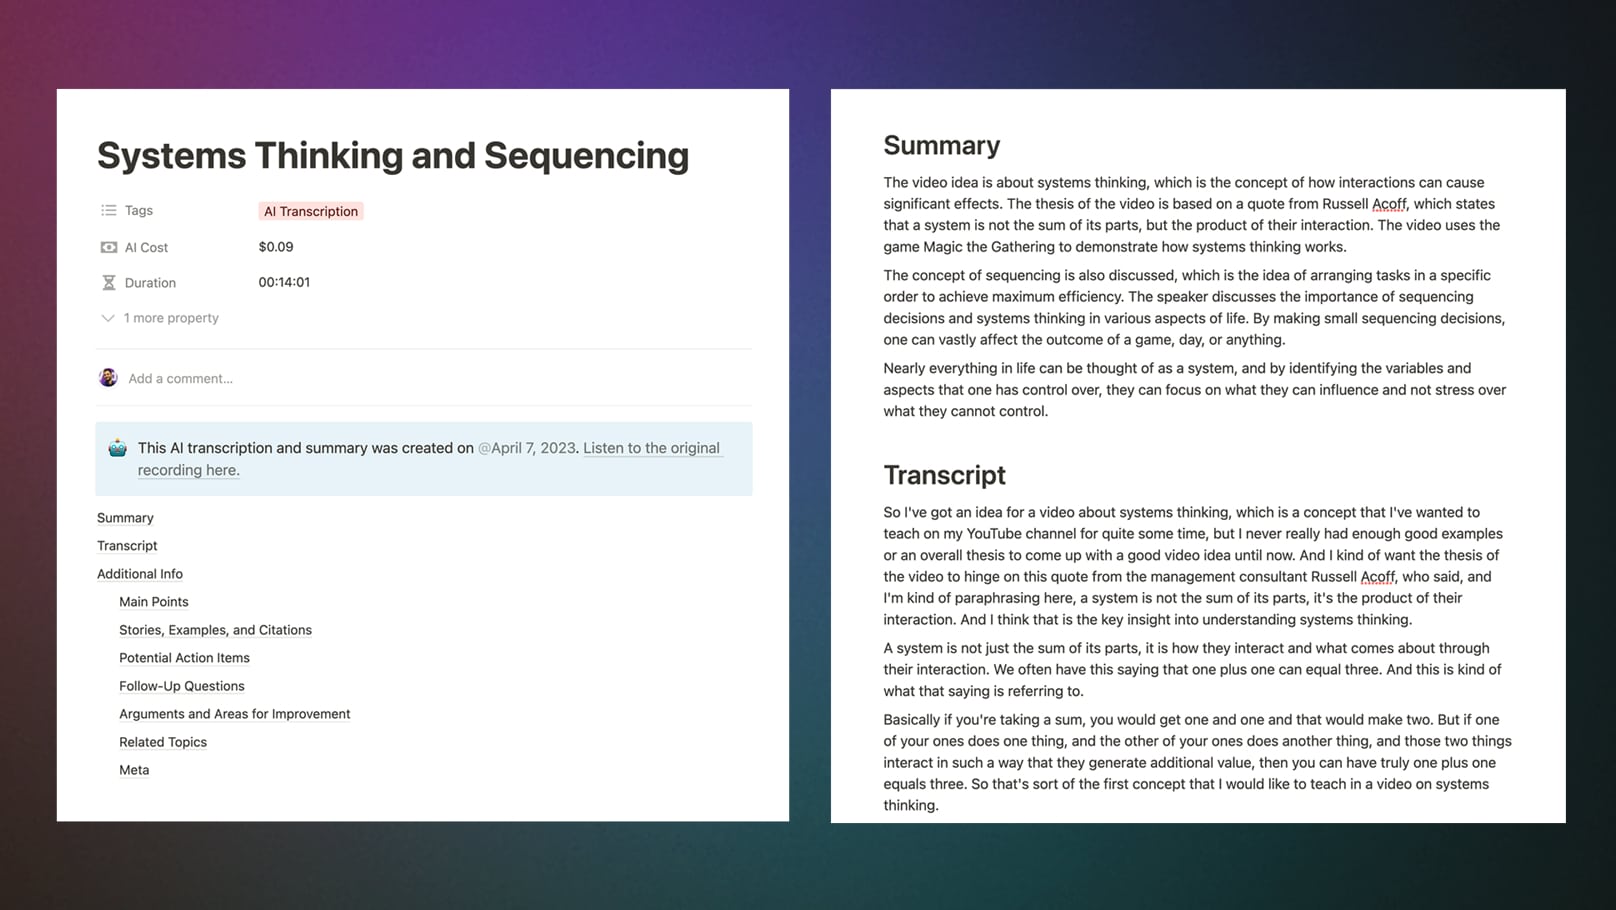